
#Updates
#October 21th, 2020
- Update Java Driver to 4.1.1.
- The Java Driver logging is now enabled via the popular SLF4J API so I added logback in the pom.xml and a configuration file
logback.xml.
#Introduction
In this very first blog post of the Java Quick Start series, I will show you how to set up your Java project with Maven and execute a MongoDB command in Java. Then we will explore all the CRUD operations using the MongoDB Java driver.
In future blog posts, we will move on and work through:
- Multi-document ACID transactions,
- The MongoDB Java reactive streams driver.
Why Java and MongoDB? Java is the most popular language in the IT industry at the date of this blog post, and developers voted MongoDB as their most wanted database four years in a row. In this series of blog posts, I will be demonstrating how powerful these two great pieces of technology are when combined and how you can access that power.
To follow along, you can use any environment you like and the integrated development environment of your choice. I'll use Maven 3.6.2 and the Java OpenJDK 13, but all the code will be compatible with Java versions 8 to 13 so feel free to use the JDK of your choice and update the Java version accordingly in the pom.xml file we are about to setup.
For the MongoDB Cluster, we will be using a M0 Free Tier MongoDB Cluster from MongoDB Atlas. If you don't have one already, check out my Get started with an M0 cluster blog post.
Get your free M0 cluster on MongoDB Atlas today. It's free forever, and you'll be able to use it to work with the examples in this blog series.
Let's jump in and take a look at how well Java and MongoDB work together.
#Getting Set Up
To begin with, we will need to setup a new Maven project. You have two options at this point. You can either clone this series' git repository or you can create and set up the maven project.
#Using the Git repository
If you choose to use git, you will get all the code immediately. I still recommend you read through the manual set up.
You can clone the repository if you like with the following command.
1 git clone https://github.com/mongodb-developer/java-quick-start
Or you can download the repository as a zip file using this link.
#Setting Up Manually
You can either use your favorite IDE to create a new Maven project for you or you can create the Maven project manually. Either way, you should get the following folder architecture:
1 java-quick-start/ 2 ├── pom.xml 3 └── src 4 └── main 5 └── java 6 └── com 7 └── mongodb 8 └── quickstart
The pom.xml file should contain the following code:
1 2 <project xmlns="http://maven.apache.org/POM/4.0.0"
xmlns:xsi="http://www.w3.org/2001/XMLSchema-instance"
xsi:schemaLocation="http://maven.apache.org/POM/4.0.0 http://maven.apache.org/xsd/maven-4.0.0.xsd"> 3 <modelVersion>4.0.0</modelVersion> 4 5 <groupId>com.mongodb</groupId> 6 <artifactId>java-quick-start</artifactId> 7 <version>1.0-SNAPSHOT</version> 8 9 <properties> 10 <maven-compiler-plugin.source>8</maven-compiler-plugin.source> 11 <maven-compiler-plugin.target>8</maven-compiler-plugin.target> 12 <project.build.sourceEncoding>UTF-8</project.build.sourceEncoding> 13 <mongodb-driver-sync.version>3.11.0</mongodb-driver-sync.version> 14 <maven-compiler-plugin.version>3.8.1</maven-compiler-plugin.version> 15 </properties> 16 17 <dependencies> 18 <dependency> 19 <groupId>org.mongodb</groupId> 20 <artifactId>mongodb-driver-sync</artifactId> 21 <version>${mongodb-driver-sync.version}</version> 22 </dependency> 23 </dependencies> 24 25 <build> 26 <plugins> 27 <plugin> 28 <groupId>org.apache.maven.plugins</groupId> 29 <artifactId>maven-compiler-plugin</artifactId> 30 <version>${maven-compiler-plugin.version}</version> 31 <configuration> 32 <source>${maven-compiler-plugin.source}</source> 33 <target>${maven-compiler-plugin.target}</target> 34 </configuration> 35 </plugin> 36 </plugins> 37 </build> 38 39 </project>
To verify that everything works correctly, you should be able to create
and run a simple "Hello MongoDB!" program. In
src/main/java/com/mongodb/quickstart, create the
HelloMongoDB.java file:
1 package com.mongodb.quickstart; 2 3 public class HelloMongoDB { 4 5 public static void main(String[] args) { 6 System.out.println("Hello MongoDB!"); 7 } 8 }
Then compile and execute it with your IDE or use the command line in the
root directory (where the src folder is):
1 mvn compile exec:java -Dexec.mainClass="com.mongodb.quickstart.HelloMongoDB"
The result should look like this:
1 [...] 2 [INFO] Scanning for projects... 3 [INFO] 4 [INFO] --------------------< com.mongodb:java-quick-start >-------------------- 5 [INFO] Building java-quick-start 1.0-SNAPSHOT 6 [INFO] --------------------------------[ jar ]--------------------------------- 7 [INFO] 8 [INFO] --- maven-resources-plugin:2.6:resources (default-resources) @ java-quick-start --- 9 [INFO] Using 'UTF-8' encoding to copy filtered resources. 10 [INFO] Copying 1 resource 11 [INFO] 12 [INFO] --- maven-compiler-plugin:3.8.1:compile (default-compile) @ java-quick-start --- 13 [INFO] Nothing to compile - all classes are up to date 14 [INFO] 15 [INFO] --- exec-maven-plugin:1.4.0:java (default-cli) @ java-quick-start --- 16 Hello MongoDB! 17 [INFO] ------------------------------------------------------------------------ 18 [INFO] BUILD SUCCESS 19 [INFO] ------------------------------------------------------------------------ 20 [INFO] Total time: 0.786 s 21 [INFO] Finished at: 2019-10-02T20:19:36+02:00 22 [INFO] ------------------------------------------------------------------------
Note: If you see some warnings about an illegal reflective access from
guice.java, it's safe to ignore them. Guice is used by Maven and needs an update. You can read more about it in this github issue. These warnings will disappear in a future release of Guice and Maven.
#Putting the Driver to Work
Now that our Maven project works, we can start talking with MongoDB.
If you have imported the Sample Dataset as suggested in the Quick Start Atlas blog post, then with the Java code we are about to create, you will be able to see a list of the databases in the sample Dataset.
The first step is to instantiate a MongoClient by passing a MongoDB
Atlas connection string into the MongoClients.create() static
method. This will establish a connection to MongoDB
Atlas using the connection string. Then
we can retrieve the list of databases on this cluster and print them out
to test the connection with MongoDB.
In src/main/java/com/mongodb, create the Connection.java file:
1 package com.mongodb.quickstart; 2 3 import com.mongodb.client.MongoClient; 4 import com.mongodb.client.MongoClients; 5 import org.bson.Document; 6 7 import java.util.ArrayList; 8 import java.util.List; 9 10 public class Connection { 11 12 public static void main(String[] args) { 13 String connectionString = System.getProperty("mongodb.uri"); 14 try (MongoClient mongoClient = MongoClients.create(connectionString)) { 15 List<Document> databases = mongoClient.listDatabases().into(new ArrayList<>()); 16 databases.forEach(db -> System.out.println(db.toJson())); 17 } 18 } 19 }
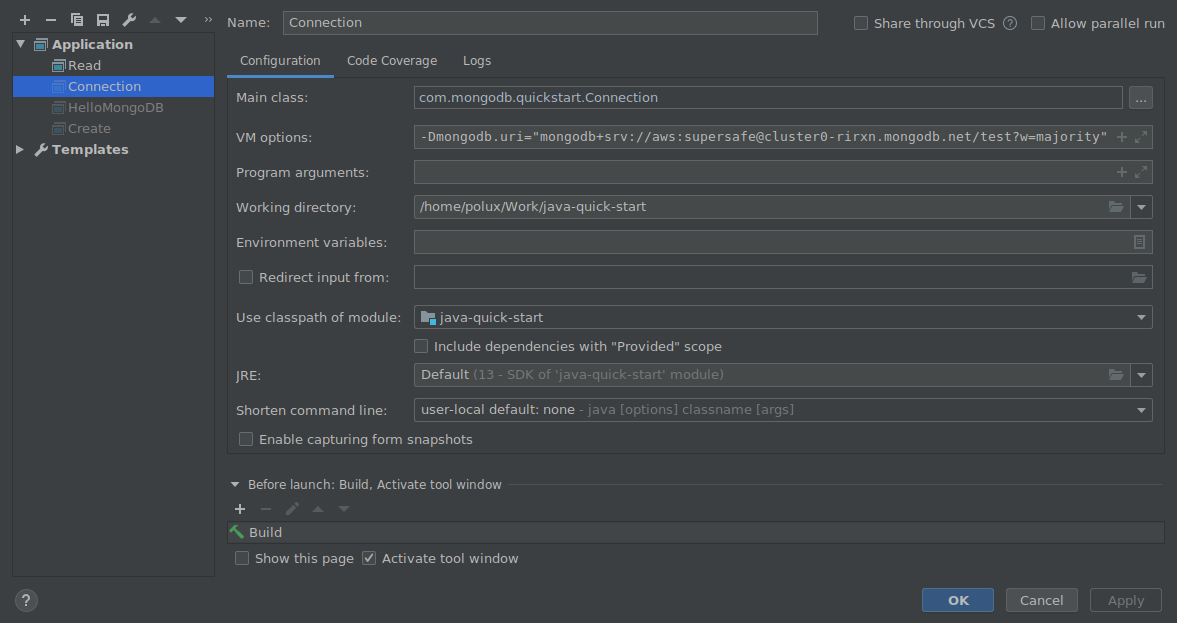
As you can see, the MongoDB connection string is retrieved from the
System Properties so we need to set this up. Once you have retrieved
your MongoDB Atlas connection
string, you
can add the mongodb.uri system property into your IDE. Here is my
configuration with IntelliJ for example.
Or if you prefer to use Maven in command line, here is the equivalent command line you can run in the root directory:
1 mvn compile exec:java -Dexec.mainClass="com.mongodb.quickstart.Connection" -Dmongodb.uri="mongodb+srv://username:password@cluster0-abcde.mongodb.net/test?w=majority"
Note: Don't forget the double quotes around the MongoDB URI to avoid surprises from your shell.
The standard output should look like this:
1 {"name": "admin", "sizeOnDisk": 303104.0, "empty": false} 2 {"name": "config", "sizeOnDisk": 147456.0, "empty": false} 3 {"name": "local", "sizeOnDisk": 5.44731136E8, "empty": false} 4 {"name": "sample_airbnb", "sizeOnDisk": 5.761024E7, "empty": false} 5 {"name": "sample_geospatial", "sizeOnDisk": 1384448.0, "empty": false} 6 {"name": "sample_mflix", "sizeOnDisk": 4.583424E7, "empty": false} 7 {"name": "sample_supplies", "sizeOnDisk": 1339392.0, "empty": false} 8 {"name": "sample_training", "sizeOnDisk": 7.4801152E7, "empty": false} 9 {"name": "sample_weatherdata", "sizeOnDisk": 5103616.0, "empty": false}
#Insert Operations
#Getting Set Up
In the setup part, we created the classes HelloMongoDB and
Connection. Now we will work on the Create class.
If you didn't set up your free cluster on MongoDB Atlas, now is great time to do so. You have all the instructions in this blog post.
#Checking the Collection and Data Model
In the sample dataset, you can find the database sample_training,
which contains a collection grades. Each document in this collection
represents a student's grades for a particular class.
Here is the JSON representation of a document in the Mongo Shell.
1 MongoDB Enterprise Cluster0-shard-0:PRIMARY> db.grades.findOne({student_id: 0, class_id: 339}) 2 { 3 "_id" : ObjectId("56d5f7eb604eb380b0d8d8ce"), 4 "student_id" : 0, 5 "scores" : [ 6 { 7 "type" : "exam", 8 "score" : 78.40446309504266 9 }, 10 { 11 "type" : "quiz", 12 "score" : 73.36224783231339 13 }, 14 { 15 "type" : "homework", 16 "score" : 46.980982486720535 17 }, 18 { 19 "type" : "homework", 20 "score" : 76.67556138656222 21 } 22 ], 23 "class_id" : 339 24 }
And here is the extended JSON representation of the same student. You can retrieve it in MongoDB Compass if you want.
Extended JSON is the human readable version of a BSON document without loss of type information. You can read more about the Java driver and BSON in the MongoDB java driver documentation.
1 { 2 "_id": { 3 "$oid": "56d5f7eb604eb380b0d8d8ce" 4 }, 5 "student_id": { 6 "$numberDouble": "0" 7 }, 8 "scores": [{ 9 "type": "exam", 10 "score": { 11 "$numberDouble": "78.40446309504266" 12 } 13 }, { 14 "type": "quiz", 15 "score": { 16 "$numberDouble": "73.36224783231339" 17 } 18 }, { 19 "type": "homework", 20 "score": { 21 "$numberDouble": "46.980982486720535" 22 } 23 }, { 24 "type": "homework", 25 "score": { 26 "$numberDouble": "76.67556138656222" 27 } 28 }], 29 "class_id": { 30 "$numberDouble": "339" 31 } 32 }
As you can see, MongoDB stores BSON documents and for each key-value
pairs, the BSON contains the key and the value along with its type. This
is how MongoDB knows that class_id is actually a double and not an
integer, which is not explicit in the Mongo Shell representation of this
document.
We have 10,000 students (student_id from 0 to 9999) already in this
collection and each of them took 10 different classes which adds up to
100,000 documents in this collection. Let's say a new student
(student_id 10,000) just arrived in this university and received a
bunch of (random) grades in his first class. Let's insert this new
student using Java.
In this university, the class_id varies from 0 to 500 so I can use
any random value between 0 and 500.
#Connecting to a Specific Collection
Firstly, we need to set up our Create class and access this
sample_training.grades collection.
1 package com.mongodb.quickstart; 2 3 import com.mongodb.client.MongoClient; 4 import com.mongodb.client.MongoClients; 5 import com.mongodb.client.MongoCollection; 6 import com.mongodb.client.MongoDatabase; 7 import org.bson.Document; 8 9 public class Create { 10 11 public static void main(String[] args) { 12 try (MongoClient mongoClient = MongoClients.create(System.getProperty("mongodb.uri"))) { 13 14 MongoDatabase sampleTrainingDB = mongoClient.getDatabase("sample_training"); 15 MongoCollection<Document> gradesCollection = sampleTrainingDB.getCollection("grades"); 16 17 } 18 } 19 }
#Create a BSON Document
Secondly, we need to represent this new student in Java using the
Document class.
1 Random rand = new Random(); 2 Document student = new Document("_id", new ObjectId()); 3 student.append("student_id", 10000d) 4 .append("class_id", 1d) 5 .append("scores", asList(new Document("type", "exam").append("score", rand.nextDouble() * 100), 6 new Document("type", "quiz").append("score", rand.nextDouble() * 100), 7 new Document("type", "homework").append("score", rand.nextDouble() * 100), 8 new Document("type", "homework").append("score", rand.nextDouble() * 100)));
As you can see, we reproduced the same data model from the existing
documents in this collection as we made sure that student_id,
class_id and score are all doubles.
Also, the Java driver would have generated the _id field with an
ObjectId for us if we didn't explicitly create one here but it's good
practise to set the _id ourselves. This won't change our life right
now but it makes more sense when we directly manipulate POJOs and we
want to create a clean REST API. I'm doing this in my mapping POJOs
post.
#Insert Operation
Finally, we can insert this document.
1 gradesCollection.insertOne(student);
#Final Code to Insert One Document
Here is the final Create class to insert one document in MongoDB
with all the details I mentioned above.
1 package com.mongodb.quickstart; 2 3 import com.mongodb.client.MongoClient; 4 import com.mongodb.client.MongoClients; 5 import com.mongodb.client.MongoCollection; 6 import com.mongodb.client.MongoDatabase; 7 import org.bson.Document; 8 import org.bson.types.ObjectId; 9 10 import java.util.Random; 11 12 import static java.util.Arrays.asList; 13 14 public class Create { 15 16 public static void main(String[] args) { 17 try (MongoClient mongoClient = MongoClients.create(System.getProperty("mongodb.uri"))) { 18 19 MongoDatabase sampleTrainingDB = mongoClient.getDatabase("sample_training"); 20 MongoCollection<Document> gradesCollection = sampleTrainingDB.getCollection("grades"); 21 22 Random rand = new Random(); 23 Document student = new Document("_id", new ObjectId()); 24 student.append("student_id", 10000d) 25 .append("class_id", 1d) 26 .append("scores", asList(new Document("type", "exam").append("score", rand.nextDouble() * 100), 27 new Document("type", "quiz").append("score", rand.nextDouble() * 100), 28 new Document("type", "homework").append("score", rand.nextDouble() * 100), 29 new Document("type", "homework").append("score", rand.nextDouble() * 100))); 30 31 gradesCollection.insertOne(student); 32 } 33 } 34 }
You can execute this class with the following maven command line in the root directory or using your IDE (see above for more details). Do not forget the doubles quotes around the MongoDB URI to avoid surprises.
1 mvn compile exec:java -Dexec.mainClass="com.mongodb.quickstart.Create" -Dmongodb.uri="mongodb+srv://USERNAME:PASSWORD@cluster0-abcde.mongodb.net/test?w=majority"
And here is the document I extracted from MongoDB Compass.
1 { 2 "_id": { 3 "$oid": "5d97c375ded5651ea3462d0f" 4 }, 5 "student_id": { 6 "$numberDouble": "10000" 7 }, 8 "class_id": { 9 "$numberDouble": "1" 10 }, 11 "scores": [{ 12 "type": "exam", 13 "score": { 14 "$numberDouble": "4.615256396625178" 15 } 16 }, { 17 "type": "quiz", 18 "score": { 19 "$numberDouble": "73.06173415145801" 20 } 21 }, { 22 "type": "homework", 23 "score": { 24 "$numberDouble": "19.378205578990727" 25 } 26 }, { 27 "type": "homework", 28 "score": { 29 "$numberDouble": "82.3089189278531" 30 } 31 }] 32 }
Note that the order of the fields is different from the initial document
with "student_id": 0.
We could get exactly the same order if we want to by creating the document like this.
1 Random rand = new Random(); 2 Document student = new Document("_id", new ObjectId()); 3 student.append("student_id", 10000d) 4 .append("scores", asList(new Document("type", "exam").append("score", rand.nextDouble() * 100), 5 new Document("type", "quiz").append("score", rand.nextDouble() * 100), 6 new Document("type", "homework").append("score", rand.nextDouble() * 100), 7 new Document("type", "homework").append("score", rand.nextDouble() * 100))) 8 .append("class_id", 1d);
But if you do things correctly, this should not have any impact in your code and logic as fields in a JSON documents are not ordered.
I'm quoting json.org for this:
An object is an unordered set of name/value pairs.
#Bulk Inserts
Now that we know how to create one document, let's learn how to insert many documents.
Of course, we could just wrap the previous insert operation into a
for loop. Indeed, if we loop 10 times on this method, we would send
10 insert commands to the cluster and expect 10 insert acknowledgments.
As you can imagine, this would not be very efficient as it would
generate a lot more TCP communications than necessary.
Instead, we want to wrap our 10 documents and send them in one call to the cluster and we want to receive only one insert acknowledgment for the entire list.
Let's refactor the code. First, let's make the random generator a
private static final field.
1 private static final Random rand = new Random();
Let's make a grade factory method.
1 private static Document generateNewGrade(double studentId, double classId) { 2 List<Document> scores = asList(new Document("type", "exam").append("score", rand.nextDouble() * 100), 3 new Document("type", "quiz").append("score", rand.nextDouble() * 100), 4 new Document("type", "homework").append("score", rand.nextDouble() * 100), 5 new Document("type", "homework").append("score", rand.nextDouble() * 100)); 6 return new Document("_id", new ObjectId()).append("student_id", studentId) 7 .append("class_id", classId) 8 .append("scores", scores); 9 }
And now we can use this to insert 10 documents all at once.
1 List<Document> grades = new ArrayList<>(); 2 for (double classId = 1d; classId <= 10d; classId++) { 3 grades.add(generateNewGrade(10001d, classId)); 4 } 5 6 gradesCollection.insertMany(grades, new InsertManyOptions().ordered(false));
As you can see, we are now wrapping our grade documents into a list and
we are sending this list in a single call with the insertMany
method.
By default, the insertMany method will insert the documents in order
and stop if an error occurs during the process. For example, if you try
to insert a new document with the same _id as an existing document
you would get a DuplicateKeyException.
Therefore, with an ordered insertMany, the last documents of the
list would not be inserted and the insertion process would stop and
return the appropriate exception as soon as the error occurs.
As you can see here, this is not the behaviour we want because all the grades are completely independent from one to another so, if one of them fails, we want to process all the grades and then eventually fall back to an exception for the ones that failed.
This is why you see the second parameter
new InsertManyOptions().ordered(false) which is true by default.
#The Final Code To Insert Multiple Documents
Let's refactor the code a bit and here is the final Create class.
1 package com.mongodb.quickstart; 2 3 import com.mongodb.client.MongoClient; 4 import com.mongodb.client.MongoClients; 5 import com.mongodb.client.MongoCollection; 6 import com.mongodb.client.MongoDatabase; 7 import com.mongodb.client.model.InsertManyOptions; 8 import org.bson.Document; 9 import org.bson.types.ObjectId; 10 11 import java.util.ArrayList; 12 import java.util.List; 13 import java.util.Random; 14 15 import static java.util.Arrays.asList; 16 17 public class Create { 18 19 private static final Random rand = new Random(); 20 21 public static void main(String[] args) { 22 try (MongoClient mongoClient = MongoClients.create(System.getProperty("mongodb.uri"))) { 23 24 MongoDatabase sampleTrainingDB = mongoClient.getDatabase("sample_training"); 25 MongoCollection<Document> gradesCollection = sampleTrainingDB.getCollection("grades"); 26 27 insertOneDocument(gradesCollection); 28 insertManyDocuments(gradesCollection); 29 } 30 } 31 32 private static void insertOneDocument(MongoCollection<Document> gradesCollection) { 33 gradesCollection.insertOne(generateNewGrade(10000d, 1d)); 34 System.out.println("One grade inserted for studentId 10000."); 35 } 36 37 private static void insertManyDocuments(MongoCollection<Document> gradesCollection) { 38 List<Document> grades = new ArrayList<>(); 39 for (double classId = 1d; classId <= 10d; classId++) { 40 grades.add(generateNewGrade(10001d, classId)); 41 } 42 43 gradesCollection.insertMany(grades, new InsertManyOptions().ordered(false)); 44 System.out.println("Ten grades inserted for studentId 10001."); 45 } 46 47 private static Document generateNewGrade(double studentId, double classId) { 48 List<Document> scores = asList(new Document("type", "exam").append("score", rand.nextDouble() * 100), 49 new Document("type", "quiz").append("score", rand.nextDouble() * 100), 50 new Document("type", "homework").append("score", rand.nextDouble() * 100), 51 new Document("type", "homework").append("score", rand.nextDouble() * 100)); 52 return new Document("_id", new ObjectId()).append("student_id", studentId) 53 .append("class_id", classId) 54 .append("scores", scores); 55 } 56 }
As a reminder, every write operation (create, replace, update, delete)
performed on a SINGLE document is
ACID in MongoDB. Which means
insertMany is not ACID by default but, good news, since MongoDB 4.0,
we can wrap this call in a multi-document ACID transaction to make it
fully ACID. I am explaining this in more details in this blog
post.
#Read Operations
#Created Data
We created the class Create. Now we will work in the Read class.
We wrote 11 new grades, one for the student with
{"student_id": 10000} and 10 for the student with
{"student_id": 10001} in the sample_training.grades collection.
As a reminder, here are the grades of the {"student_id": 10000}.
1 MongoDB Enterprise Cluster0-shard-0:PRIMARY> db.grades.findOne({"student_id":10000}) 2 { 3 "_id" : ObjectId("5daa0e274f52b44cfea94652"), 4 "student_id" : 10000, 5 "class_id" : 1, 6 "scores" : [ 7 { 8 "type" : "exam", 9 "score" : 39.25175977753478 10 }, 11 { 12 "type" : "quiz", 13 "score" : 80.2908713167313 14 }, 15 { 16 "type" : "homework", 17 "score" : 63.5444978481843 18 }, 19 { 20 "type" : "homework", 21 "score" : 82.35202261582563 22 } 23 ] 24 }
We also discussed BSON types and we noted that student_id and
class_id are doubles.
MongoDB treats some types as equivalent for comparison purposes. For instance, numeric types undergo conversion before comparison.
So do not be surprised if I filter with an integer number and match a document which contains a double number for example. If you want to filter documents by value types, you can use the $type operator.
You can read more about type bracketing and comparison and sort order in our documentation.
#Read with a Filter
Let's read the document above. To achieve this, we will use the method
find.
Please create a class Read in the com.mongodb.quickstart package
with this code:
1 package com.mongodb.quickstart; 2 3 import com.mongodb.client.*; 4 import org.bson.Document; 5 6 import java.util.ArrayList; 7 import java.util.List; 8 9 import static com.mongodb.client.model.Filters.*; 10 import static com.mongodb.client.model.Projections.*; 11 import static com.mongodb.client.model.Sorts.descending; 12 13 public class Read { 14 15 public static void main(String[] args) { 16 try (MongoClient mongoClient = MongoClients.create(System.getProperty("mongodb.uri"))) { 17 MongoDatabase sampleTrainingDB = mongoClient.getDatabase("sample_training"); 18 MongoCollection<Document> gradesCollection = sampleTrainingDB.getCollection("grades"); 19 20 // find one document with new Document 21 Document student1 = gradesCollection.find(new Document("student_id", 10000)).first(); 22 System.out.println("Student 1: " + student1.toJson()); 23 } 24 } 25 }
Also, make sure you set up your mongodb.uri in your system
properties using your IDE if you want to run this code in your favorite
IDE.
Alternatively, you can use this maven command line in your root project
(where the src folder is):
1 mvn compile exec:java -Dexec.mainClass="com.mongodb.quickstart.Read" -Dmongodb.uri="mongodb+srv://USERNAME:PASSWORD@cluster0-abcde.mongodb.net/test?w=majority"
The standard output should be:
1 Student 1: {"_id": {"$oid": "5daa0e274f52b44cfea94652"}, 2 "student_id": 10000.0, 3 "class_id": 1.0, 4 "scores": [ 5 {"type": "exam", "score": 39.25175977753478}, 6 {"type": "quiz", "score": 80.2908713167313}, 7 {"type": "homework", "score": 63.5444978481843}, 8 {"type": "homework", "score": 82.35202261582563} 9 ] 10 }
The MongoDB driver comes with a few helpers to ease the writing of these
queries. Here is an equivalent query using the Filters.eq() method.
1 gradesCollection.find(eq("student_id", 10000)).first();
Of course, I used a static import to make the code as compact and easy to read as possible.
1 import static com.mongodb.client.model.Filters.eq;
#Read a Range of Documents
In the previous example, the benefit of these helpers is not obvious, but let me show you another example where I'm searching all the grades with a student_id greater than or equal to 10,000.
1 // without helpers 2 gradesCollection.find(new Document("student_id", new Document("$gte", 10000))); 3 // with the Filters.gte() helper 4 gradesCollection.find(gte("student_id", 10000));
As you can see, I'm using the $gte operator to write this query. You
can learn about all the different query
operators
in the MongoDB documentation.
#Iterators
The find method returns an object that implements the interface
FindIterable which ultimately extends the Iterable interface so
we can use an iterator to go through the list of documents we are
receiving from MongoDB:
1 FindIterable<Document> iterable = gradesCollection.find(gte("student_id", 10000)); 2 MongoCursor<Document> cursor = iterable.iterator(); 3 System.out.println("Student list with cursor: "); 4 while (cursor.hasNext()) { 5 System.out.println(cursor.next().toJson()); 6 }
#Lists
Lists are usually easier to manipulate than iterators, so we can also do
this to retrieve directly an ArrayList<Document>:
1 List<Document> studentList = gradesCollection.find(gte("student_id", 10000)).into(new ArrayList<>()); 2 System.out.println("Student list with an ArrayList:"); 3 for (Document student : studentList) { 4 System.out.println(student.toJson()); 5 }
#Consumers
We could also use a Consumer which is a functional interface:
1 Consumer<Document> printConsumer = document -> System.out.println(document.toJson()); 2 gradesCollection.find(gte("student_id", 10000)).forEach(printConsumer);
#Cursors, Sort, Skip, Limit, and Projections
As we saw above with the Iterator example, MongoDB leverages
cursors
to iterate through your result set.
If you are already familiar with the cursors in the Mongo Shell, you know that transformations can be applied to it. A cursor can be sorted and the documents it contains can be transformed using a projection. Also, once the cursor is sorted, we can choose to skip a few documents and limit the number of documents in the output. This is very useful to implement pagination in your frontend for example.
Let's combine everything we have learnt in one query:
1 List<Document> docs = gradesCollection.find(and(eq("student_id", 10001), lte("class_id", 5))) 2 .projection(fields(excludeId(), 3 include("class_id", 4 "student_id"))) 5 .sort(descending("class_id")) 6 .skip(2) 7 .limit(2) 8 .into(new ArrayList<>()); 9 10 System.out.println("Student sorted, skipped, limited and projected: "); 11 for (Document student : docs) { 12 System.out.println(student.toJson()); 13 }
Here is the output we get:
1 {"student_id": 10001.0, "class_id": 3.0} 2 {"student_id": 10001.0, "class_id": 2.0}
I remind you that documents are returned in the natural order, so if you want your output ordered, you need to sort your cursors to make sure there is no randomness in your algorithm.
#Indexes
If you want to make these queries (with or without sort) efficient, you need indexes!
To make my last query efficient, I should create this index:
1 db.grades.createIndex({"student_id": 1, "class_id": -1})
When I run an explain on this query, this is the winning plan I get:
1 "winningPlan" : { 2 "stage" : "LIMIT", 3 "limitAmount" : 2, 4 "inputStage" : { 5 "stage" : "PROJECTION_COVERED", 6 "transformBy" : { 7 "_id" : 0, 8 "class_id" : 1, 9 "student_id" : 1 10 }, 11 "inputStage" : { 12 "stage" : "SKIP", 13 "skipAmount" : 2, 14 "inputStage" : { 15 "stage" : "IXSCAN", 16 "keyPattern" : { 17 "student_id" : 1, 18 "class_id" : -1 19 }, 20 "indexName" : "student_id_1_class_id_-1", 21 "isMultiKey" : false, 22 "multiKeyPaths" : { 23 "student_id" : [ ], 24 "class_id" : [ ] 25 }, 26 "isUnique" : false, 27 "isSparse" : false, 28 "isPartial" : false, 29 "indexVersion" : 2, 30 "direction" : "forward", 31 "indexBounds" : { 32 "student_id" : [ 33 "[10001.0, 10001.0]" 34 ], 35 "class_id" : [ 36 "[5.0, -inf.0]" 37 ] 38 } 39 } 40 } 41 } 42 }
With this index, we can see that we have no SORT stage so we are not doing a sort in memory as the documents are already sorted "for free" and returned in the order of the index.
Also, we can see that we don't have any FETCH stage so this is a covered query, the most efficient type of query you can run in MongoDB. Indeed, all the information we are returning at the end are already in the index, so the index itself contains everything we need to answer this query.
#The Final Code To Read Documents
1 package com.mongodb.quickstart; 2 3 import com.mongodb.client.*; 4 import org.bson.Document; 5 6 import java.util.ArrayList; 7 import java.util.List; 8 import java.util.function.Consumer; 9 10 import static com.mongodb.client.model.Filters.*; 11 import static com.mongodb.client.model.Projections.*; 12 import static com.mongodb.client.model.Sorts.descending; 13 14 public class Read { 15 16 public static void main(String[] args) { 17 try (MongoClient mongoClient = MongoClients.create(System.getProperty("mongodb.uri"))) { 18 MongoDatabase sampleTrainingDB = mongoClient.getDatabase("sample_training"); 19 MongoCollection<Document> gradesCollection = sampleTrainingDB.getCollection("grades"); 20 21 // find one document with new Document 22 Document student1 = gradesCollection.find(new Document("student_id", 10000)).first(); 23 System.out.println("Student 1: " + student1.toJson()); 24 25 // find one document with Filters.eq() 26 Document student2 = gradesCollection.find(eq("student_id", 10000)).first(); 27 System.out.println("Student 2: " + student2.toJson()); 28 29 // find a list of documents and iterate throw it using an iterator. 30 FindIterable<Document> iterable = gradesCollection.find(gte("student_id", 10000)); 31 MongoCursor<Document> cursor = iterable.iterator(); 32 System.out.println("Student list with a cursor: "); 33 while (cursor.hasNext()) { 34 System.out.println(cursor.next().toJson()); 35 } 36 37 // find a list of documents and use a List object instead of an iterator 38 List<Document> studentList = gradesCollection.find(gte("student_id", 10000)).into(new ArrayList<>()); 39 System.out.println("Student list with an ArrayList:"); 40 for (Document student : studentList) { 41 System.out.println(student.toJson()); 42 } 43 44 // find a list of documents and print using a consumer 45 System.out.println("Student list using a Consumer:"); 46 Consumer<Document> printConsumer = document -> System.out.println(document.toJson()); 47 gradesCollection.find(gte("student_id", 10000)).forEach(printConsumer); 48 49 // find a list of documents with sort, skip, limit and projection 50 List<Document> docs = gradesCollection.find(and(eq("student_id", 10001), lte("class_id", 5))) 51 .projection(fields(excludeId(), include("class_id", "student_id"))) 52 .sort(descending("class_id")) 53 .skip(2) 54 .limit(2) 55 .into(new ArrayList<>()); 56 57 System.out.println("Student sorted, skipped, limited and projected: "); 58 for (Document student : docs) { 59 System.out.println(student.toJson()); 60 } 61 } 62 } 63 }
#Update Operations
#Update One Document
Let's edit the document with {student_id: 10000}. To achieve this,
we will use the method updateOne.
Please create a class Update in the com.mongodb.quickstart
package with this code:
1 package com.mongodb.quickstart; 2 3 import com.mongodb.client.MongoClient; 4 import com.mongodb.client.MongoClients; 5 import com.mongodb.client.MongoCollection; 6 import com.mongodb.client.MongoDatabase; 7 import com.mongodb.client.model.FindOneAndUpdateOptions; 8 import com.mongodb.client.model.ReturnDocument; 9 import com.mongodb.client.model.UpdateOptions; 10 import com.mongodb.client.result.UpdateResult; 11 import org.bson.Document; 12 import org.bson.conversions.Bson; 13 import org.bson.json.JsonWriterSettings; 14 15 import static com.mongodb.client.model.Filters.and; 16 import static com.mongodb.client.model.Filters.eq; 17 import static com.mongodb.client.model.Updates.*; 18 19 public class Update { 20 21 public static void main(String[] args) { 22 JsonWriterSettings prettyPrint = JsonWriterSettings.builder().indent(true).build(); 23 24 try (MongoClient mongoClient = MongoClients.create(System.getProperty("mongodb.uri"))) { 25 MongoDatabase sampleTrainingDB = mongoClient.getDatabase("sample_training"); 26 MongoCollection<Document> gradesCollection = sampleTrainingDB.getCollection("grades"); 27 28 // update one document 29 Bson filter = eq("student_id", 10000); 30 Bson updateOperation = set("comment", "You should learn MongoDB!"); 31 UpdateResult updateResult = gradesCollection.updateOne(filter, updateOperation); 32 System.out.println("=> Updating the doc with {\"student_id\":10000}. Adding comment."); 33 System.out.println(gradesCollection.find(filter).first().toJson(prettyPrint)); 34 System.out.println(updateResult); 35 } 36 } 37 }
As you can see in this example, the method updateOne takes 2
parameters:
- the first one is the filter that identifies the document we want to update,
- the second one is the update operation. Here, we are setting a new field
commentwith the value"You should learn MongoDB!".
In order to run this program, make sure you set up your mongodb.uri
in your system properties using your IDE if you want to run this code in
your favorite IDE (see above for more details).
Alternatively, you can use this maven command line in your root project
(where the src folder is):
1 mvn compile exec:java -Dexec.mainClass="com.mongodb.quickstart.Update" -Dmongodb.uri="mongodb+srv://USERNAME:PASSWORD@cluster0-abcde.mongodb.net/test?w=majority"
The standard output should look like this:
1 => Updating the doc with {"student_id":10000}. Adding comment. 2 { 3 "_id": { 4 "$oid": "5dd5c1f351f97d4a034109ed" 5 }, 6 "student_id": 10000.0, 7 "class_id": 1.0, 8 "scores": [ 9 { 10 "type": "exam", 11 "score": 21.580800815091415 12 }, 13 { 14 "type": "quiz", 15 "score": 87.66967927111044 16 }, 17 { 18 "type": "homework", 19 "score": 96.4060480668003 20 }, 21 { 22 "type": "homework", 23 "score": 75.44966835508427 24 } 25 ], 26 "comment": "You should learn MongoDB!" 27 } 28 AcknowledgedUpdateResult{matchedCount=1, modifiedCount=1, upsertedId=null}
#Upsert
An upsert is a mix between an insert operation and an update one. It happens when you want to update a document, assuming it exists, but it actually doesn't exist yet in your database.
In MongoDB, you can set an option to create this document on the fly and carry on with your update operation: this is an upsert operation.
In this example, I want to add a comment to the grades of my student 10002 for the class 10 but this document doesn't exist yet.
1 filter = and(eq("student_id", 10002d), eq("class_id", 10d)); 2 updateOperation = push("comments", "You will learn a lot if you read the MongoDB blog!"); 3 UpdateOptions options = new UpdateOptions().upsert(true); 4 updateResult = gradesCollection.updateOne(filter, updateOperation, options); 5 System.out.println("\n=> Upsert document with {\"student_id\":10002.0, \"class_id\": 10.0} because it doesn't exist yet."); 6 System.out.println(updateResult); 7 System.out.println(gradesCollection.find(filter).first().toJson(prettyPrint));
As you can see, I'm using the third parameter of the update operation to set the option upsert to true.
I'm also using here the static method Updates.push() to push a new
value in my array comments which does not exist yet, so I'm creating
an array of one element in this case.
This is the output we get:
1 => Upsert document with {"student_id":10002.0, "class_id": 10.0} because it doesn't exist yet.
AcknowledgedUpdateResult{matchedCount=0, modifiedCount=0, upsertedId=BsonObjectId{value=5ddeb7b7224ad1d5cfab3733}}
{
"_id": {
"$oid": "5ddeb7b7224ad1d5cfab3733"
},
"class_id": 10.0,
"student_id": 10002.0,
"comments": [
"You will learn a lot if you read the MongoDB blog!"
]
}
#Update many documents
The same way I was able to update one document with updateOne(), I
can update multiple documents with updateMany().
1 filter = eq("student_id", 10001); 2 updateResult = gradesCollection.updateMany(filter, updateOperation); 3 System.out.println("\n=> Updating all the documents with {\"student_id\":10001}."); 4 System.out.println(updateResult);
In this example, I'm using the same updateOperation as earlier, so
I'm creating a new one element array comments in these 10 documents.
Here is the output:
1 => Updating all the documents with {"student_id":10001}. 2 AcknowledgedUpdateResult{matchedCount=10, modifiedCount=10, upsertedId=null}
#The findOneAndUpdate method
Finally, we have one last very useful method available in the MongoDB
Java Driver: findOneAndUpdate().
In most web application, when a user update something, he wants to see
this update reflected in his web page. Without the
findOneAndUpdate() method, you would have to run an update operation
and then fetch the document with a find operation to make sure you are
printing the latest version of this object in the web page.
The findOneAndUpdate() method allow you to combine these two
operations in one.
1 // findOneAndUpdate 2 filter = eq("student_id", 10000); 3 Bson update1 = inc("x", 10); // increment x by 10. As x doesn't exist yet, x=10. 4 Bson update2 = rename("class_id", "new_class_id"); // rename variable "class_id" in "new_class_id". 5 Bson update3 = mul("scores.0.score", 2); // multiply the first score in the array by 2. 6 Bson update4 = addToSet("comments", "This comment is uniq"); // creating an array with a comment. 7 Bson update5 = addToSet("comments", "This comment is uniq"); // using addToSet so no effect. 8 Bson updates = combine(update1, update2, update3, update4, update5); 9 // returns the old version of the document before the update. 10 Document oldVersion = gradesCollection.findOneAndUpdate(filter, updates); 11 System.out.println("\n=> FindOneAndUpdate operation. Printing the old version by default:"); 12 System.out.println(oldVersion.toJson(prettyPrint)); 13 14 // but I can also request the new version 15 filter = eq("student_id", 10001); 16 FindOneAndUpdateOptions optionAfter = new FindOneAndUpdateOptions().returnDocument(ReturnDocument.AFTER); 17 Document newVersion = gradesCollection.findOneAndUpdate(filter, updates, optionAfter); 18 System.out.println("\n=> FindOneAndUpdate operation. But we can also ask for the new version of the doc:"); 19 System.out.println(newVersion.toJson(prettyPrint));
Here is the output:
1 => FindOneAndUpdate operation. Printing the old version by default: 2 { 3 "_id": { 4 "$oid": "5dd5d46544fdc35505a8271b" 5 }, 6 "student_id": 10000.0, 7 "class_id": 1.0, 8 "scores": [ 9 { 10 "type": "exam", 11 "score": 69.52994626959251 12 }, 13 { 14 "type": "quiz", 15 "score": 87.27457417188077 16 }, 17 { 18 "type": "homework", 19 "score": 83.40970667948744 20 }, 21 { 22 "type": "homework", 23 "score": 40.43663797673247 24 } 25 ], 26 "comment": "You should learn MongoDB!" 27 } 28 29 => FindOneAndUpdate operation. But we can also ask for the new version of the doc: 30 { 31 "_id": { 32 "$oid": "5dd5d46544fdc35505a82725" 33 }, 34 "student_id": 10001.0, 35 "scores": [ 36 { 37 "type": "exam", 38 "score": 138.42535412437857 39 }, 40 { 41 "type": "quiz", 42 "score": 84.66740178906916 43 }, 44 { 45 "type": "homework", 46 "score": 36.773091359279675 47 }, 48 { 49 "type": "homework", 50 "score": 14.90842128691825 51 } 52 ], 53 "comments": [ 54 "You will learn a lot if you read the MongoDB blog!", 55 "This comment is uniq" 56 ], 57 "new_class_id": 10.0, 58 "x": 10 59 }
As you can see in this example, you can choose which version of the document you want to return using the appropriate option.
I also used this example to show you a bunch of update operators:
setwill set a value,incwill increment a value,renamewill rename a field,mulwill multiply the value by the given number,addToSetis similar to push but will only push the value in the array if the value doesn't exist already.
There are a few other update operators. You can consult the entire list in our documentation.
#The Final Code For Updates
1 package com.mongodb.quickstart; 2 3 import com.mongodb.client.MongoClient; 4 import com.mongodb.client.MongoClients; 5 import com.mongodb.client.MongoCollection; 6 import com.mongodb.client.MongoDatabase; 7 import com.mongodb.client.model.FindOneAndUpdateOptions; 8 import com.mongodb.client.model.ReturnDocument; 9 import com.mongodb.client.model.UpdateOptions; 10 import com.mongodb.client.result.UpdateResult; 11 import org.bson.Document; 12 import org.bson.conversions.Bson; 13 import org.bson.json.JsonWriterSettings; 14 15 import static com.mongodb.client.model.Filters.and; 16 import static com.mongodb.client.model.Filters.eq; 17 import static com.mongodb.client.model.Updates.*; 18 19 public class Update { 20 21 public static void main(String[] args) { 22 JsonWriterSettings prettyPrint = JsonWriterSettings.builder().indent(true).build(); 23 24 try (MongoClient mongoClient = MongoClients.create(System.getProperty("mongodb.uri"))) { 25 MongoDatabase sampleTrainingDB = mongoClient.getDatabase("sample_training"); 26 MongoCollection<Document> gradesCollection = sampleTrainingDB.getCollection("grades"); 27 28 // update one document 29 Bson filter = eq("student_id", 10000); 30 Bson updateOperation = set("comment", "You should learn MongoDB!"); 31 UpdateResult updateResult = gradesCollection.updateOne(filter, updateOperation); 32 System.out.println("=> Updating the doc with {\"student_id\":10000}. Adding comment."); 33 System.out.println(gradesCollection.find(filter).first().toJson(prettyPrint)); 34 System.out.println(updateResult); 35 36 // upsert 37 filter = and(eq("student_id", 10002d), eq("class_id", 10d)); 38 updateOperation = push("comments", "You will learn a lot if you read the MongoDB blog!"); 39 UpdateOptions options = new UpdateOptions().upsert(true); 40 updateResult = gradesCollection.updateOne(filter, updateOperation, options); 41 System.out.println("\n=> Upsert document with {\"student_id\":10002.0, \"class_id\": 10.0} because it doesn't exist yet."); 42 System.out.println(updateResult); 43 System.out.println(gradesCollection.find(filter).first().toJson(prettyPrint)); 44 45 // update many documents 46 filter = eq("student_id", 10001); 47 updateResult = gradesCollection.updateMany(filter, updateOperation); 48 System.out.println("\n=> Updating all the documents with {\"student_id\":10001}."); 49 System.out.println(updateResult); 50 51 // findOneAndUpdate 52 filter = eq("student_id", 10000); 53 Bson update1 = inc("x", 10); // increment x by 10. As x doesn't exist yet, x=10. 54 Bson update2 = rename("class_id", "new_class_id"); // rename variable "class_id" in "new_class_id". 55 Bson update3 = mul("scores.0.score", 2); // multiply the first score in the array by 2. 56 Bson update4 = addToSet("comments", "This comment is uniq"); // creating an array with a comment. 57 Bson update5 = addToSet("comments", "This comment is uniq"); // using addToSet so no effect. 58 Bson updates = combine(update1, update2, update3, update4, update5); 59 // returns the old version of the document before the update. 60 Document oldVersion = gradesCollection.findOneAndUpdate(filter, updates); 61 System.out.println("\n=> FindOneAndUpdate operation. Printing the old version by default:"); 62 System.out.println(oldVersion.toJson(prettyPrint)); 63 64 // but I can also request the new version 65 filter = eq("student_id", 10001); 66 FindOneAndUpdateOptions optionAfter = new FindOneAndUpdateOptions().returnDocument(ReturnDocument.AFTER); 67 Document newVersion = gradesCollection.findOneAndUpdate(filter, updates, optionAfter); 68 System.out.println("\n=> FindOneAndUpdate operation. But we can also ask for the new version of the doc:"); 69 System.out.println(newVersion.toJson(prettyPrint)); 70 } 71 } 72 }
#Delete Operations
#Delete One Document
Let's delete the document above. To achieve this, we will use the method
deleteOne.
Please create a class Delete in the com.mongodb.quickstart
package with this code:
1 package com.mongodb.quickstart; 2 3 import com.mongodb.client.MongoClient; 4 import com.mongodb.client.MongoClients; 5 import com.mongodb.client.MongoCollection; 6 import com.mongodb.client.MongoDatabase; 7 import com.mongodb.client.result.DeleteResult; 8 import org.bson.Document; 9 import org.bson.conversions.Bson; 10 11 import static com.mongodb.client.model.Filters.eq; 12 import static com.mongodb.client.model.Filters.gte; 13 14 public class Delete { 15 16 public static void main(String[] args) { 17 18 try (MongoClient mongoClient = MongoClients.create(System.getProperty("mongodb.uri"))) { 19 MongoDatabase sampleTrainingDB = mongoClient.getDatabase("sample_training"); 20 MongoCollection<Document> gradesCollection = sampleTrainingDB.getCollection("grades"); 21 22 // delete one document 23 Bson filter = eq("student_id", 10000); 24 DeleteResult result = gradesCollection.deleteOne(filter); 25 System.out.println(result); 26 } 27 } 28 }
As you can see in this example, the method deleteOne only takes one
parameter: a filter, just like the find() operation.
In order to run this program, make sure you set up your mongodb.uri
in your system properties using your IDE if you want to run this code in
your favorite IDE (see above for more details).
Alternatively, you can use this maven command line in your root project
(where the src folder is):
1 mvn compile exec:java -Dexec.mainClass="com.mongodb.quickstart.Delete" -Dmongodb.uri="mongodb+srv://USERNAME:PASSWORD@cluster0-abcde.mongodb.net/test?w=majority"
The standard output should look like this:
1 AcknowledgedDeleteResult{deletedCount=1}
#FindOneAndDelete()
You are emotionally attached to your document and you want a chance to see it one last time before it's too late? We have what you need.
The method findOneAndDelete() allows you to retrieve a document and
delete it in a single atomic operation.
Here is how it works:
1 Bson filter = eq("student_id", 10002); 2 Document doc = gradesCollection.findOneAndDelete(filter); 3 System.out.println(doc.toJson(JsonWriterSettings.builder().indent(true).build()));
Here is the output we get:
1 { 2 "_id": { 3 "$oid": "5ddec378224ad1d5cfac02b8" 4 }, 5 "class_id": 10.0, 6 "student_id": 10002.0, 7 "comments": [ 8 "You will learn a lot if you read the MongoDB blog!" 9 ] 10 }
#Delete Many Documents
This time we will use deleteMany() instead of deleteOne() and we
will use a different filter to match more documents.
1 Bson filter = gte("student_id", 10000); 2 DeleteResult result = gradesCollection.deleteMany(filter); 3 System.out.println(result);
As a reminder, you can learn more about all the query selectors in our documentation.
This is the output we get:
1 AcknowledgedDeleteResult{deletedCount=10}
#Delete a Collection
Deleting all the documents from a collection will not delete the collection itself because a collection also contains metadata like the index definitions or the chunk distribution if your collection is sharded for example.
If you want to remove the entire collection and all the metadata
associated with it, then you need to use the drop() method.
1 gradesCollection.drop();
#The Final Code For Delete Operations
1 package com.mongodb.quickstart; 2 3 import com.mongodb.client.MongoClient; 4 import com.mongodb.client.MongoClients; 5 import com.mongodb.client.MongoCollection; 6 import com.mongodb.client.MongoDatabase; 7 import com.mongodb.client.result.DeleteResult; 8 import org.bson.Document; 9 import org.bson.conversions.Bson; 10 import org.bson.json.JsonWriterSettings; 11 12 import static com.mongodb.client.model.Filters.eq; 13 import static com.mongodb.client.model.Filters.gte; 14 15 public class Delete { 16 17 public static void main(String[] args) { 18 try (MongoClient mongoClient = MongoClients.create(System.getProperty("mongodb.uri"))) { 19 MongoDatabase sampleTrainingDB = mongoClient.getDatabase("sample_training"); 20 MongoCollection<Document> gradesCollection = sampleTrainingDB.getCollection("grades"); 21 22 // delete one document 23 Bson filter = eq("student_id", 10000); 24 DeleteResult result = gradesCollection.deleteOne(filter); 25 System.out.println(result); 26 27 // findOneAndDelete operation 28 filter = eq("student_id", 10002); 29 Document doc = gradesCollection.findOneAndDelete(filter); 30 System.out.println(doc.toJson(JsonWriterSettings.builder().indent(true).build())); 31 32 // delete many documents 33 filter = gte("student_id", 10000); 34 result = gradesCollection.deleteMany(filter); 35 System.out.println(result); 36 37 // delete the entire collection and its metadata (indexes, chunk metadata, etc). 38 gradesCollection.drop(); 39 } 40 } 41 }
#Wrapping Up
With this blog post we have now covered all the CRUD operations. You can find the links to the other blog posts of this series just below.
If you want to learn more and deepen your knowledge faster, I recommend you check out the M220J: MongoDB for Java Developers training available for free on MongoDB University.
More from this series