End-to-end tests are the cherry on top of a delicious ice cream sundae of automated tests. Just like many people find cherries to be disgusting (rightly so—cherries are gross!), many developers are not thrilled to write end-to-end tests. These tests can be time consuming to write and difficult to maintain. However, these tests can provide development teams with confidence that the entire application is functioning as expected.

Today I'll discuss how to write end-to-end tests for apps built using MongoDB Realm.
This is the third post in the DevOps + MongoDB Realm Serverless Functions = 😍 blog series. I began the series by introducing the Social Stats app, a serverless app I built using MongoDB Realm. I've explained how I wrote unit tests and integration tests for the app. If you haven't read the first post where I explained what the app does and how I architected it, I recommend you start there and then return to this post.
Prefer to learn by video? Many of the concepts I cover in this series are available in this video.
#Writing End-to-End Tests for MongoDB Realm Serverless Apps
Today I'll focus on the top layer of the testing pyramid: end-to-end tests. End-to-end tests work through a complete scenario a user would take while using the app. These tests typically interact with the user interface (UI), clicking buttons and inputting text just as a user would. End-to-end tests ultimately check that the various components and systems that make up the app are configured and working together correctly.
Because end-to-end tests interact with the UI, they tend to be very brittle; they break easily as the UI changes. These tests can also be challenging to write. As a result, developers typically write very few of these tests.
Despite their brittle nature, having end-to-end tests is still important. These tests give development teams confidence that the app is functioning as expected.
#Sidenote
I want to pause and acknowledge something before the Internet trolls start sending me snarky DMs.

This section is titled writing end-to-end tests for MongoDB Realm serverless apps. To be clear, none of the approaches I'm sharing in this post about writing end-to-end tests are specific to MongoDB Realm serverless apps. When you write end-to-end tests that interact with the UI, the underlying architecture is irrelevant. I know this. Please keep your angry Tweets to yourself.
I decided to write this post, because writing about only two-thirds of the testing pyramid just seemed wrong. Now let's continue.
#Example End-to-End Test
Let's walk through how I wrote an end-to-test for the Social Stats app. I began with the simplest flow:
- A user navigates to the page where they can upload their Twitter statistics.
- The user uploads a Twitter statistics spreadsheet that has stats for a single Tweet.
- The user navigates to the dashboard so they can see their statistics.
I decided to build my end-to-end tests using Jest and Selenium. Using Jest was a straightforward decision as I had already built my unit and integration tests using it. Selenium has been a popular choice for automating browser interactions for many years. I've used it successfully in the past, so using it again was an easy choice.
I created a new file named uploadTweetStats.test.js. Then I started writing the typical top-of-the-file code.
I began by importing several constants. I imported the MongoClient so that I would be able to interact directly with my database, I imported several constants I would need in order to use Selenium, and I imported the names of the database and collection I would be testing later.
1 const { MongoClient } = require('mongodb'); 2 3 const { Builder, By, until, Capabilities } = require('selenium-webdriver'); 4 5 const { TwitterStatsDb, statsCollection } = require('../constants.js');
Then I declared some variables.
1 let collection; 2 let mongoClient; 3 let driver;
Next, I created constants for common XPaths I would need to reference throughout my tests. XPath is a query language you can use to select nodes in HTML documents. Selenium provides a variety of ways—including XPaths—for you to select elements in your web app. The constants below are the XPaths for the nodes with the text "Total Engagements" and "Total Impressions."
1 const totalEngagementsXpath = "//*[text()='Total Engagements']"; 2 const totalImpressionsXpath = "//*[text()='Total Impressions']";
Now that I had all of my top-of-the-file code written, I was ready to start setting up my testing structure. I began by implementing the beforeAll() function, which Jest runs once before any of the tests in the file are run.
Browser-based tests can run a bit slower than other automated tests, so I increased the timeout for each test to 30 seconds.
Then, just as I did with the integration tests, I connected directly to the test database.
1 beforeAll(async () => { 2 jest.setTimeout(30000); 3 4 // Connect directly to the database 5 const uri = `mongodb+srv://${process.env.DB_USERNAME}:${process.env.DB_PASSWORD}@${process.env.CLUSTER_URI}/test?retryWrites=true&w=majority`; 6 mongoClient = new MongoClient(uri); 7 await mongoClient.connect(); 8 collection = mongoClient.db(TwitterStatsDb).collection(statsCollection); 9 });
Next, I implemented the beforeEach() function, which Jest runs before each test in the file.
I wanted to ensure that the collection the tests will be interacting with is empty before each test, so I added a call to delete everything in the collection.
Next, I configured the browser the tests will use. I chose to use headless Chrome, meaning that a browser UI will not actually be displayed. Headless browsers provide many benefits including increased performance. Selenium supports a variety of browsers, so you can choose to use whatever browser combinations you'd like.
I used the configurations for Chrome when I created a new WebDriver stored in driver. The driver is what will control the browser session.
1 beforeEach(async () => { 2 // Clear the database 3 const result = await collection.deleteMany({}); 4 5 // Create a new driver using headless Chrome 6 let chromeCapabilities = Capabilities.chrome(); 7 var chromeOptions = { 8 'args': ['--headless', 'window-size=1920,1080'] 9 }; 10 chromeCapabilities.set('chromeOptions', chromeOptions); 11 driver = new Builder() 12 .forBrowser('chrome') 13 .usingServer('http://localhost:4444/wd/hub') 14 .withCapabilities(chromeCapabilities) 15 .build(); 16 });
I wanted to ensure the browser session was closed after each test, so I added a call to do so in afterEach().
1 afterEach(async () => { 2 driver.close(); 3 })
Lastly, I wanted to ensure that the database connection was closed after all of the tests finished running, so I added a call to do so in afterAll().
1 afterAll(async () => { 2 await mongoClient.close(); 3 })
Now that I had all of my test structure code written, I was ready to begin writing the code to interact with elements in my browser. I quickly discovered that I would need to repeat a few actions in multiple tests, so I wrote functions specifically for those.
- refreshChartsDashboard(): This function clicks the appropriate buttons to manually refresh the data in the dashboard.
- moveToCanvasOfElement(elementXpath): This function moves the mouse to the chart canvas associated with the node identified by
elementXpath. This function will come in handy for verifying elements in charts. - verifyChartText(elementXpath, chartText): This function verifies that when you move the mouse to the chart canvas associated with the node identified by
elementXpath, thechartTextis displayed in the tooltip.
Finally, I was ready to write my first test case that tests uploading a CSV file with Twitter statistics for a single Tweet.
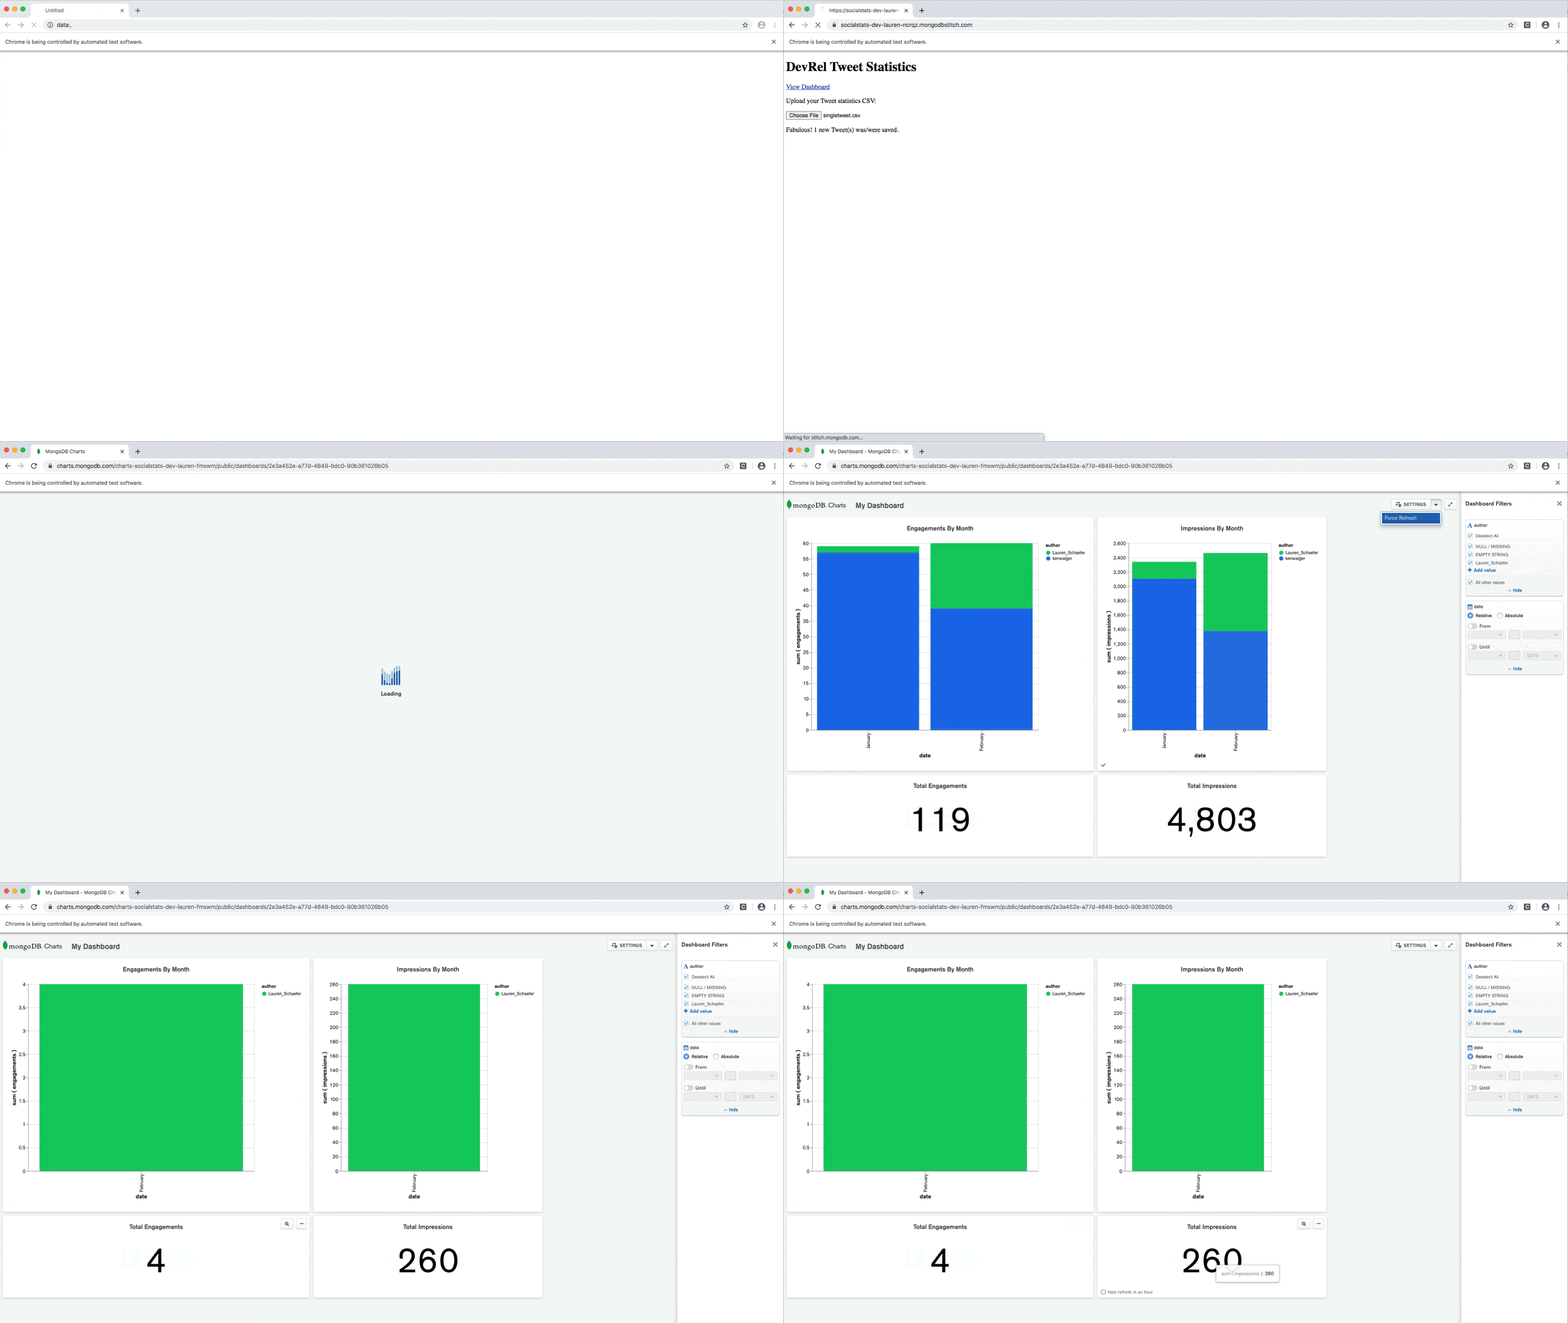
1 test('Single tweet', async () => { 2 await driver.get(`${process.env.URL}`); 3 const button = await driver.findElement(By.id('csvUpload')); 4 await button.sendKeys(process.cwd() + "/tests/ui/files/singletweet.csv"); 5 6 const results = await driver.findElement(By.id('results')); 7 await driver.wait(until.elementTextIs(results, `Fabulous! 1 new Tweet(s) was/were saved.`), 10000); 8 9 const dashboardLink = await driver.findElement(By.id('dashboard-link')); 10 dashboardLink.click(); 11 12 await refreshChartsDashboard(); 13 14 await verifyChartText(totalEngagementsXpath, "4"); 15 await verifyChartText(totalImpressionsXpath, "260"); 16 })
Let's walk through what this test is doing.

Single tweet test when run in ChromeThe test begins by navigating to the URL for the application I'm using for testing.
Then the test clicks the button that allows users to browse for a file to upload. The test selects a file and chooses to upload it.
The test asserts that the page displays a message indicating that the upload was successful.
Then the test clicks the link to open the dashboard. In case the charts in the dashboard have stale data, the test clicks the buttons to manually force the data to be refreshed.
Finally, the test verifies that the correct number of engagements and impressions are displayed in the charts.
After I finished this test, I wrote another end-to-end test. This test verifies that uploading CSV files that update the statistics on existing Tweets as well as uploading CSV files for multiple authors all work as expected.
You can find the full test file with both end-to-end tests in storeCsvInDB.test.js.
#Wrapping Up
You now know the basics of how to write automated tests for Realm serverless apps.
The Social Stats application source code and associated test files are available in a GitHub repo: https://github.com/mongodb-developer/SocialStats. The repo's readme has detailed instructions on how to execute the test files.
While writing and maintaining end-to-end tests can sometimes be painful, they are an important piece of the testing pyramid. Combined with the other automated tests, end-to-end tests give the development team confidence that the app is ready to be deployed.
Now that you have a strong foundation of automated tests, you're ready to dive into automated deployments. Be on the lookout for the next post in this series where I'll explain how to craft a CI/CD pipeline for Realm serverless apps.
#Related Links
Check out the following resources for more information:
More from this series


