
Welcome (or welcome back!) to the SQL to MongoDB series. In the first post in this series, I mapped terms and concepts from SQL to MongoDB.
I also introduced you to Ron. Let's take a moment and return to Ron. Ron is pretty set in his ways. For example, he loves his typewriter. It doesn't matter that computers are a bajillion times more powerful than typewriters. Until someone convinces him otherwise, he's sticking with his typewriter.

Maybe you don't have a love for typewriters. But perhaps you have a love for SQL databases. You've been using them for years, you've learned how to make them work well enough for you, and you know that learning MongoDB will require you to change your mindset. Is it really worth the effort?
Yes!
In this post, we'll examine the top four reasons why you should use MongoDB:
#Scale Cheaper
You can scale cheaper with MongoDB. Why?
Let's begin by talking about scaling SQL databases. Typically, SQL databases scale vertically-when a database becomes too big for its server, it is migrated to a larger server.

A few key problems arise with vertical scaling:
- Large servers tend to be more expensive than two smaller servers with the same total capacity.
- Large servers may not be available due to cost limitations, cloud provider limitations, or technology limitations (a server the size you need may not exist).
- Migrating to a larger server may require application downtime.
When you use MongoDB, you have the flexibility to scale horizontally through sharding. Sharding is a method for distributing data across multiple servers. When your database exceeds the capacity of its current server, you can begin sharding and split it over two servers. As your database continues to grow, you can continue to add more servers. The advantage is that these new servers don't need to be big, expensive machines-they can be cheaper, commodity hardware. Plus, no downtime is required.

#Query Faster
Your queries will typically be faster with MongoDB. Let's examine why.
Even in our simple example in the previous post where we modeled Leslie's data in SQL, we saw that her information was spread across three tables. Whenever we want to query for Leslie's information, we'll need to join three tables together.
In these three small tables, the join will be very fast. However, as the tables grow and our queries become more complex, joining tables together becomes very expensive.
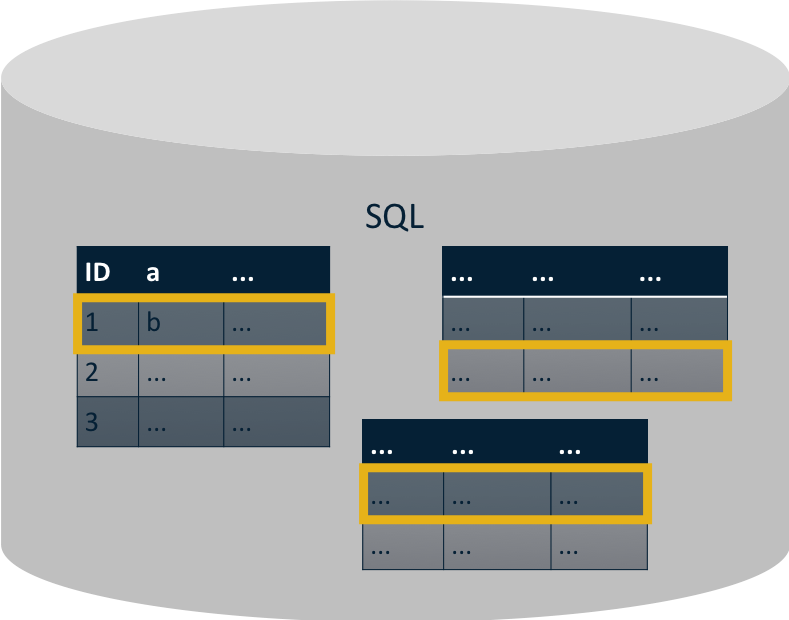
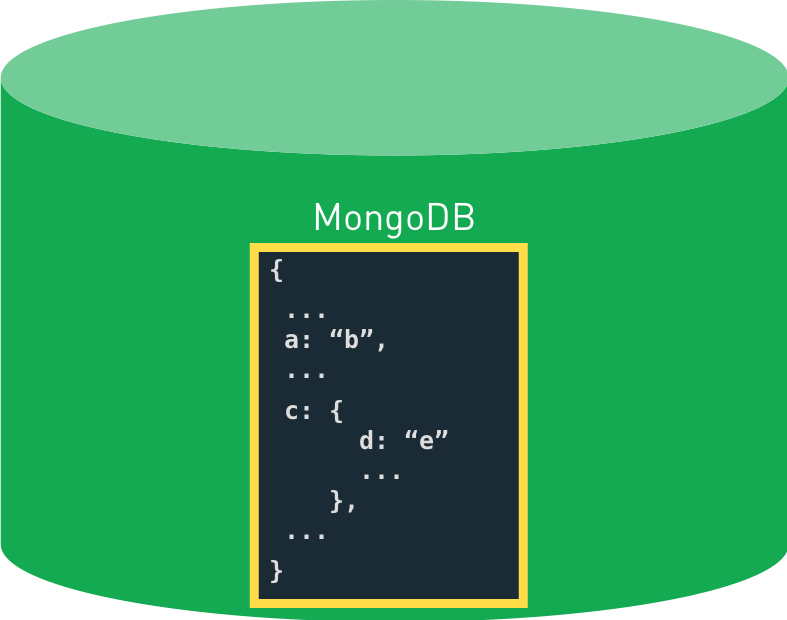
Recall our rule of thumb when modeling data in MongoDB: data that is accessed together should be stored together. When you follow this rule of thumb, most queries will not require you to join any data together.
Continuing with our earlier example, if we want to retrieve Leslie's
information from MongoDB, we can simply query for a single document in
the Users collection. As a result, our query will be very fast.
As our documents and collections grow larger, we don't have to worry about our queries slowing down as long as we are using indexes and continue following our rule of thumb: data that is accessed together should be stored together.
#Pivot Easier
Requirements change. Sometimes the changes are simple and require only a few tweaks to the user interface. But sometimes changes go all the way down to the database.
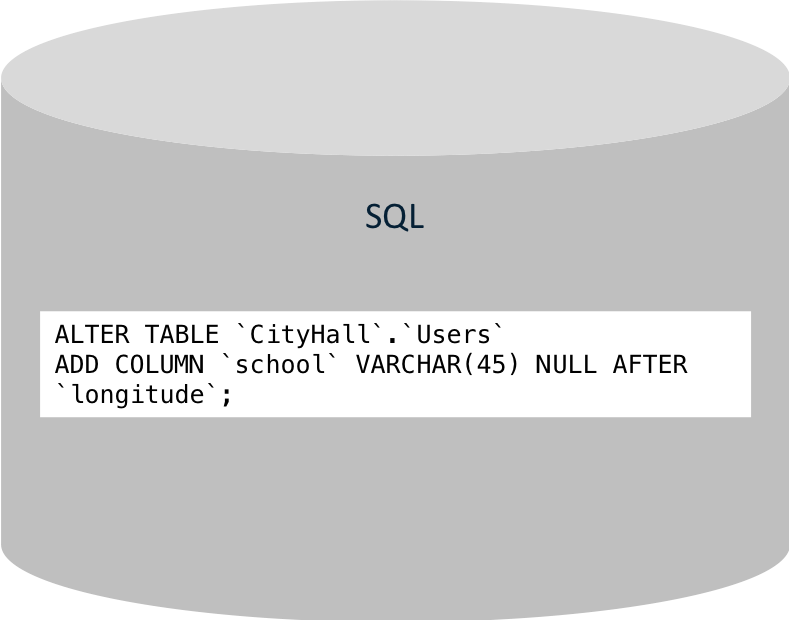
In the previous post in this series, we discovered—after implementing our application—that we needed to store information about Lauren's school. Let's take a look at this example a little more closely.
To add a new school column in our SQL database, we're going to have
to alter the Users table. Executing the Alter Table command
could take a couple of hours depending on how much data is in the table.
The performance of our application could be decreased while the table is
being altered, and we may need to schedule downtime for our application.
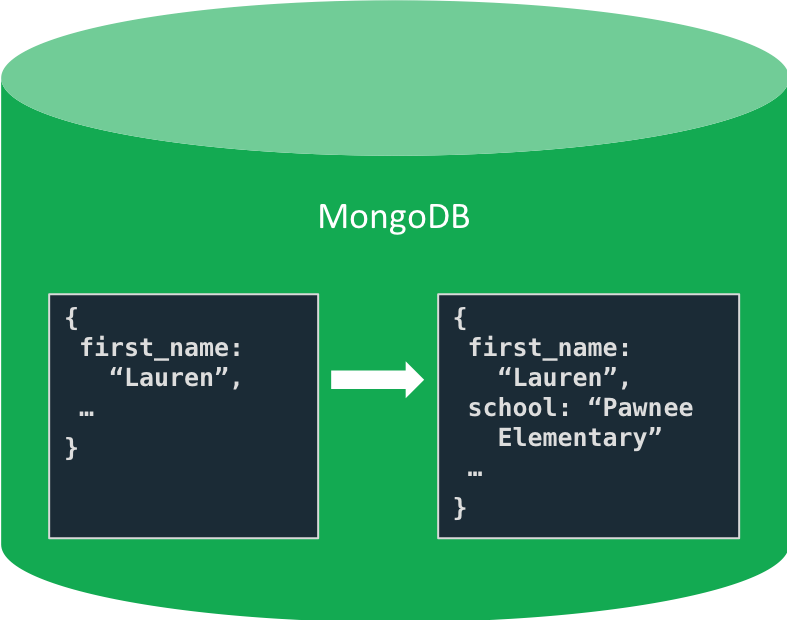
Now let's examine how we can do something similar in MongoDB. When our
requirements change and we need to begin storing the name of a user's
school in a User document, we can simply begin doing so. We can
choose if and when to update existing documents in the collection.
If we had implemented schema validation, we would have the option of applying the validation to all inserts and updates or only to inserts and updates to documents that already meet the schema requirements. We would also have the choice of throwing an error or a warning if a validation rule is violated.
With MongoDB, you can easily change the shape of your data as your app evolves.
#Program Faster
To be honest with you, this advantage is one of the biggest surprises to me. I figured that it didn't matter what you used as your backend database—the code that interacts with it would be basically the same. I was wrong.

MongoDB documents map to data structures in most popular programming languages. This sounds like such a simple thing, but it makes a humongous difference when you're writing code.
A friend encouraged me to test this out, so I did. I implemented the code to retrieve and update user profile information. My code has some simplifications in it to enable me to focus on the interactions with the database rather than the user interface. I also limited the user profile information to just contact information and hobbies.
Below is a comparison of my implementation using MySQL and MongoDB.
I wrote the code in Python, but, don't worry if you're not familiar with Python, I'll walk you through it step by step. The concepts will be applicable no matter what your programming language of choice is.
#Connect to the Databases
Let's begin with the typical top-of-the-file stuff. We'll import what we need, connect to the database, and declare our variables. I'm going to simplify things by hardcoding the User ID of the user whose profile we will be retrieving rather than pulling it dynamically from the frontend code.
MySQL
1 import mysql.connector 2 3 # CONNECT TO THE DB 4 mydb = mysql.connector.connect( 5 host="localhost", 6 user="root", 7 passwd="rootroot", 8 database="CityHall" 9 ) 10 mycursor = mydb.cursor(dictionary=True) 11 12 # THE ID OF THE USER WHOSE PROFILE WE WILL BE RETRIEVING AND UPDATING 13 userId = 1
We'll pass the dictionary=True option when we create the cursor so that each row will be returned as a dictionary.
MongoDB
1 import pymongo 2 from pymongo import MongoClient 3 4 # CONNECT TO THE DB 5 client = MongoClient() 6 client = pymongo.MongoClient("mongodb+srv://root:rootroot@mycluster.mongodb.net/test?retryWrites=true&w=majority") 7 db = client.CityHall 8 9 # THE ID OF THE USER WHOSE PROFILE WE WILL BE RETRIEVING AND UPDATING 10 userId = 1
So far, the code is pretty much the same.
#Get the User's Profile Information
Now that we have our database connections ready, let's use them to retrieve our user profile information. We'll store the profile information in a Python Dictionary. Dictionaries are a common data structure in Python and provide an easy way to work with your data.
Let's begin by implementing the code for MySQL.
Since the user profile information is spread across the Users table
and the Hobbies table, we'll need to join them in our query. We can
use prepared
statements to
ensure our data stays safe.
MySQL
1 sql = "SELECT * FROM Users LEFT JOIN Hobbies ON Users.ID = Hobbies.user_id WHERE Users.id=%s" 2 values = (userId,) 3 my cursor.execute(sql, values) 4 user = mycursor.fetchone()
When we execute the query, a
result is returned for every user/hobby combination. When we call fetchone(), we get a dictionary
like the following
1 {u'city': u'Pawnee', u'first_name': u'Leslie', u'last_name': u'Yepp', u'user_id': 1, u'school': None, u'longitude': -86.5366, u'cell': u'8125552344', u'latitude': 39.1703, u'hobby': u'scrapbooking', u'ID': 10}
Because we joined the Users and the Hobbies tables, we have a
result for each hobby this user has. To retrieve all of the hobbies, we
need to iterate the cursor. We'll append each hobby to a new hobbies
array and then add the hobbies array to our user dictionary.
MySQL
1 hobbies = [] 2 if (user["hobby"]): 3 hobbies.append(user["hobby"]) 4 del user["hobby"] 5 del user["ID"] 6 for result in mycursor: 7 hobbies.append(result["hobby"]) 8 user["hobbies"] = hobbies
Now let's implement that same functionality for MongoDB.
Since we stored all of the user profile information in the User
document, we don't need to do any joins. We can simply retrieve a single
document in our collection.
Here is where the big advantage that MongoDB documents map to data structures in most popular programming languages comes in. I don't have to do any work to get my data into an easy-to-work-with Python Dictionary. MongoDB gives me all of the results in a Python Dictionary automatically.
MongoDB
1 user = db['Users'].find_one({"_id": userId})
And that's it—we're done. What took us 12 lines for MySQL, we were able to implement in 1 line for MongoDB.
Our user dictionaries are now pretty similar in both pieces of code.
MySQL
1 { 2 'city': 'Pawnee', 3 'first_name': 'Leslie', 4 'last_name': 'Yepp', 5 'school': None, 6 'cell': '8125552344', 7 'latitude': 39.1703, 8 'longitude': -86.5366,3 9 'hobbies': ['scrapbooking', 'eating waffles', 'working'], 10 'user_id': 1 11 }
MongoDB
1 { 2 'city': 'Pawnee', 3 'first_name': 'Leslie', 4 'last_name': 'Yepp', 5 'cell': '8125552344', 6 'location': [-86.536632, 39.170344], 7 'hobbies': ['scrapbooking', 'eating waffles', 'working'], 8 '_id': 1 9 }
Now that we have retrieved the user's profile information, we'd likely send that information up the stack to the frontend UI code.
#Update the User's Profile Information
When Leslie views her profile information in our application, she may discover she needs to update her profile information. The frontend UI code would send that updated information in a Python dictionary to the Python files we've been writing.
To simulate Leslie updating her profile information, we'll manually update the Python dictionary ourselves for both MySQL and MongoDB.
MySQL:
1 user.update( { 2 "city": "Washington, DC", 3 "latitude": 38.897760, 4 "longitude": -77.036809, 5 "hobbies": ["scrapbooking", "eating waffles", "signing bills"] 6 } )
MongoDB:
1 user.update( { 2 "city": "Washington, DC", 3 "location": [-77.036809, 38.897760], 4 "hobbies": ["scrapbooking", "eating waffles", "signing bills"] 5 } )
Now that our user dictionary is updated, let's push the updated
information to our databases.
Let's begin with MySQL. First, we need to update the information that is
stored in the Users table.
MySQL
1 sql = "UPDATE Users SET first_name=%s, last_name=%s, cell=%s, city=%s, latitude=%s, longitude=%s, school=%s WHERE (ID=%s)" 2 values = (user["first_name"], user["last_name"], user["cell"], user["city"], user["latitude"], user["longitude"], user["school"], userId) 3 mycursor.execute(sql, values) 4 mydb.commit()
Second, we need to update our hobbies. For simplicity, we'll delete any
existing hobbies in the Hobbies table for this user and then we'll
insert the new hobbies into the Hobbies table.
MySQL
1 sql = "DELETE FROM Hobbies WHERE user_id=%s" 2 values = (userId,) 3 mycursor.execute(sql, values) 4 mydb.commit() 5 6 if(len(user["hobbies"]) > 0): 7 sql = "INSERT INTO Hobbies (user_id, hobby) VALUES (%s, %s)" 8 values = [] 9 for hobby in user["hobbies"]: 10 values.append((userId, hobby)) 11 mycursor.executemany(sql,values) 12 mydb.commit()
Now let's update the user profile information in MongoDB. Since the
user's profile information is stored in a single document, we only have
to do a single update. Once again we will benefit from MongoDB documents
mapping to data structures in most popular programming languages. We can
send our user Python dictionary when we call update_one(), which
significantly simplifies our code.
MongoDB
1 result = db['Users'].update_one({"_id": userId}, {"$set": user})
What took us 15 lines for MySQL, we were able to implement in 1 line for MongoDB.
#Summary of Programming Faster
In this example, we wrote 27 lines of code to interact with our data in MySQL and 2 lines of code to interact with our data in MongoDB. While fewer lines of code is not always indicative of better code, in this case, we can probably agree that fewer lines of code will likely lead to easier maintenance and fewer bugs.
The examples above were relatively simple with small queries. Imagine how much bigger the difference would be for larger, more complex queries.
MongoDB documents mapping to data structures in most popular programming languages can be a huge advantage in terms of time to write, debug, and maintain code.
The code above was written in Python and leveraged the Python MongoDB Driver. For a complete list of all of the programming languages that have MongoDB drivers, visit the MongoDB Manual.
If you'd like to grab a copy of the code in the examples above, visit my GitHub repo.
#Wrap Up
In this post, we discussed the top four reasons why you should use MongoDB:
Be on the lookout for the final post in this series where I'll discuss the top three things you need to know as you move from SQL to MongoDB.
More from this series