
I'm relatively new to building iOS apps (a little over a year's experience), and so I prefer using the latest technologies that make me a more productive developer. That means my preferred app stack looks like this:
Technologies Used by the App
| In 🔥 | Out ❄️ |
|---|---|
| Swift | Objective C |
| SwiftUI | UIKit |
| Combine | RxSwift |
| Realm | Core Data |
| MongoDB Realm Sync (where needed) | Home-baked cross-platform data sync |
This article presents a simple task management app that I built on that stack. To continue my theme on being productive (lazy), I've borrowed heavily (stolen) from MongoDB's official iOS Swift tutorial:
- I've refactored the original front end, adding Combine for event management, and replacing the UIKit ViewControllers with Swift views.
- The back end Realm app is entirely unchanged. Note that once you've stood up this back end, then this app can share its data with the equivalent Android, React/JavaScript, and Node.js apps with no changes.
I'm going to focus here on the iOS app. Check the official tutorial if you want to understand how the back end works.
You can download all of the code for the front end app from the GitHub repo.
#Prerequisites
I'm lucky that I don't have to support an existing customer base that's running on old versions of iOS, and so I can take advantage of the latest language, operating system, and SDK features:
- A Mac (sorry Windows and Linux users)
iOS14+ / XCode 12.2+
- It would be pretty easy to port the app back to iOS13, but iOS14 makes SwiftUI more of a first-class citizen (though there are still times when a more complex app would need to break out into UIKit code—e.g., if you wanted to access the device's camera).
- Apple introduced SwiftUI and Combine in iOS13, and so you'd be better sticking with the original tutorial if you need to support iOS12 or earlier.
- Realm Cocoa 10 adds support for Combine and the ability to "Freeze" Realm Objects, making it simpler and safer to embed them directly within SwiftUI views.
#Running the App for Yourself
I always prefer to build and run an app before being presented with code snippets; these are the steps:
- If you don't already have Xcode 12 installed, install it through the Apple App Store.
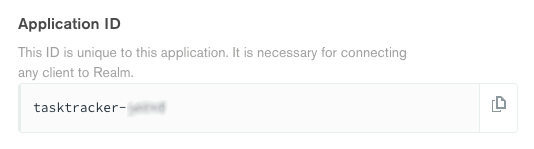
- Set up your back end Realm app. Make a note of the ID:
- Download the iOS app, install dependencies, and open the workspace in Xcode:
1 git clone https://github.com/ClusterDB/task-tracker-swiftui.git 2 cd task-tracker-swiftui 3 pod install --repo-update 4 open task-tracker-swiftui.xcworkspace
- Within Xcode, edit
task-tracker-swiftui/task_tracker_swiftuiApp.swiftand set the Realm application ID to the value you noted in Step 2:
1 let app = App(id: "tasktracker-xxxxx")
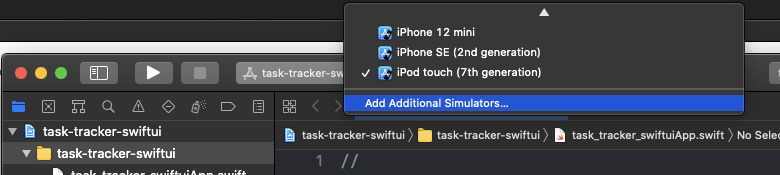
- In Xcode, select an iOS simulator:
- Build and run the app using
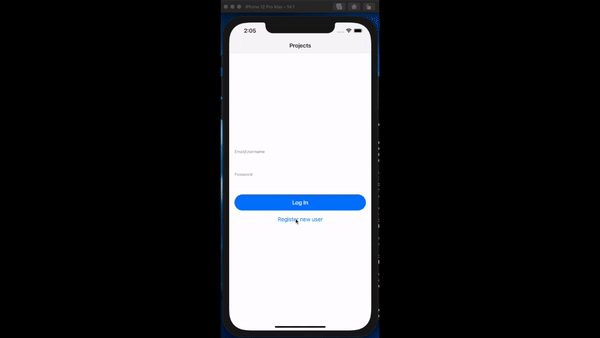
⌘-R. - Go ahead and play with the app:
#Key Pieces of Code
Usually, when people start explaining SwiftUI, they begin with, "You know how you do X with UIKit? With SwiftUI, you do Y instead." But, I'm not going to assume that you're an experienced UIKit developer.
#The Root of a SwiftUI App
If you built and ran the app, you've already seen the "root" of the app in swiftui_realmApp.swift:
1 import SwiftUI 2 import RealmSwift: 3 4 let app = App(id: "tasktracker-xxxxx") // TODO: Set the Realm application ID 5 6 7 struct swiftui_realmApp: SwiftUI.App { 8 @StateObject var state = AppState() 9 10 var body: some Scene { 11 WindowGroup { 12 ContentView() 13 .environmentObject(state) 14 } 15 } 16 }
app is the Realm application that will be used by our iOS app to store and retrieve data stored in Realm.
SwiftUI works with views, typically embedding many views within other views (a recent iOS app I worked on has over 500 views), and you always start with a top-level view for the app—in this case, ContentView.
Individual views contain their own state (e.g., the details of the task that's currently being edited, or whether a pop-up sheet should be displayed), but we store any app-wide state in the state variable. @ObservedObject is a SwiftUI annotation to indicate that a view should be refreshed whenever particular attributes within an object change. We pass state to ContentView as an environmentOject so that any of the app's views can access it.
#Application-Wide State Management
Like other declarative, state-driven frameworks (e.g., React or Vue.js), components/views can pass state up and down the hierarchy. However, it can simplify state management by making some state available application-wide. In this app, we centralize this app-wide state data storage and control in an instance of the AppState class:
1 class AppState: ObservableObject { 2 var loginPublisher = PassthroughSubject<RealmSwift.User, Error>() 3 var logoutPublisher = PassthroughSubject<Void, Error>() 4 let userRealmPublisher = PassthroughSubject<Realm, Error>() 5 var cancellables = Set<AnyCancellable>() 6 7 @Published var shouldIndicateActivity = false 8 @Published var error: String? 9 10 var user: User? 11 }
We use shouldIndicateActivity to control whether a "working on it" view should be displayed while the app is busy. error is set whenever we want to display an error message. Both of these variables are annotated with @Published to indicate that referencing views should be refreshed when their values change.
user represents the Realm user that's currently logged into the app.
The app uses the Realm SDK to interact with the back end Realm application to perform actions such as logging into Realm. Those operations can take some time as they involve accessing resources over the internet, and so we don't want the app to sit busy-waiting for a response. Instead, we use "Combine" publishers and subscribers to handle these events. loginPublisher, logoutPublisher, and userRealmPublisher are publishers to handle logging in, logging out, and opening a Realm for a user.
As an example, when an event is sent to loginPublisher to indicate that the login process has completed, Combine will run this pipeline:
1 init() { 2 loginPublisher 3 .receive(on: DispatchQueue.main) 4 .flatMap { user -> RealmPublishers.AsyncOpenPublisher in 5 self.shouldIndicateActivity = true 6 var realmConfig = user.configuration(partitionValue: "user=\(user.id)") 7 realmConfig.objectTypes = [User.self, Project.self] 8 return Realm.asyncOpen(configuration: realmConfig) 9 } 10 .receive(on: DispatchQueue.main) 11 .map { 12 self.shouldIndicateActivity = false 13 return $0 14 } 15 .subscribe(userRealmPublisher) 16 .store(in: &self.cancellables) 17 }
The pipeline receives the freshly-logged-in Realm user.
The receive(on: DispatchQueue.main) stage specifies that the next stage in the pipeline should run in the main thread (because it will update the UI).
The Realm user is passed to the flatMap stage which:
- Updates the UI to show that the app is busy.
- Opens a Realm for this user (requesting Objects where the partition matches the string
"user=\(user.id"). - Passes a publisher for the opening of the Realm to the next stage.
The .subscribe stage subscribes the userRealmPublisher to outputs from the publisher it receives from the previous stage. In that way, a pipeline associated with the userRealmPublisher publisher can react to an event indicating when the Realm has been opened.
The .store stage stores the publisher in the cancellables array so that it isn't removed when the init() function completes.
#The Object Model
You'll find the Realm object model in the Model group in the Xcode workspace. These are the objects used in the iOS app and synced to MongoDB Atlas in the back end.
The User class represents application users. It inherits from Object which is a class in the Realm SDK and allows instances of the class to be stored in Realm:
1 import RealmSwift 2 3 class User: Object { 4 dynamic var _id: String = UUID().uuidString 5 dynamic var _partition: String = "" 6 dynamic var name: String = "" 7 let memberOf = RealmSwift.List<Project>() 8 9 override static func primaryKey() -> String? { 10 return "_id" 11 } 12 }
Note that instances of classes that inherit from Object can be used as @ObservedObjects without inheriting from ObservableObject or annotating attributes with @Public.
Summary of the attributes:
_iduniquely identifies aUserobject. We set it to be the Realm primary key._partitionis used as the partition key, which can be used by the app to filter whichUserObjectsit wants to access.nameis the username (email address).membersOfis a Realm List of projects that the user can access. (It always contains its own project, but it may also include other users' projects if those users have added this user to their teams.)
The elements in memberOf are instances of the Project class. Project inherits from EmbeddedObject which means that instances of Project can be embedded within other Realm Objects:
1 import RealmSwift 2 3 class Project: EmbeddedObject { 4 dynamic var name: String? 5 dynamic var partition: String? 6 convenience init(partition: String, name: String) { 7 self.init() 8 self.partition = partition 9 self.name = name 10 } 11 }
Summary of the attributes:
nameis the project's name.partitionis a string taking the form"project=project-name"whereproject-nameis the_idof the project's owner.
Individual tasks are represented by the Task class:
1 import RealmSwift 2 3 enum TaskStatus: String { 4 case Open 5 case InProgress 6 case Complete 7 } 8 9 class Task: Object { 10 dynamic var _id: ObjectId = ObjectId.generate() 11 dynamic var _partition: String = "" 12 dynamic var name: String = "" 13 dynamic var owner: String? 14 dynamic var status: String = "" 15 override static func primaryKey() -> String? { 16 return "_id" 17 } 18 19 var statusEnum: TaskStatus { 20 get { 21 return TaskStatus(rawValue: status) ?? .Open 22 } 23 set { 24 status = newValue.rawValue 25 } 26 } 27 28 convenience init(partition: String, name: String) { 29 self.init() 30 self._partition = partition 31 self.name = name 32 } 33 }
Summary of the attributes:
_iduniquely identifies aTaskobject. We set it to be the Realm primary key._partitionis used as the partition key, which can be used by the app to filter whichTaskObjectsit wants to access. It takes the form"project=project-id".nameis the task's title.statustakes on the value "Open", "InProgress", or "Complete".
#User Authentication
We want app users to only be able to access the tasks from their own project (or the projects of other users who have added them to their team). Our users need to see their tasks when they restart the app or run it on a different device. Realm's username/password authentication is a simple way to enable this.
Recall that our top-level SwiftUI view is ContentView (task-tracker-swiftui/Views/ContentView.swift). ContentView selects whether to show the LoginView or ProjectsView view based on whether a user is already logged into Realm:
1 struct ContentView: View { 2 @EnvironmentObject var state: AppState 3 4 var body: some View { 5 NavigationView { 6 ZStack { 7 VStack { 8 if state.loggedIn && state.user != nil { 9 if state.user != nil { 10 ProjectsView() 11 } 12 } else { 13 LoginView() 14 } 15 Spacer() 16 if let error = state.error { 17 Text("Error: \(error)") 18 .foregroundColor(Color.red) 19 } 20 } 21 if state.shouldIndicateActivity { 22 ProgressView("Working With Realm") 23 } 24 } 25 .navigationBarItems(leading: state.loggedIn ? LogoutButton() : nil) 26 } 27 } 28 }
Note that ContentView also renders the state.error message and the ProgressView views. These will kick in whenever a sub-view updates state.
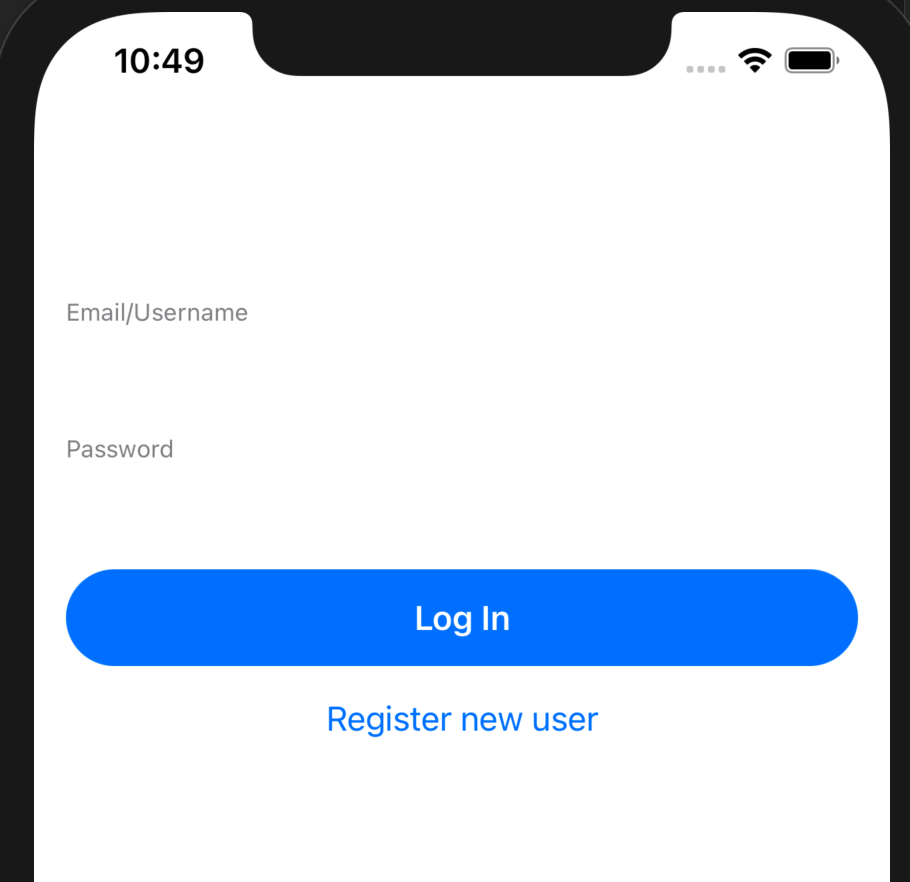
LoginView (task-tracker-swiftui/Views/User Accounts/LoginView.swift) presents a simple form for existing app users to log in:
When the user taps "Log In", the login function is executed:
1 private func login(username: String, password: String) { 2 if username.isEmpty || password.isEmpty { 3 return 4 } 5 self.state.error = nil 6 state.shouldIndicateActivity = true 7 app.login(credentials: .emailPassword(email: username, password: password)) 8 .receive(on: DispatchQueue.main) 9 .sink(receiveCompletion: { 10 state.shouldIndicateActivity = false 11 switch $0 { 12 case .finished: 13 break 14 case .failure(let error): 15 self.state.error = error.localizedDescription 16 } 17 }, receiveValue: { 18 self.state.error = nil 19 state.loginPublisher.send($0) 20 }) 21 .store(in: &state.cancellables) 22 }
login calls app.login (app is the Realm app that we create when the app starts) which returns a Combine publisher. The results from the publisher are passed to a Combine pipeline which updates the UI and sends the resulting Realm user to loginPublisher, which can then complete the process.
If it's a first-time user, then they tap "Register new user" to be taken to SignupView which registers a new user with Realm (app.emailPasswordAuth.registerUser) before popping back to loginView (self.presentationMode.wrappedValue.dismiss()):
1 private func signup(username: String, password: String) { 2 if username.isEmpty || password.isEmpty { 3 return 4 } 5 self.state.error = nil 6 state.shouldIndicateActivity = true 7 app.emailPasswordAuth.registerUser(email: username, password: password) 8 .receive(on: DispatchQueue.main) 9 .sink(receiveCompletion: { 10 state.shouldIndicateActivity = false 11 switch $0 { 12 case .finished: 13 break 14 case .failure(let error): 15 self.state.error = error.localizedDescription 16 } 17 }, receiveValue: { 18 self.state.error = nil 19 self.presentationMode.wrappedValue.dismiss() 20 }) 21 .store(in: &state.cancellables) 22 }
To complete the user lifecycle, LogoutButton logs them out from Realm and then sends an event to logoutPublisher:
1 struct LogoutButton: View { 2 @EnvironmentObject var state: AppState 3 var body: some View { 4 Button("Log Out") { 5 state.shouldIndicateActivity = true 6 app.currentUser?.logOut() 7 .receive(on: DispatchQueue.main) 8 .sink(receiveCompletion: { _ in 9 }, receiveValue: { 10 state.shouldIndicateActivity = false 11 state.logoutPublisher.send($0) 12 }) 13 .store(in: &state.cancellables) 14 } 15 .disabled(state.shouldIndicateActivity) 16 } 17 }
#Projects View
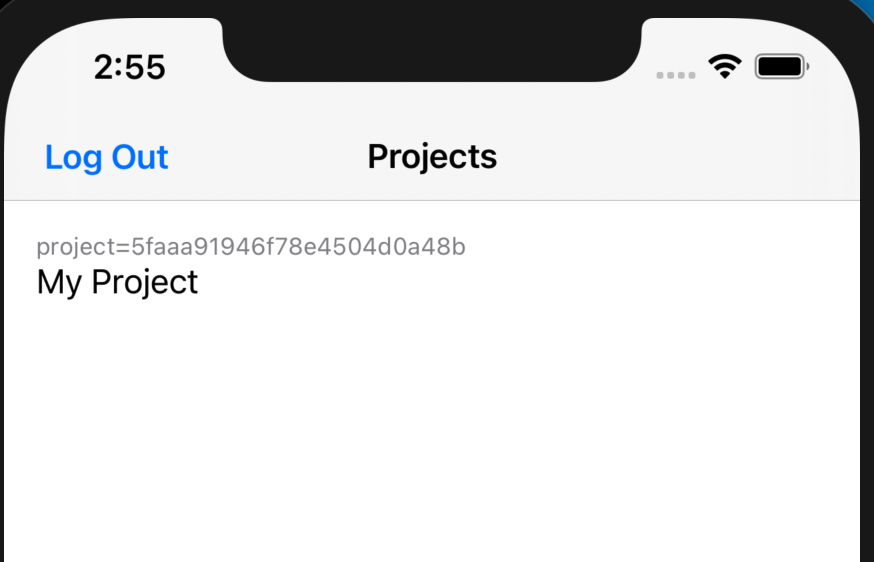
After logging in, the user is shown ProjectsView (task-tracker-swiftui/Views/Projects & Tasks/ProjectsView.swift) which displays a list of projects that they're a member of:
1 var body: some View { 2 VStack(spacing: Dimensions.padding) { 3 if let projects = state.user?.memberOf { 4 ForEach(projects, id: \.self) { project in 5 HStack { 6 LabeledButton(label: project.partition ?? "No partition", 7 text: project.name ?? "No project name") { 8 showTasks(project) 9 } 10 } 11 } 12 } 13 Spacer() 14 if let tasksRealm = tasksRealm { 15 NavigationLink( destination: TasksView(realm: tasksRealm, projectName: projectName), 16 isActive: $showingTasks) { 17 EmptyView() } 18 } 19 } 20 .navigationBarTitle("Projects", displayMode: .inline) 21 .toolbar { 22 ToolbarItem(placement: .bottomBar) { 23 Button(action: { self.showingSheet = true }) { 24 ManageTeamButton() 25 } 26 } 27 } 28 .sheet(isPresented: $showingSheet) { TeamsView() } 29 .padding(.all, Dimensions.padding) 30 }
Recall that state.user is assigned the data retrieved from Realm when the pipeline associated with userRealmPublisher processes the event forwarded from the login pipeline:
1 userRealmPublisher 2 .sink(receiveCompletion: { result in 3 if case let .failure(error) = result { 4 self.error = "Failed to log in and open realm: \(error.localizedDescription)" 5 } 6 }, receiveValue: { realm in 7 self.user = realm.objects(User.self).first 8 }) 9 .store(in: &cancellables)
Each project in the list is a button that invokes showTasks(project):
1 func showTasks(_ project: Project) { 2 state.shouldIndicateActivity = true 3 let realmConfig = app.currentUser?.configuration(partitionValue: project.partition ?? "") 4 guard var config = realmConfig else { 5 state.error = "Cannot get Realm config from current user" 6 return 7 } 8 config.objectTypes = [Task.self] 9 Realm.asyncOpen(configuration: config) 10 .receive(on: DispatchQueue.main) 11 .sink(receiveCompletion: { result in 12 state.shouldIndicateActivity = false 13 if case let .failure(error) = result { 14 self.state.error = "Failed to open realm: \(error.localizedDescription)" 15 } 16 }, receiveValue: { realm in 17 self.tasksRealm = realm 18 self.projectName = project.name ?? "" 19 self.showingTasks = true 20 state.shouldIndicateActivity = false 21 }) 22 .store(in: &self.state.cancellables) 23 }
showTasks opens a new Realm and then sets up the variables which are passed to TasksView in body (note that the NavigationLink is automatically followed when showingTasks is set to true):
1 NavigationLink( 2 destination: TasksView(realm: tasksRealm, projectName: projectName), 3 isActive: $showingTasks) { 4 EmptyView() 5 }
#Tasks View

TasksView (task-tracker-swiftui/Views/Projects & Tasks/TasksView.swift) presents a list of the tasks within the selected project:
1 var body: some View { 2 VStack { 3 if let tasks = tasks { 4 List { 5 ForEach(tasks.freeze()) { task in 6 if let tasksRealm = tasks.realm { 7 TaskView(task: (tasksRealm.resolve(ThreadSafeReference(to: task)))!) 8 } 9 } 10 .onDelete(perform: deleteTask) 11 } 12 } else { 13 Text("Loading...") 14 } 15 if let lastUpdate = lastUpdate { 16 LastUpdate(date: lastUpdate) 17 } 18 } 19 .navigationBarTitle("Tasks in \(projectName)", displayMode: .inline) 20 .navigationBarItems(trailing: Button(action: { self.showingSheet = true }) { 21 Image(systemName: "plus.circle.fill") 22 .renderingMode(.original) 23 24 }) 25 .sheet(isPresented: $showingSheet) { AddTaskView(realm: realm) } 26 .onAppear(perform: loadData) 27 .onDisappear(perform: stopWatching) 28 }
Tasks can be removed from the projects by other instances of the application or directly from Atlas in the back end. SwiftUI tends to crash if an item is removed from a list which is bound to the UI, and so we use Realm's "freeze" feature to isolate the UI from those changes:
1 ForEach(tasks.freeze()) { task in ...
However, TaskView can make changes to a task, and so we need to "unfreeze" Task Objects before passing them in:
1 TaskView(task: (tasksRealm.resolve(ThreadSafeReference(to: task)))!)
When the view loads, we must fetch the latest list of tasks in the project. We want to refresh the view in the UI whenever the app observes a change in the list of tasks. The loadData function fetches the initial list, and then observes the Realm and updates the lastUpdate field on any changes (which triggers a view refresh):
1 func loadData() { 2 tasks = realm.objects(Task.self).sorted(byKeyPath: "_id") 3 realmNotificationToken = realm.observe { _, _ in 4 lastUpdate = Date() 5 } 6 }
To conserve resources, we release the refresh token when leaving this view:
1 func stopWatching() { 2 if let token = realmNotificationToken { 3 token.invalidate() 4 } 5 }
We delete a task when the user swipes it to the left:
1 func deleteTask(at offsets: IndexSet) { 2 do { 3 try realm.write { 4 guard let tasks = tasks else { 5 return 6 } 7 realm.delete(tasks[offsets.first!]) 8 } 9 } catch { 10 state.error = "Unable to open Realm write transaction" 11 } 12 }
#Task View

TaskView (task-tracker-swiftui/Views/Projects & Tasks/TaskView.swift) is responsible for rendering a Task Object; optionally adding an image and format based on the task status:
1 var body: some View { 2 Button(action: { self.showingUpdateSheet = true }) { 3 HStack(spacing: Dimensions.padding) { 4 switch task.statusEnum { 5 case .Complete: 6 Text(task.name) 7 .strikethrough() 8 .foregroundColor(.gray) 9 Spacer() 10 Image(systemName: "checkmark.square") 11 .foregroundColor(.gray) 12 case .InProgress: 13 Text(task.name) 14 .fontWeight(.bold) 15 Spacer() 16 Image(systemName: "tornado") 17 case .Open: 18 Text(task.name) 19 Spacer() 20 } 21 } 22 } 23 .sheet(isPresented: $showingUpdateSheet) { 24 UpdateTaskView(task: task) 25 } 26 .padding(.horizontal, Dimensions.padding) 27 }
The task in the UI is a button that exposes UpdateTaskView when tapped. That view doesn't cover any new ground, and so I won't dig into it here.
#Teams View
A user can add others to their team; all team members can view and edit tasks in the user's project. For the logged-in user to add another member to their team, they need to update that user's User Object. This isn't allowed by the Realm Rules in the back end app. Instead, we make use of Realm Functions that have been configured in the back end to make these changes securely.
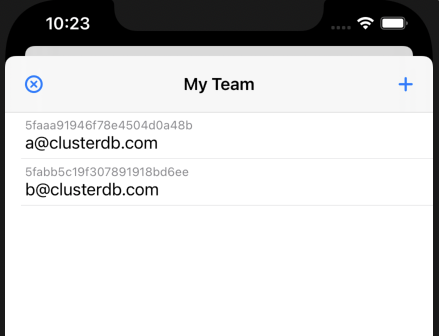
TeamsView (task-tracker-swiftui/Views/Teams/TeamsView.swift) presents a list of all the user's teammates:
1 var body: some View { 2 NavigationView { 3 VStack { 4 List { 5 ForEach(members) { member in 6 LabeledText(label: member.id, text: member.name) 7 } 8 .onDelete(perform: removeTeamMember) 9 } 10 Spacer() 11 } 12 .navigationBarTitle(Text("My Team"), displayMode: .inline) 13 .navigationBarItems( 14 leading: Button( 15 action: { self.presentationMode.wrappedValue.dismiss() }) { Image(systemName: "xmark.circle") }, 16 trailing: Button(action: { self.showingAddTeamMember = true }) { Image(systemName: "plus.circle.fill") 17 .renderingMode(.original) 18 } 19 ) 20 } 21 .sheet(isPresented: $showingAddTeamMember) { 22 // TODO: Not clear why we need to pass in the environmentObject, appears that it may 23 // be a bug – should test again in the future. 24 AddTeamMemberView(refresh: fetchTeamMembers) 25 .environmentObject(state) 26 } 27 .onAppear(perform: fetchTeamMembers) 28 }
We invoke a Realm Function to fetch the list of team members, when this view is opened (.onAppear) through the fetchTeamMembers function:
1 func fetchTeamMembers() { 2 state.shouldIndicateActivity = true 3 let user = app.currentUser! 4 5 user.functions.getMyTeamMembers([]) { (result, error) in 6 DispatchQueue.main.sync { 7 state.shouldIndicateActivity = false 8 guard error == nil else { 9 state.error = "Fetch team members failed: \(error!.localizedDescription)" 10 return 11 } 12 guard let result = result else { 13 state.error = "Result from fetching members is nil" 14 return 15 } 16 self.members = result.arrayValue!.map({ (bson) in 17 return Member(document: bson!.documentValue!) 18 }) 19 } 20 } 21 }
Swiping left removes a team member using another Realm Function:
1 func removeTeamMember(at offsets: IndexSet) { 2 state.shouldIndicateActivity = true 3 let user = app.currentUser! 4 let email = members[offsets.first!].name 5 user.functions.removeTeamMember([AnyBSON(email)]) { (result, error) in 6 DispatchQueue.main.sync { 7 state.shouldIndicateActivity = false 8 if let error = error { 9 self.state.error = "Internal error, failed to remove member: \(error.localizedDescription)" 10 } else if let resultDocument = result?.documentValue { 11 if let resultError = resultDocument["error"]??.stringValue { 12 self.state.error = resultError 13 } else { 14 print("Removed team member") 15 self.fetchTeamMembers() 16 } 17 } else { 18 self.state.error = "Unexpected result returned from server" 19 } 20 } 21 } 22 }
Tapping on the "+" button opens up the AddTeamMemberView sheet/modal, but no new concepts are used there, and so I'll skip it here.
#Summary
Our app relies on the latest features in the Realm-Cocoa SDK (notably Combine and freezing objects) to bind the model directly to our SwiftUI views. You may have noticed that we don't have a view model.
We use Realm's username/password functionality and Realm Sync to ensure that each user can work with all of their tasks from any device.
You've seen how the front end app can delegate work to the back end app using Realm Functions. In this case, it was to securely work around the data access rules for the User object; other use-cases for Realm Functions are:
- Securely access other network services without exposing credentials in the front end app.
- Complex data wrangling using the MongoDB Aggregation Framework.
- We've used Apple's Combine framework to handle asynchronous events, such as performing follow-on actions once the back end confirms that a user has been authenticated and logged in.
This iOS app reuses the back end Realm application from the official MongoDB Realm tutorials. This demonstrates how the same data and back end logic can be shared between apps running on iOS, Android, web, Node.js...
#References
- WildAid O-FISH – an example of a much bigger app built on Realm and MongoDB Realm Sync
If you have questions, please head to our developer community website where the MongoDB engineers and the MongoDB community will help you build your next big idea with MongoDB.