
Hello, everyone. I am Henna. I started mobile application development back in 2017 when I was a lucky recipient of the Udacity Scholarship. :)
I had always used SQLite when it came to using databases in my mobile apps. Using SQLite was definitely a lot of boilerplate code, but using it with the Room library did make it easier.
I had heard about Realm before but I got so comfortable using Room with SQLite that I never thought of exploring the option.
At the time, I was not aware that Realm had multiple offerings, from being used as a local database on mobile to also offering Sync features to be able to sync your app data to multiple devices.
I will pen down my experiments with MongoDB Realm as a series of articles. This is the first article in the series and it is divided into two parts.
Part A will explain how to create a MongoDB Realm back end for your mobile app.
Part B will explain how to implement Google Authentication in the app.
Pre-Requisites: You have created at least one app using Android Studio.

Photo by Emily Finch on Unsplash
Let's get some coffee and get the ball rolling. :)
#Part A: Creating a MongoDB Realm Back End
#Step 1. How to Create an Account on MongoDB Cloud
MongoDB Realm is a back end as a service. When you want to use MongoDB Realm Sync functionality, you need to create a MongoDB Realm account and it is free. :D
MongoDB's Atlas offering of database as a service is what makes this database so amazing. For mobile applications, we use Realm DB locally on the mobile device, and the local data gets synced to MongoDB Atlas on the cloud.
An account on MongoDB Cloud can be easily created by visiting https://account.mongodb.com/account/login.
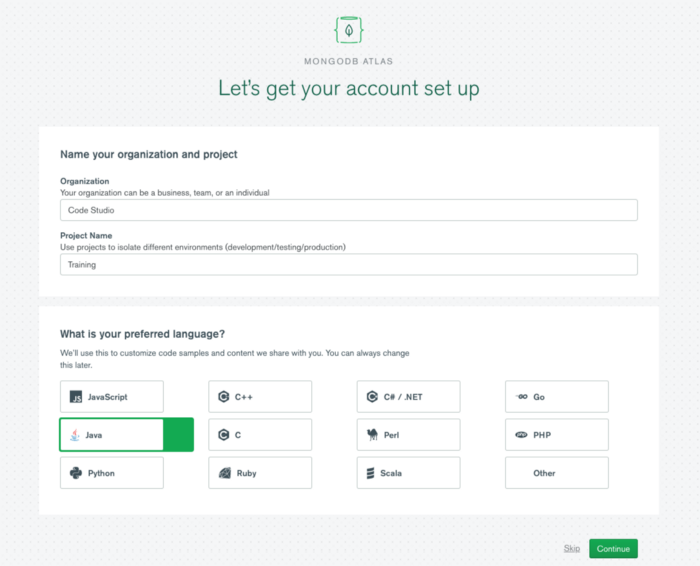
If this is the first time you are creating a MongoDB Atlas account, you will be asked to set up an organization and project name. This is what I entered for mine.
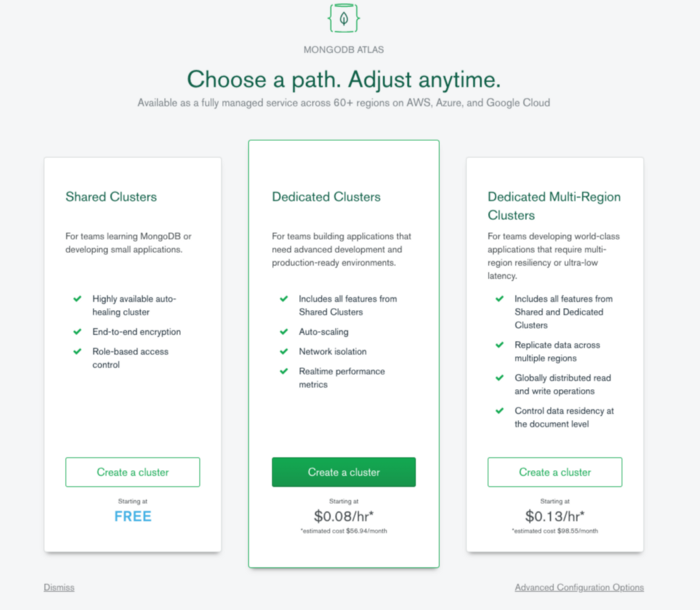
Next, you will be asked to set up a cluster. The obvious choice is to go with the free one if you are experimenting. ;)
A cluster is a group of MongoDB servers that store your data in the cloud. Depending on your app requirement, you choose one. I opted for a free cluster option for this app.
Next, you get to choose the cloud provider and the region. We mostly opt for regions closer to where our app will live, but since Realm Sync works with MongoDB 4.4, for the free M0 cluster, we only have the option to go ahead with N. Virginia. If you use an M10+ cluster (which are dedicated clusters), you can choose Europe or Australia as well.
Note: Please make sure you have the MongoDB 4.4 version selected. Otherwise, Sync functionalities will not work.
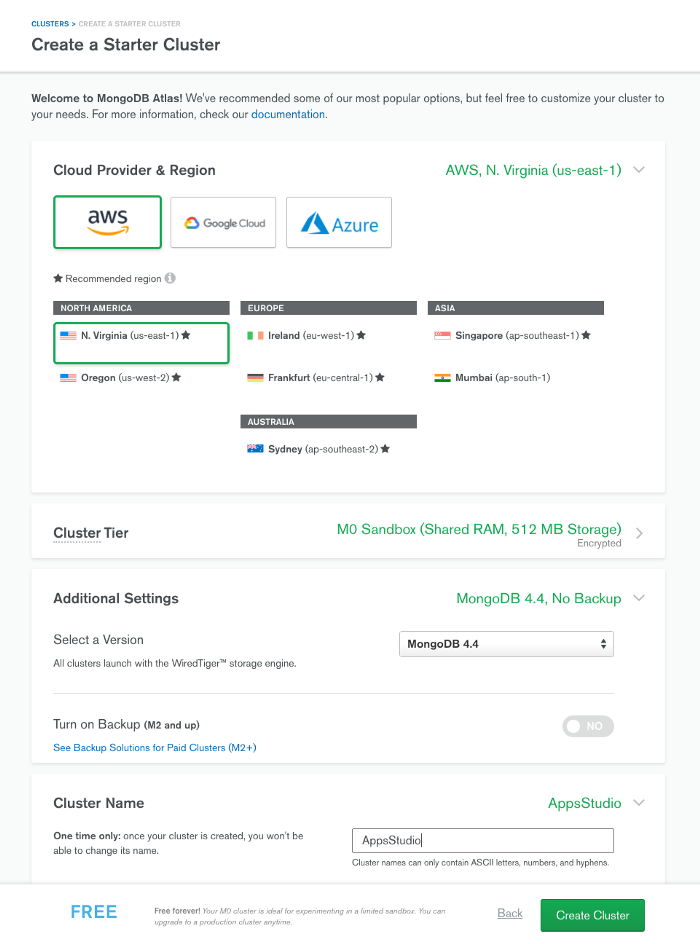
Give a name to your cluster. Please note this cannot be changed later. You may need to expand the "Additional Settings" section to enter details.
And with this, you are all set with Step 1.
#Step 2. How to Create a Realm App on the Cloud
We have set up our cluster, so the next step is to create a Realm app and link to it.
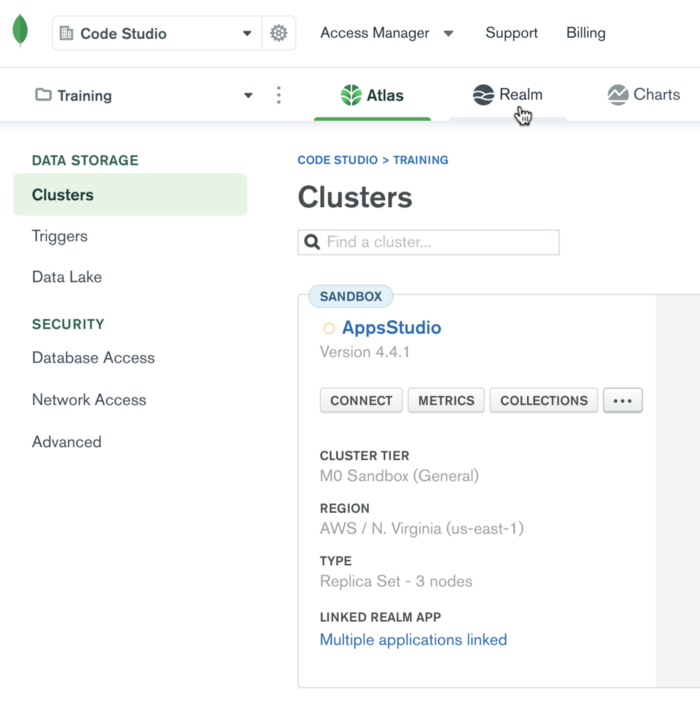
Once you create your cluster, you will see a dashboard like the one below. Now, you have to click on the Realm tab in the center.
When you click on the Realm tab, you will see a screen like this (or a different UI, if this has changed). Select the options that would suit your use case. I selected the ones below.

Once you click on "Start a New Realm App," it opens the page below. I have expanded the Advance Configuration option so I can select a deployment region.
Select the options that suit your use case. Please note, Realm app names should have fewer than 32 characters. The cluster you created in the previous step would get auto-populated here.
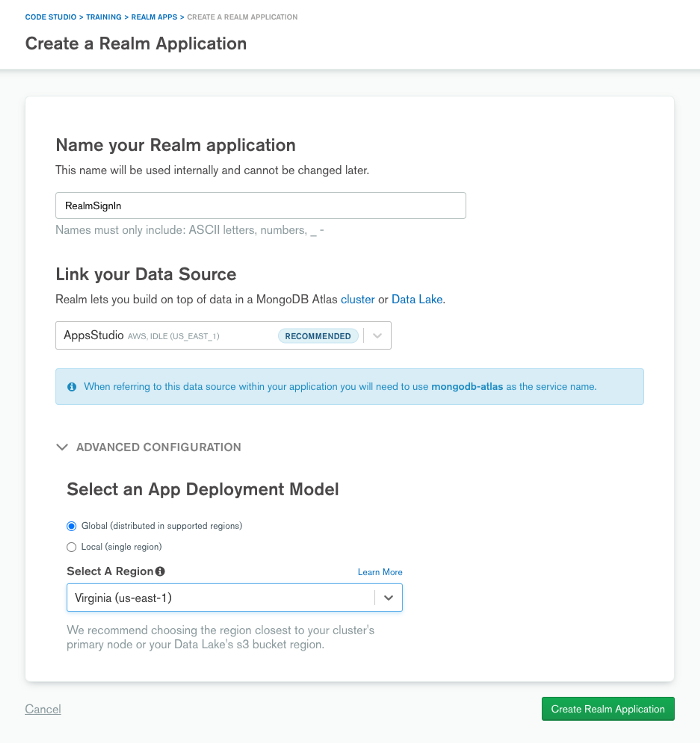
You can choose between global and local deployments. The difference is the routing of read requests. The write will happen in the region you choose for deployment.
You should always try to select the region that is the same as the cluster region selected in the previous step. There is no issue selecting different regions, but the Sync Write performance is best when both regions are the same.
You can follow the Global Deployment section in MongoDB's official documentation for more details.
Once you have all options selected, click Create Realm Application and you will be directed to your Realm app's dashboard.
Please keep a note of the App Id, This will be needed when we create the Android Studio project.
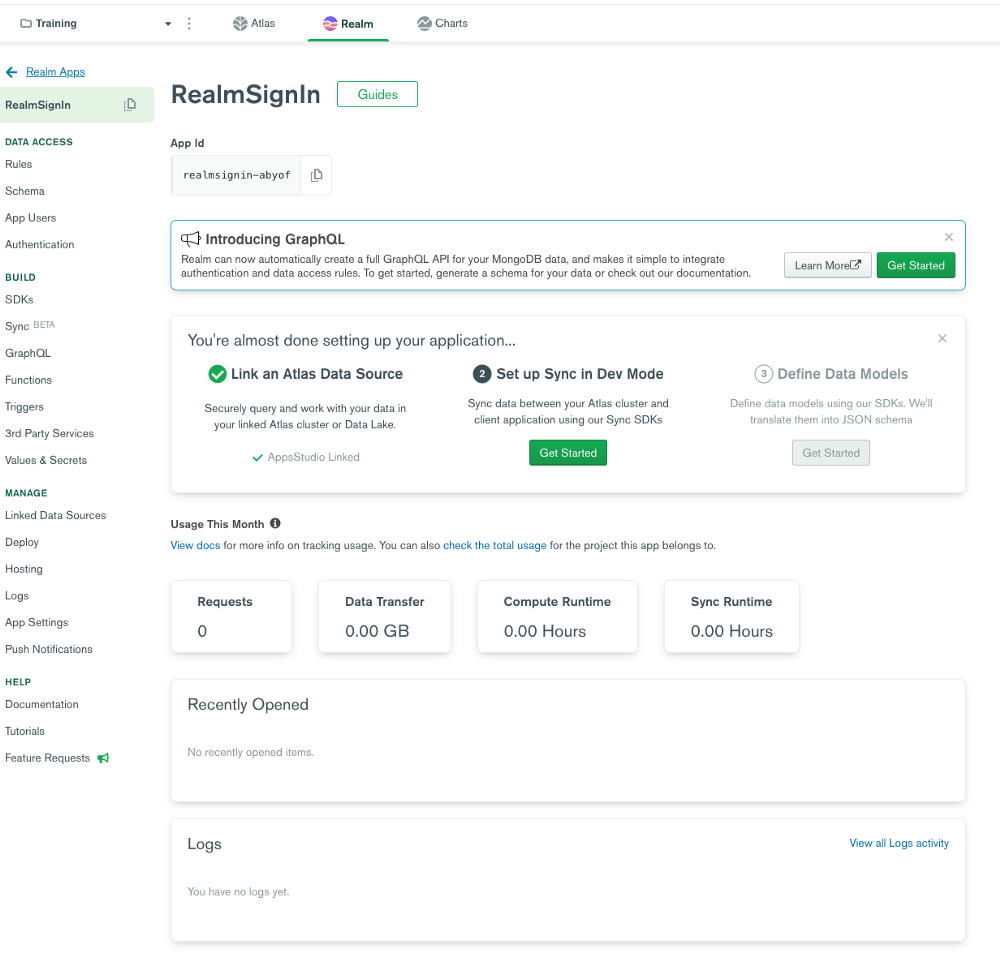
This screenshot is a truckload of functionality that comes with MongoDB Realm. You can use functions, triggers, GraphQL, and other features depending on your app use cases. For this article, we will be using Authentication.
With this, we are finished with Part A. Yayyy!! :D
#Part B: Implementing Google Authentication in a Realm App
#Step 3. Creating an Android Studio Project
I presume you all have experience creating mobile applications using Android Studio. In this step, you would "Start a new Android Project." You can enter any name of your choice and select Kotlin as the language and min API 21.
Once you create the project, you need to add dependencies for the Realm Database and Google Authentication.
For Realm, add this line of code in the project-level build.gradle file. This is the latest version at the time of writing this article.
1 classpath "io.realm:realm-gradle-plugin:10.0.0"
After adding this, the dependencies block would look like this.
1 dependencies { 2 classpath "com.android.tools.build:gradle:4.0.0" 3 classpath "org.jetbrains.kotlin:kotlin-gradle-plugin:$kotlin_version" 4 5 classpath "io.realm:realm-gradle-plugin:10.0.0-BETA.6" 6 7 // NOTE: Do not place your application dependencies here; they belong 8 // in the individual module build.gradle files 9 }
Now we add Realm plugin and Google Authentication in the app-level build.gradle file. Add this code at the top of the file but below the kotlin-kapt extension. If you are using Java, then this would come after the Android plugin.
1 apply plugin: 'kotlin-kapt' 2 apply plugin: 'realm-android'
In the same file, we would also add the below code to enable the Realm sync in the application. You can add it anywhere inside the Android block.
1 android { 2 ... 3 ... 4 realm { 5 syncEnabled = true 6 } 7 ... 8 }
For Google Auth, add the following dependency in the app-level gradle file. Please note, the versions may change since the time of this article.
1 dependencies{ 2 ... 3 ... 4 //Google OAuth 5 implementation 'com.google.android.gms:play-services-auth:19.0.0' 6 ... 7 }
With this, we are finished with Step 3. Let's move onto the next step to implement Google Authentication in the project.
#Step 4. Adding Google Authentication to the Application
Now, I will not get into too much detail on implementing Google Authentication to the app since that will deviate from our main topic. I have listed below the set of steps I took and links I followed to implement Google Authentication in my app.
- Configure a Google API Console project. (Create credentials for Android Application and Web Application).
Your credential screen should have 2 oAuth Client IDs.

- Configure Google Sign-in and the GoogleSignInClient object (in the Activity's onCreate method).
This is what the activity will look like at the end of the four steps.
Please note: This is only a guideline. Your variable names and views can be different. The String server_client_id here is the web client-id you created in Google Console when you created Google Auth credentials in the Google Console Project.
1 class MainActivity : AppCompatActivity() { 2 3 private lateinit var client: GoogleSignInClient
override fun onCreate(savedInstanceState: Bundle?) { 4 super.onCreate(savedInstanceState) 5 setContentView(R.layout.activity_main) 6 7 val googleSignInOptions = GoogleSignInOptions.Builder(GoogleSignInOptions.DEFAULT_SIGN_IN) 8 .requestEmail() 9 .requestServerAuthCode(getString(R.string.server_client_id)) 10 .build() 11 12 client = GoogleSignIn.getClient(this, googleSignInOptions) 13 14 findViewById(R.id.sign_in_button).setOnClickListener{ 15 signIn() 16 } 17 } 18 19 override fun onActivityResult(requestCode: Int, resultCode: Int, data: Intent?) { 20 super.onActivityResult(requestCode, resultCode, data) 21 if(requestCode == 100){ 22 val task = GoogleSignIn.getSignedInAccountFromIntent(data) 23 val account = task.getResult(ApiException::class.java) 24 handleSignInResult(account) 25 } 26 } 27 28 private fun handleSignInResult(account: GoogleSignInAccount?) { 29 try{ 30 Log.d("MainActivity", "${account?.serverAuthCode}") 31 //1 32 val idToken = account?.serverAuthCode 33 34 //signed in successfully, forward credentials to MongoDB realm 35 //2 36 val googleCredentials = Credentials.google(idToken) 37 //3 38 app.loginAsync(googleCredentials){ 39 if(it.isSuccess){ 40 Log.d("MainActivity", "Successfully authenticated using Google OAuth") 41 //4 42 startActivity(Intent(this, SampleResult::class.java)) 43 } else { 44 Log.d("MainActivity", "Failed to Log in to MongoDB Realm: ${it.error.errorMessage}") 45 } 46 } 47 } catch(exception: ApiException){ 48 Log.d("MainActivity", exception.printStackTrace().toString()) 49 } 50 } 51 52 private fun signIn() { 53 val signIntent = client.signInIntent
startActivityForResult(signIntent, 100)
}
}
When you run your app, your app should ask you to sign in with your Google account, and when successful, it should open SampleResult Activity. I displayed a random text to show that it works. :D
Now, we will move onto the next step and configure the Google Auth provider on the MongoDB Realm cloud account.
#Step 5. Configure Google Auth Provider on MongoRealm UI
Return to the MongoDB Realm account where you created your Realm app. On the left panel, click on the Authentication tab and you will see the list of auth providers that MongoDB Realm supports.
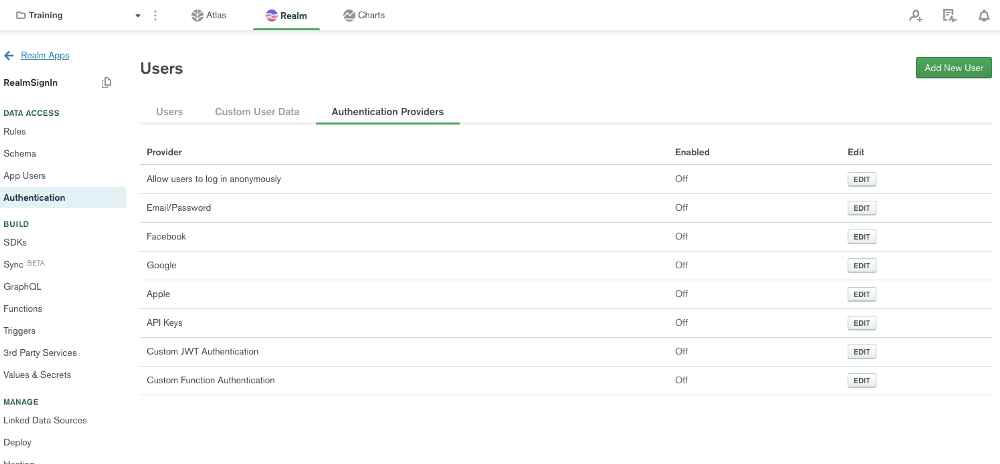
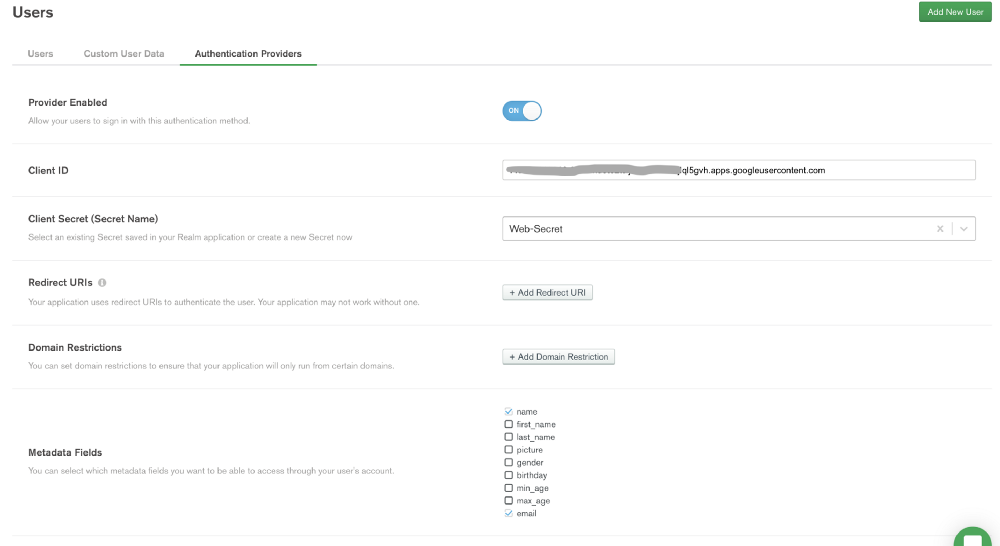
Click on the edit icon corresponding to Google Authentication provider and you will be led to a page as shown below.
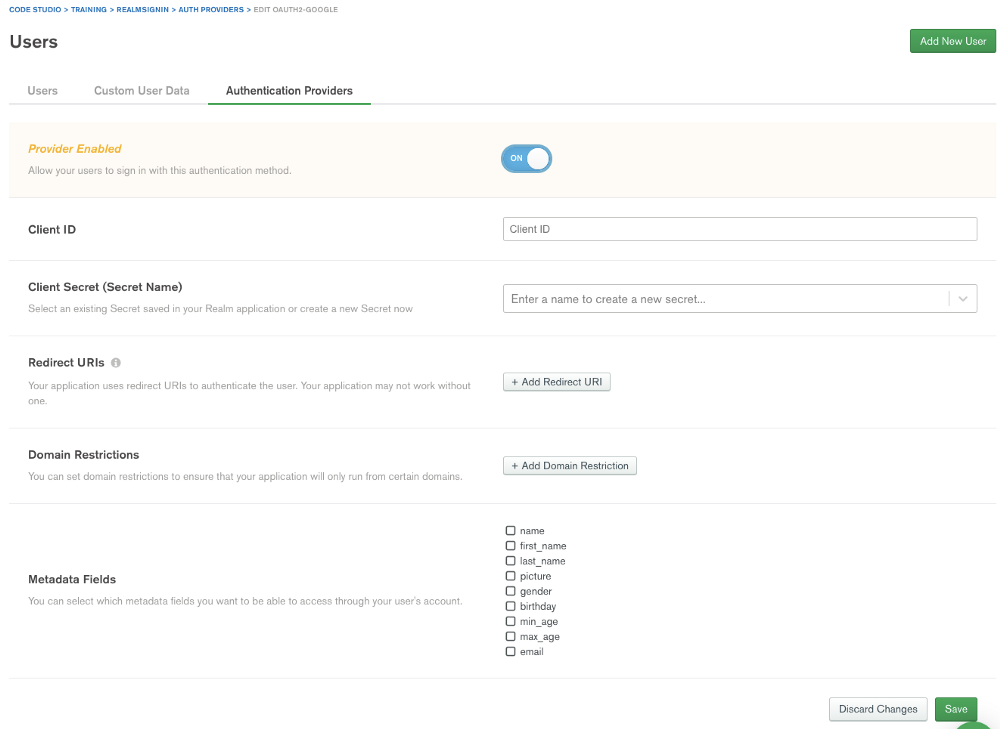
Toggle the Provider Enabled switch to On and enter the Web-Client ID and Web Client Secret from the Google Console Project you created above.
You can choose the Metadata Fields as per your app use case and click Save.
With this, we are finished with Step 5. High five!! ;)

Photo by Priscilla Du Preez on Unsplash
#Step 6. Implementing Google Auth Sync Credentials to the Project
This is the last step of Part 2. We will use the Google Auth token received upon signing in with our Google Account in the previous step to authenticate to our MongoDB Realm account.
We already added dependencies for Realm in Step 3 and we created a Realm app on the back end in Step 2. Now, we initialize Realm and use the appId (Remember I asked you to make a note of the app Id? Check Step 2. ;)) to connect back end with our mobile app.
Create a new Kotlin class that extends the application class and write the following code onto it.
1 val appId ="realmsignin-abyof" // Enter your own App Id here 2 lateinit var app: App 3 4 class RealmApp: Application() { 5 6 override fun onCreate() { 7 super.onCreate() 8 Realm.init(this) 9 10 app = App(AppConfiguration.Builder(appId).build()) 11 12 } 13 }
An "App" is the main client-side entry point for interacting with the MongoDB Realm app and all its features, so we configure it in the application subclass for getting global access to the variable.
This is the simplest way to configure it. After configuring the "App", you can add authentication, manage users, open synchronized realms, and all other functionalities that MongoDB Realm offers.
To add more details when configuring, check the MongoDB Realm Java doc.
Don't forget to add the RealmApp class or whatever name you chose to the manifest file.
1 <application 2 .. 3 android:theme="@style/AppTheme" 4 android:name=".RealmApp"> 5 .... 6 .... 7 <activity android:name=".MainActivity"> 8 ... 9 ... 10 </activity> 11 </application>
Now come back to the handleSignInResult() method call in the MainActivity, and add the following code to that method.
1 private fun handleSignInResult(account: GoogleSignInAccount?) { 2 try{ 3 Log.d("MainActivity", "${account?.serverAuthCode}") 4 5 // Here, you get the serverAuthCode after signing in with your Google account. 6 val idToken = account?.serverAuthCode 7 8 // signed in successfully, forward credentials to MongoDB realm 9 // In this statement, you pass the token received to ``Credentials.google()`` method to pass it to MongoDB Realm. 10 val googleCredentials = Credentials.google(idToken) 11 12 // Here, you login asynchronously by passing Google credentials to the method. 13 app.loginAsync(googleCredentials){ 14 if(it.isSuccess){ 15 Log.d("MainActivity", "Successfully authenticated using Google OAuth") 16 17 // If successful, you navigate to another activity. This may give a red mark because you have not created SampleResult activity. Create an empty activity and name it SampleResult. 18 startActivity(Intent(this, SampleResult::class.java)) 19 } else { 20 Log.d("MainActivity", "Failed to Log in to MongoDB Realm: ${it.error.errorMessage}") 21 } 22 } 23 } catch(exception: ApiException){ 24 Log.d("MainActivity", exception.printStackTrace().toString()) 25 } 26 }
Add a TextView with a Successful Login message to the SampleResult layout file.
Now, when you run your app, log in with your Google account and your SampleResult Activity with Successful Login message should be shown.
When you check the App Users section in your MongoDB Realm account, you should notice one user created.

#Wrapping Up
You can get the code for this tutorial from this GitHub repo.
Well done, everyone. We are finished with implementing Google Auth with MongoDB Realm, and I would love to know if you have any feedback for me. ❤
In the next article, we will talk about Developer Modes, designing a schema, making changes to data from mobile, and seeing the update on the server side.
Questions? Comments? We'd love to connect with you. Join the conversation on the MongoDB Community Forums.