
Are you new to data structures and algorithms? In this post, you will learn about one of the most important data structures in Computer Science, the Linked List, implemented with a MongoDB twist. This post will cover the fundamentals of the linked list data structure. It will also answer questions like, "How do linked lists differ from arrays?" and "What are the pros and cons of using a linked list?"
#Intro to Linked Lists
Did you know that linked lists are one of the foundational data structures in Computer Science? If you are like many devs that are self-taught or you graduated from a developer boot camp, then you might need a little lesson in how this data structure works. Or, if you're like me, you might need a refresher if it's been a couple of years since your last Computer Science lecture on data structures and algorithms. In this post, I will be walking through how to implement a linked list from scratch using Node.js and MongoDB. This is also a great place to start for getting a handle on the basics of MongoDB CRUD operations and this legendary data structure. Let's get started with the basics.
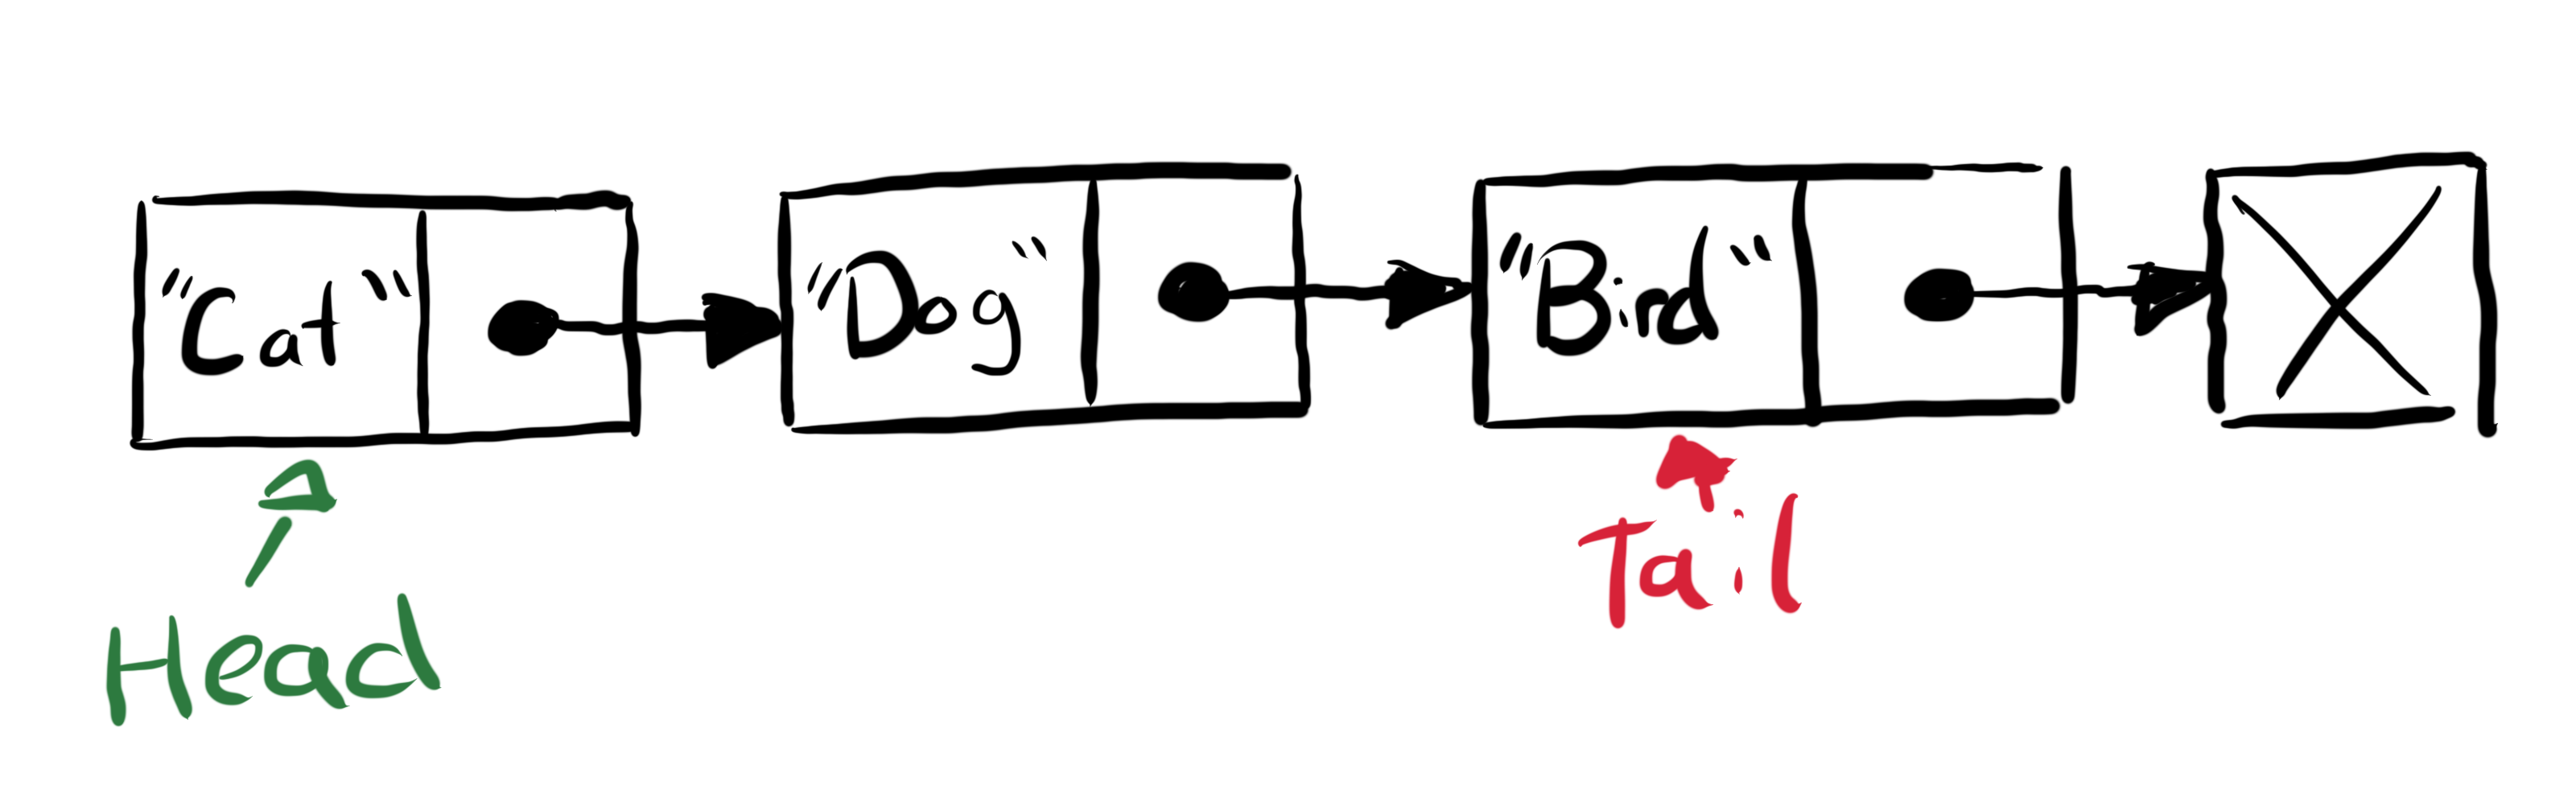
A linked list is a data structure that contains a list of nodes that are connected using references or pointers. A node is an object in memory. It usually contains at most two pieces of information, a data value, and a pointer to next node in the linked list. Linked lists also have separate pointer references to the head and the tail of the linked list. The head is the first node in the list, while the tail is the last object in the list.
A node that does NOT link to another node
1 { 2 "data": "Cat", 3 "next": null 4 }
A node that DOES link to another node
1 { 2 "data": "Cat", 3 "next": { 4 "data": "Dog", 5 "next": { 6 "data": "Bird", 7 "next": null 8 } 9 } // these are really a reference to an object in memory 10 }
#Why Use a Linked List?
There are a lot of reasons why linked lists are used, as opposed to other data structures like arrays (more on that later). However, we use linked lists in situations where we don't know the exact size of the data structure but anticipate that the list could potentially grow to large sizes. Often, linked lists are used when we think that the data structure might grow larger than the available memory of the computer we are working with. Linked lists are also useful if we still need to preserve order AND anticipate that order will change over time.
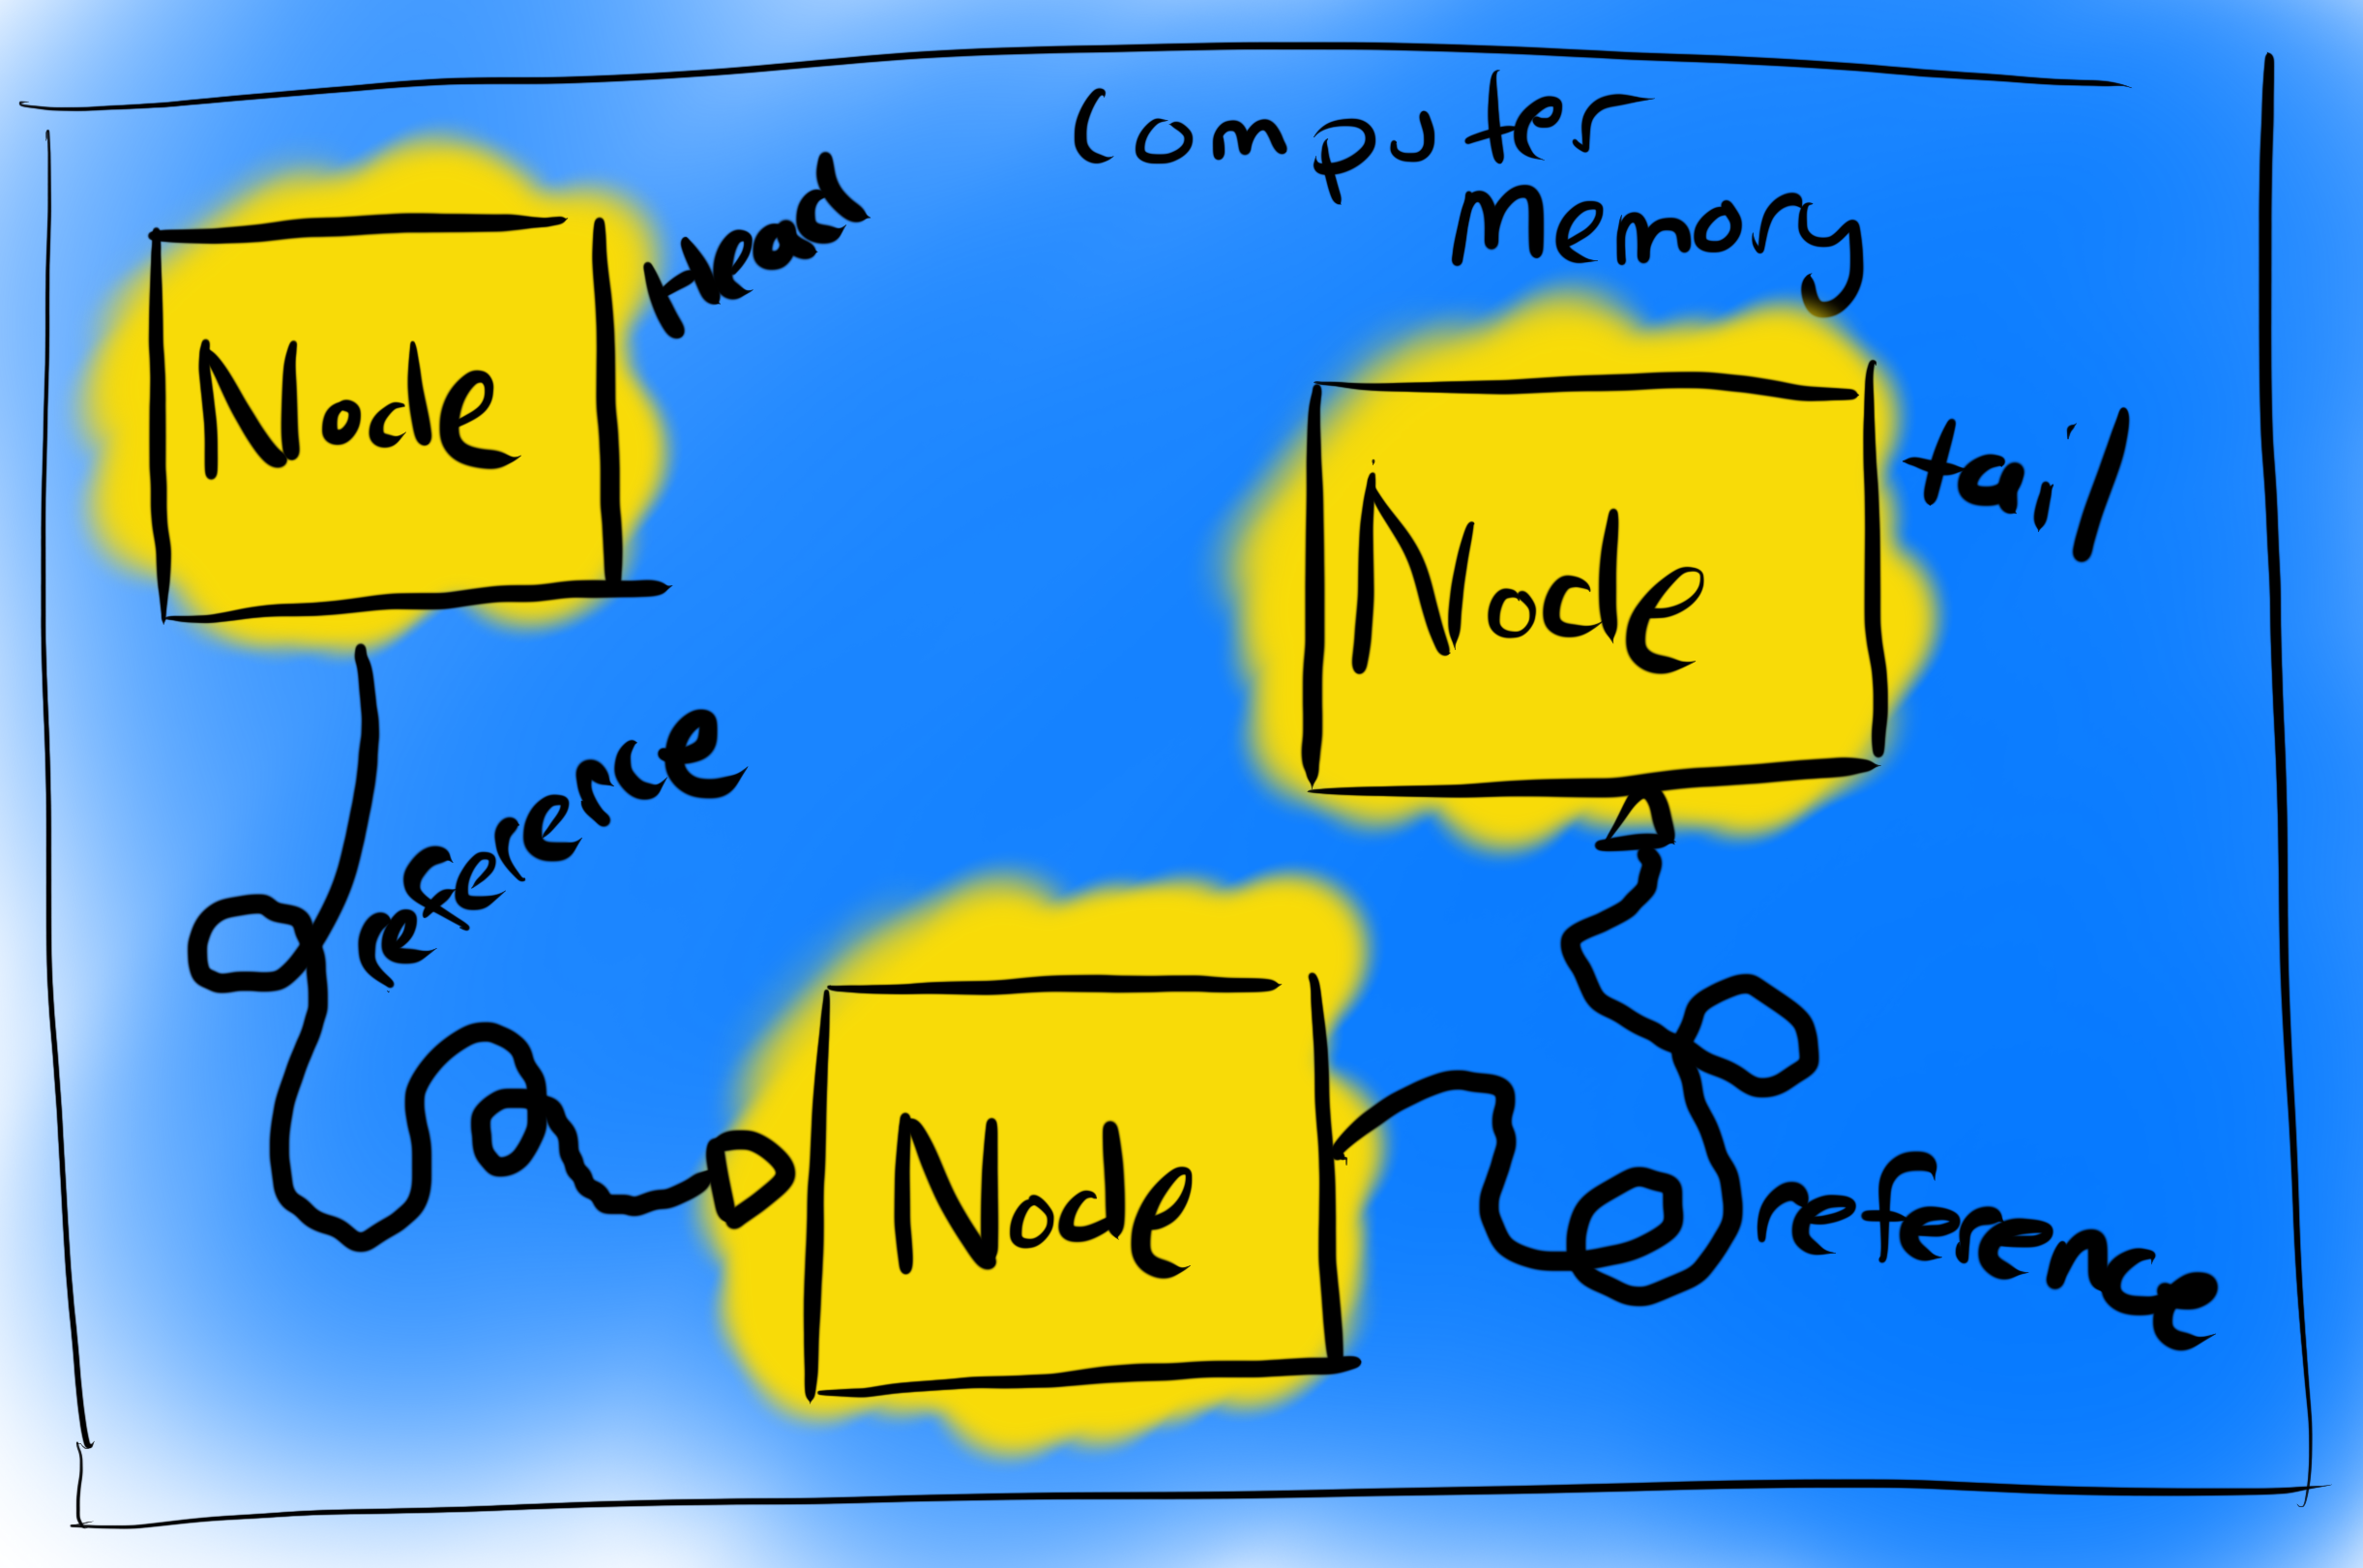
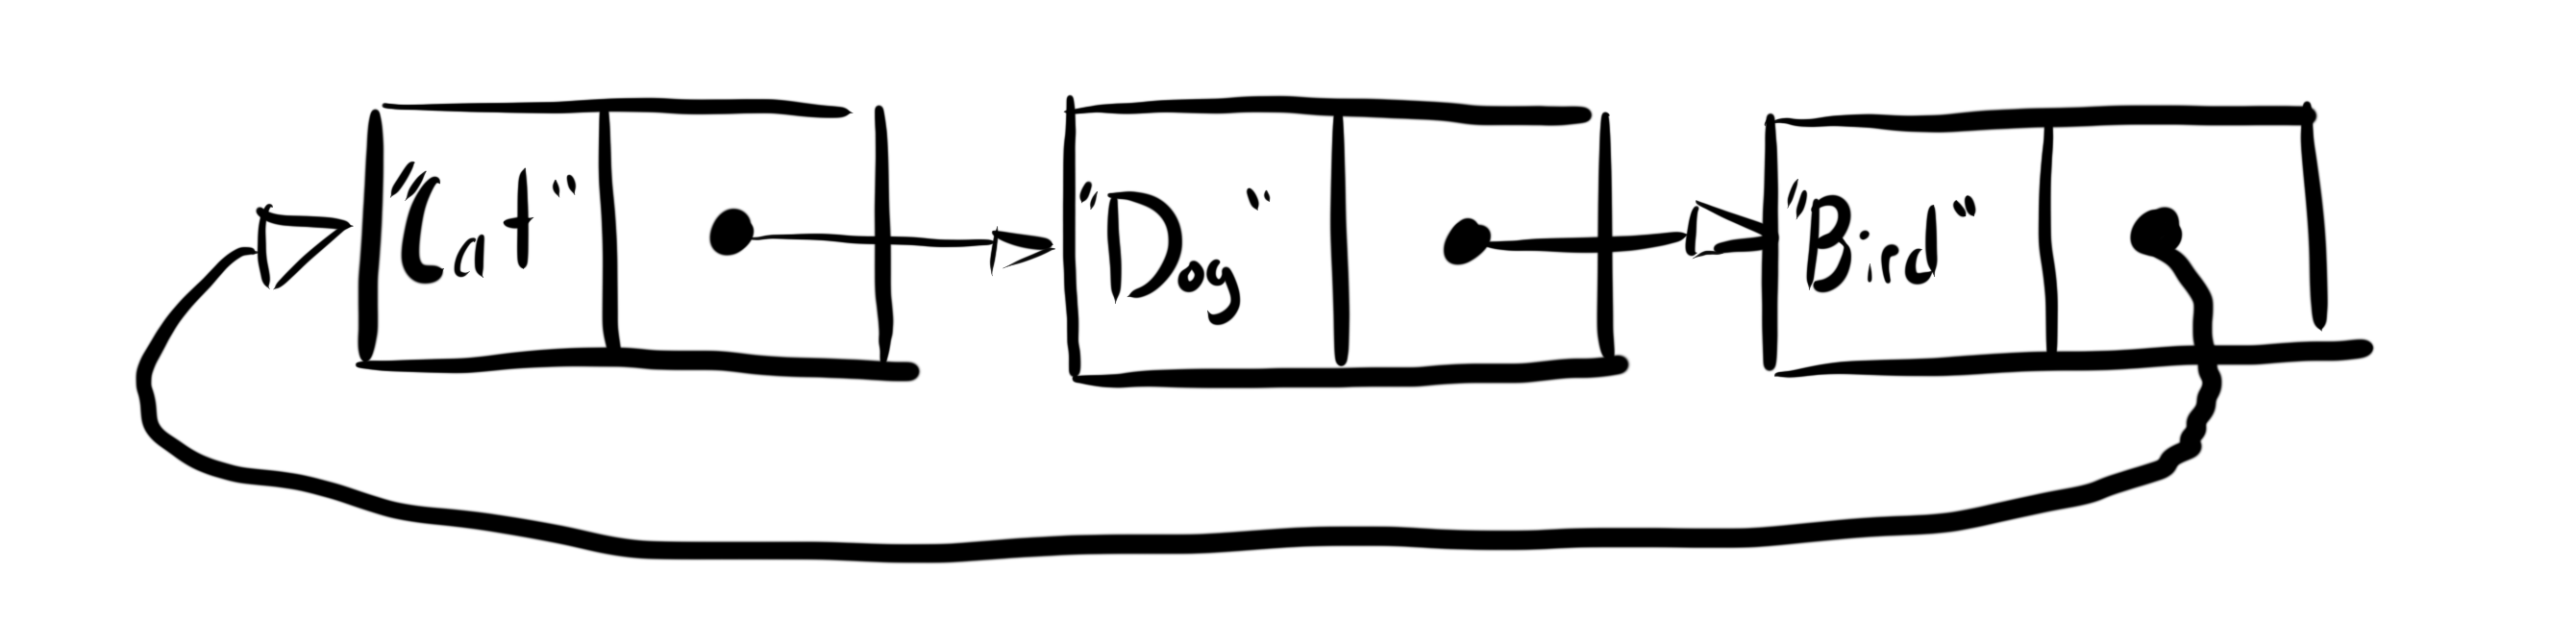
Linked lists are just objects in memory. One object holds a reference to another object, or one node holds a pointer to the next node. In memory, a linked list looks like this:
#Advantages of Linked Lists
- Linked lists are dynamic in nature, which allocates the memory when required.
- Insertion and deletion operations can be easily implemented.
- Stacks and queues can be easily executed using a linked list.
#Disadvantages of Linked Lists
- Memory is wasted as pointers require extra memory for storage.
- No element can be accessed randomly; it has to access each node sequentially starting from the head.
- Reverse traversing is difficult in a singly linked list.
#Comparison Between Arrays and Linked Lists
Now, you might be thinking that linked lists feel an awful lot like arrays, and you would be correct! They both keep track of a sequence of data, and they both can be iterated and looped over. Also, both data structures preserve sequence order. However, there are some key differences.
#Advantages of Arrays
- Arrays are simple and easy to use.
- They offer faster access to elements (O(1) or constant time).
- They can access elements by any index without needing to iterate through the entire data set from the beginning.
#Disadvantages of Arrays
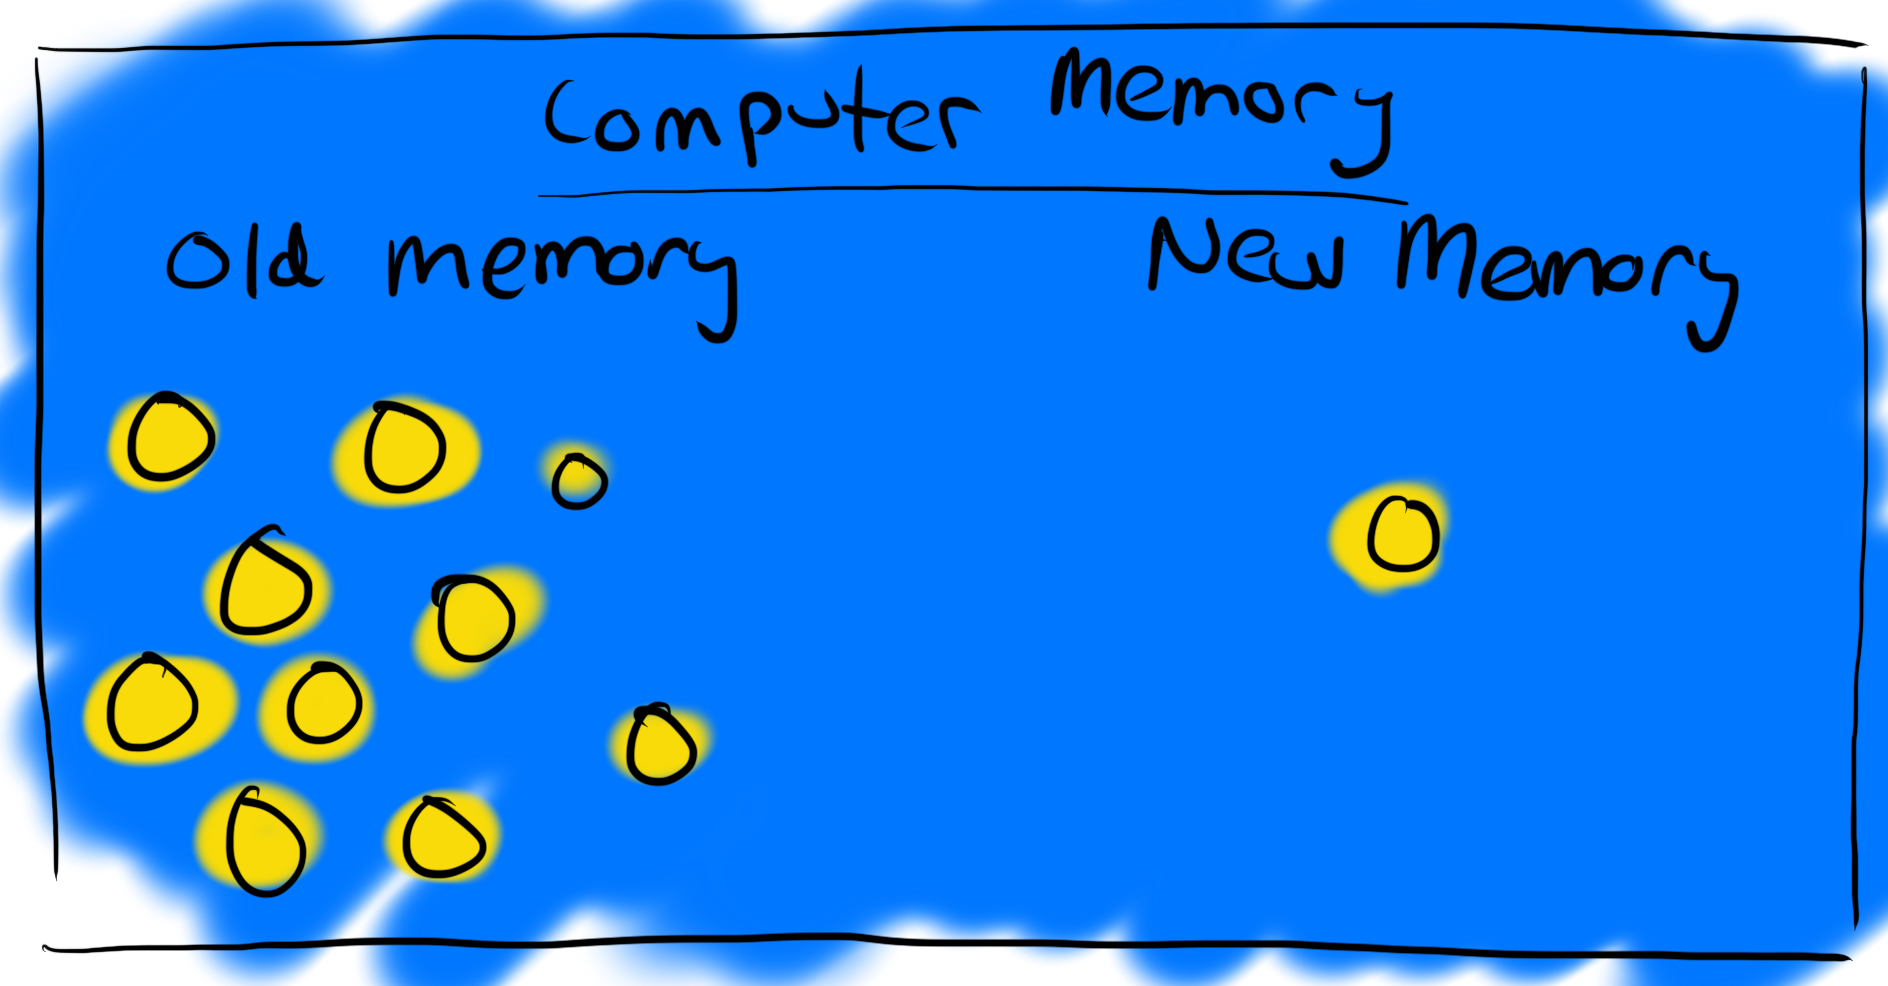
- Did you know that arrays can waste memory? This is because typically, compilers will preallocate a sequential block of memory when a new array is created in order to make super speedy queries. Therefore, many of these preallocated memory blocks may be empty.
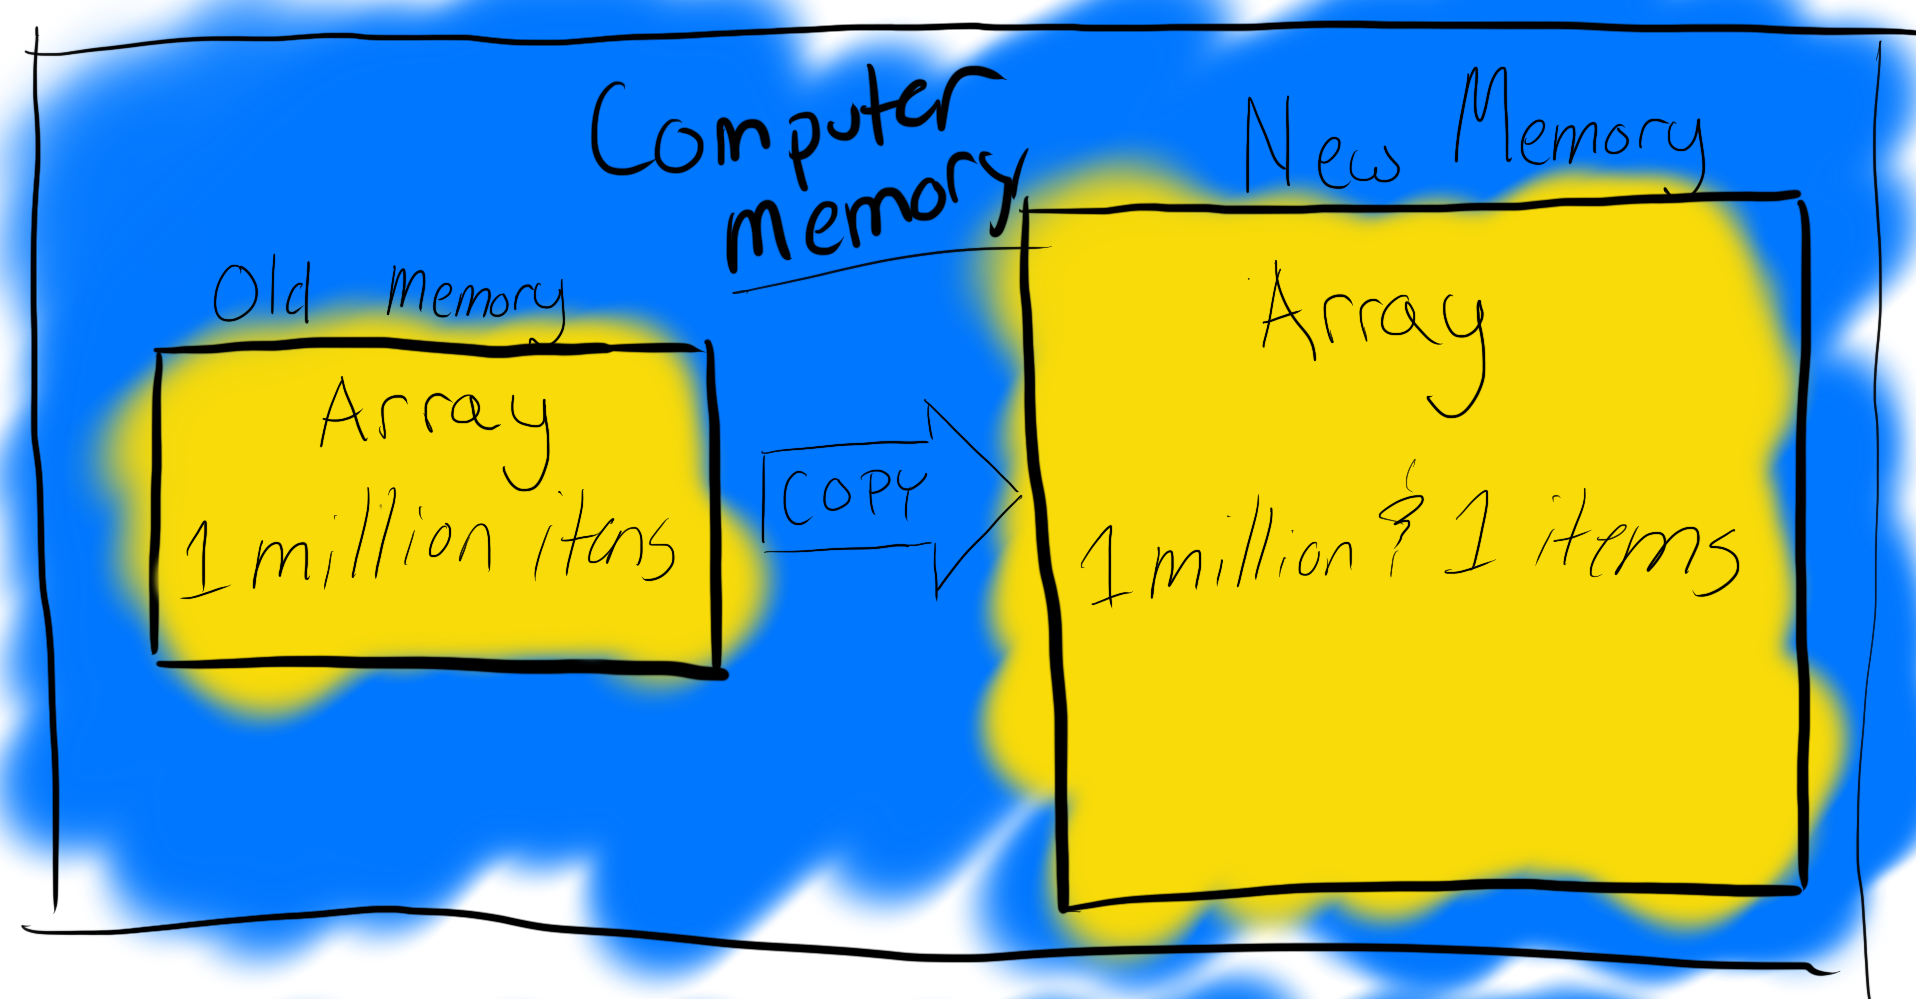
- Arrays have a fixed size. If the preallocated memory block is filled to capacity, the code compiler will allocate an even larger memory block, and it will need to copy the old array over to the new array memory block before new array operations can be performed. This can be expensive with both time and space.
- To insert an element at a given position, operation is complex. We may need to shift the existing elements to create vacancy to insert the new element at desired position.
#Other Types of Linked Lists
#Doubly Linked List
A doubly linked list is the same as a singly linked list with the exception that each node also points to the previous node as well as the next node.

#Circular Linked List
A circular linked list is the same as a singly linked list with the exception that there is no concept of a head or tail. All nodes point to the next node circularly. There is no true start to the circular linked list.
#Let's Code A Linked List!
#First, Let's Set Up Our Coding Environment
#Creating A Cluster On Atlas
First thing we will need to set up is a MongoDB Atlas account. And don't worry, you can create an M0 MongoDB Atlas cluster for free. No credit card is required to get started! To get up and running with a free M0 cluster, follow the MongoDB Atlas Getting Started guide.
After signing up for Atlas, we will then need to deploy a free MongoDB cluster. Note, you will need to add a rule to allow the IP address of the computer we are connecting to MongoDB Atlas Custer too, and you will need to create a database user before you are able to connect to your new cluster. These are security features that are put in place to make sure bad actors cannot access your database.
If you have any issues connecting or setting up your free MongoDB Atlas cluster, be sure to check out the MongoDB Community Forums to get help.
#Connect to VS Code MongoDB Plugin
Next, we are going to connect to our new MongoDB Atlas database cluster using the Visual Studio Code MongoDB Plugin. The MongoDB extension allow us to:
- Connect to a MongoDB or Atlas cluster, navigate through your databases and collections, get a quick overview of your schema, and see the documents in your collections.
- Create MongoDB Playgrounds, the fastest way to prototype CRUD operations and MongoDB commands.
- Quickly access the MongoDB Shell, to launch the MongoDB Shell from the command palette and quickly connect to the active cluster.
To install MongoDB for VS Code, simply search for it in the Extensions list directly inside VS Code or head to the� "MongoDB for VS Code" homepage in the VS Code Marketplace.
#Navigate Your MongoDB Data
MongoDB for VS Code can connect to MongoDB standalone instances or clusters on MongoDB Atlas or self-hosted. Once connected, you can browse databases, collections, and read-only views directly from the tree view.
For each collection, you will see a list of sample documents and a quick overview of the schema. This is very useful as a reference while writing queries and aggregations.
Once installed, there will be a new MongoDB tab that we can use to add our connections by clicking "Add Connection." If you've used MongoDB Compass before, then the form should be familiar. You can enter your connection details in the form or use a connection string. I went with the latter, as my database is hosted on MongoDB Atlas.


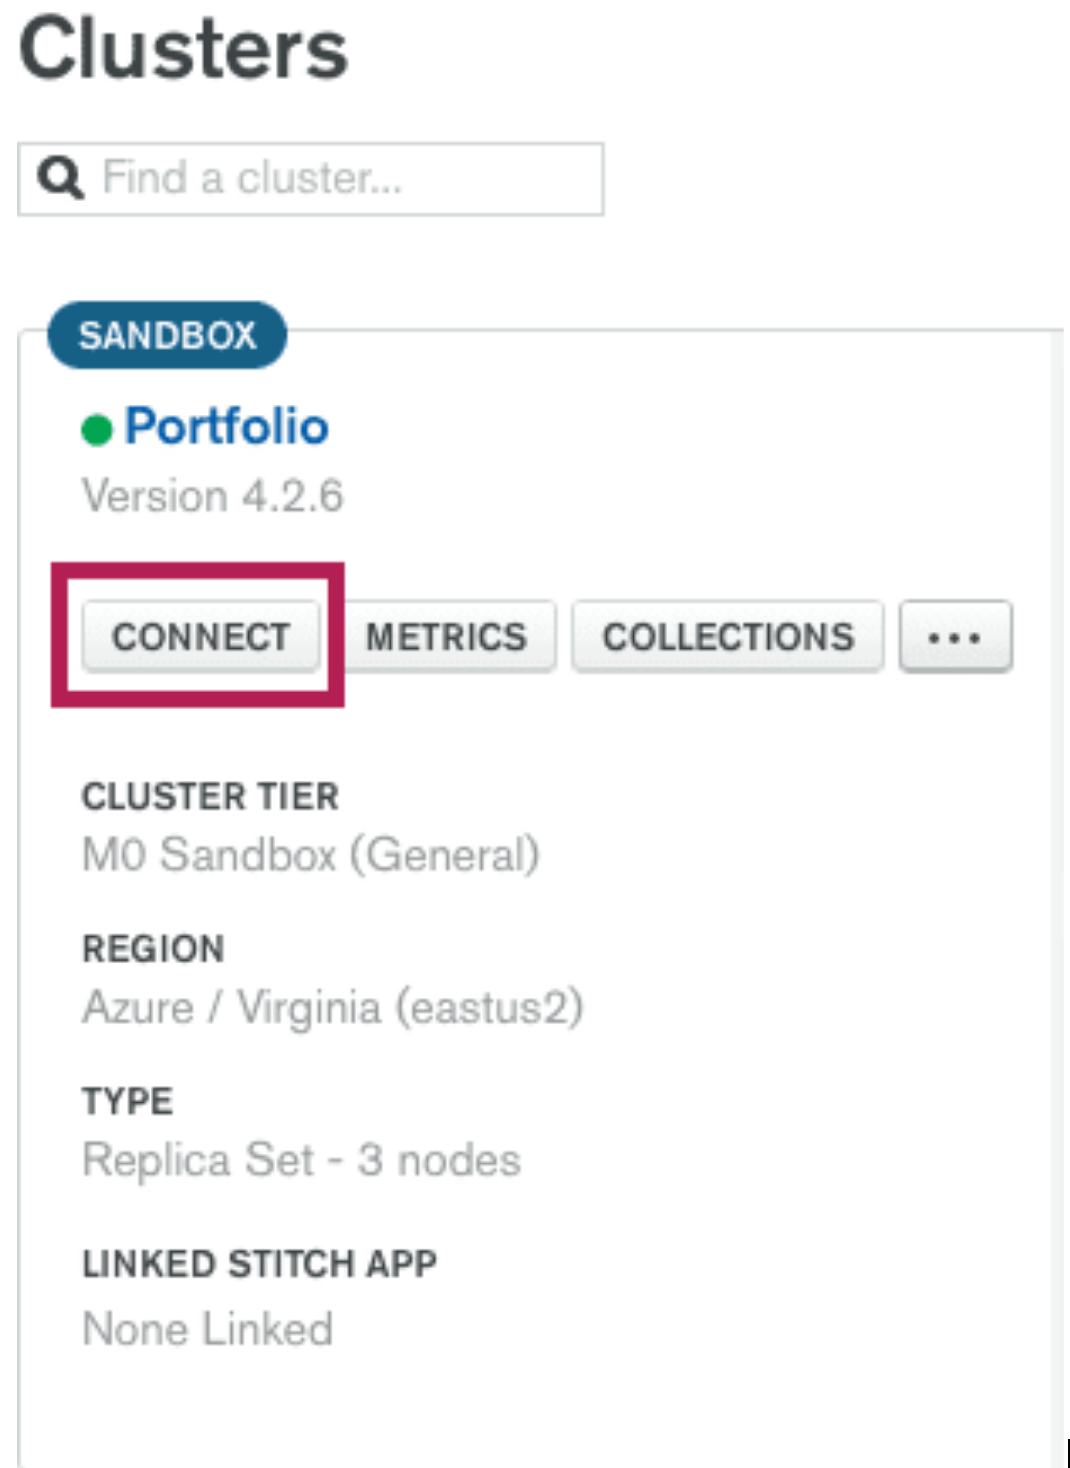
To obtain your connection string, navigate to your "Clusters" page and select "Connect."
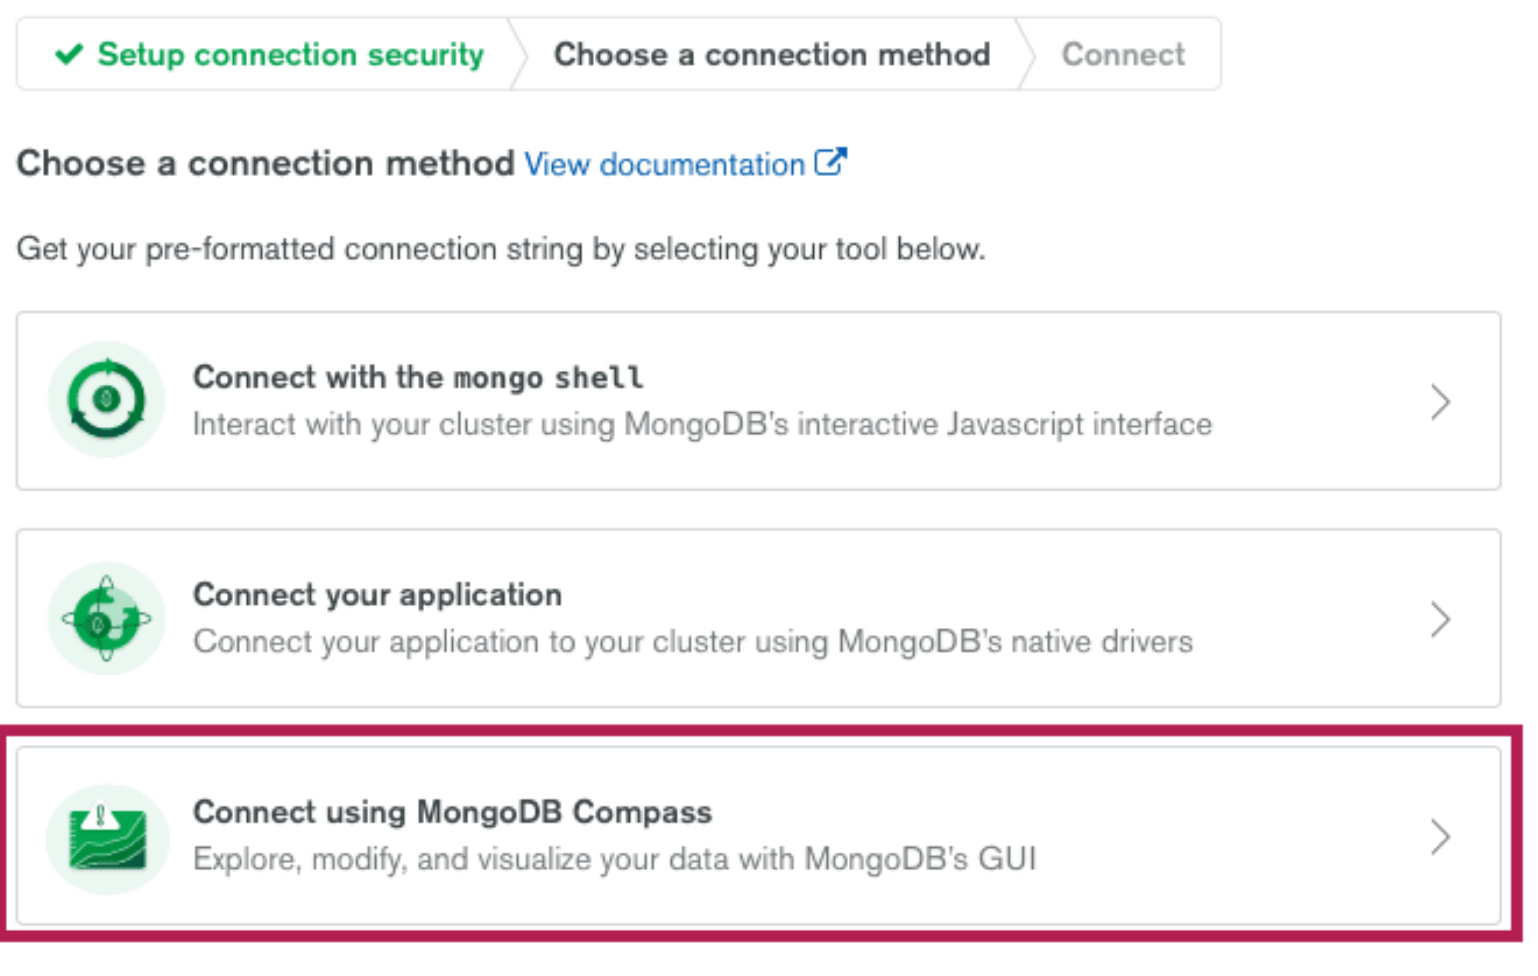
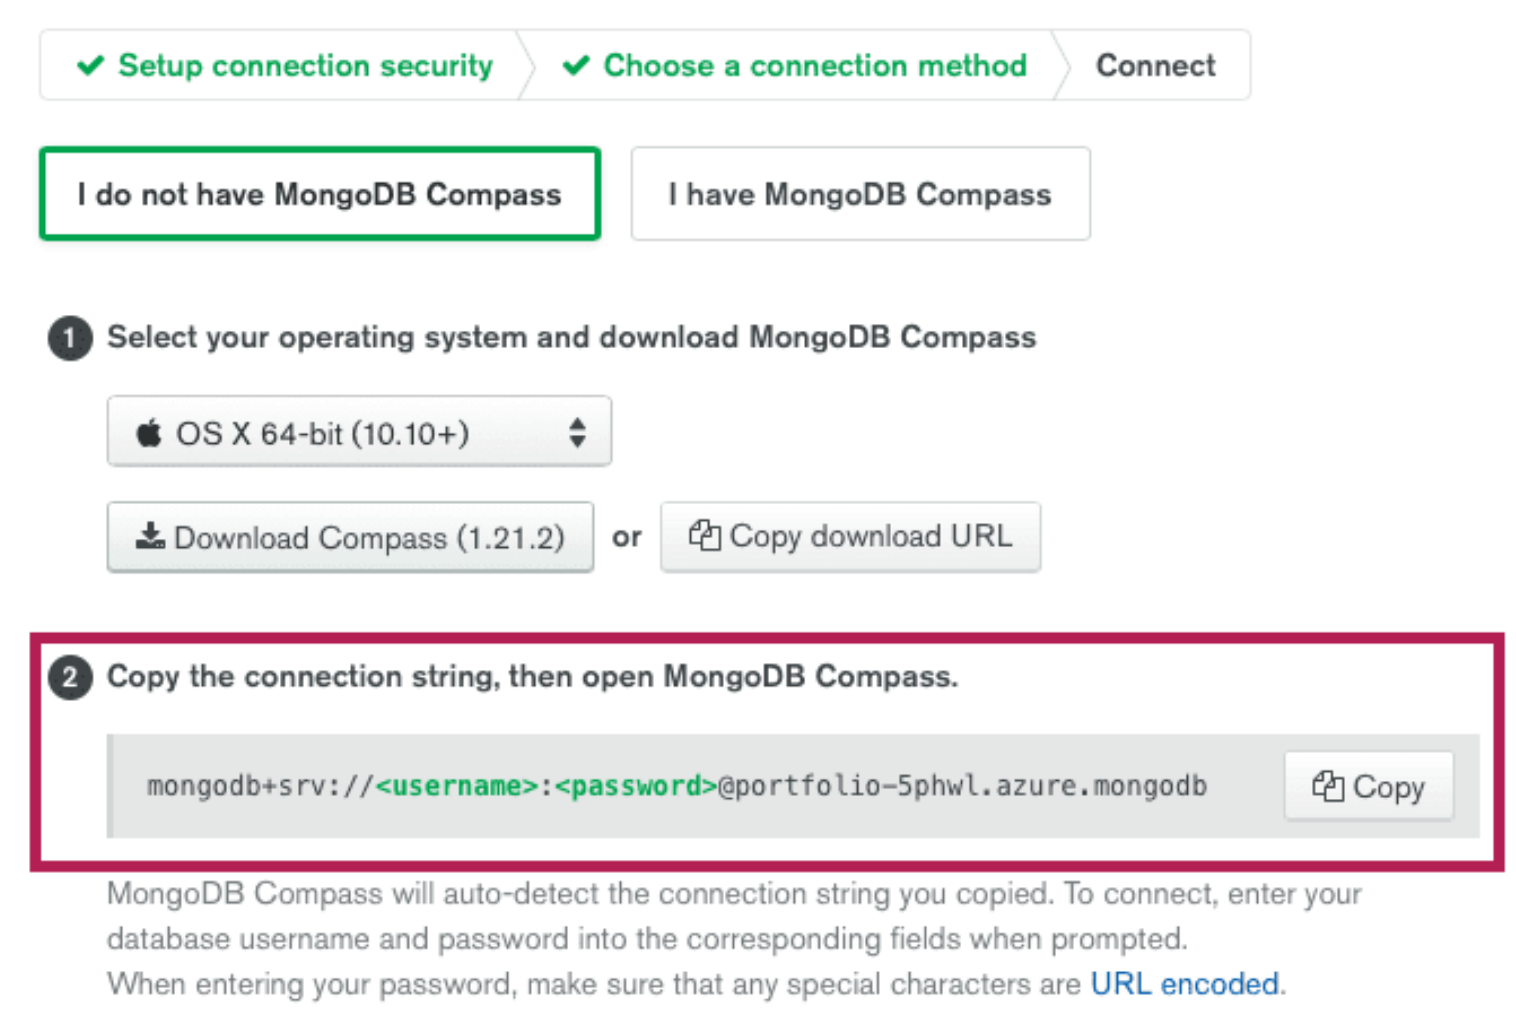
Choose the "Connect using MongoDB Compass" option and copy the connection string. Make sure to add your username and password in their respective places before entering the string in VS Code.

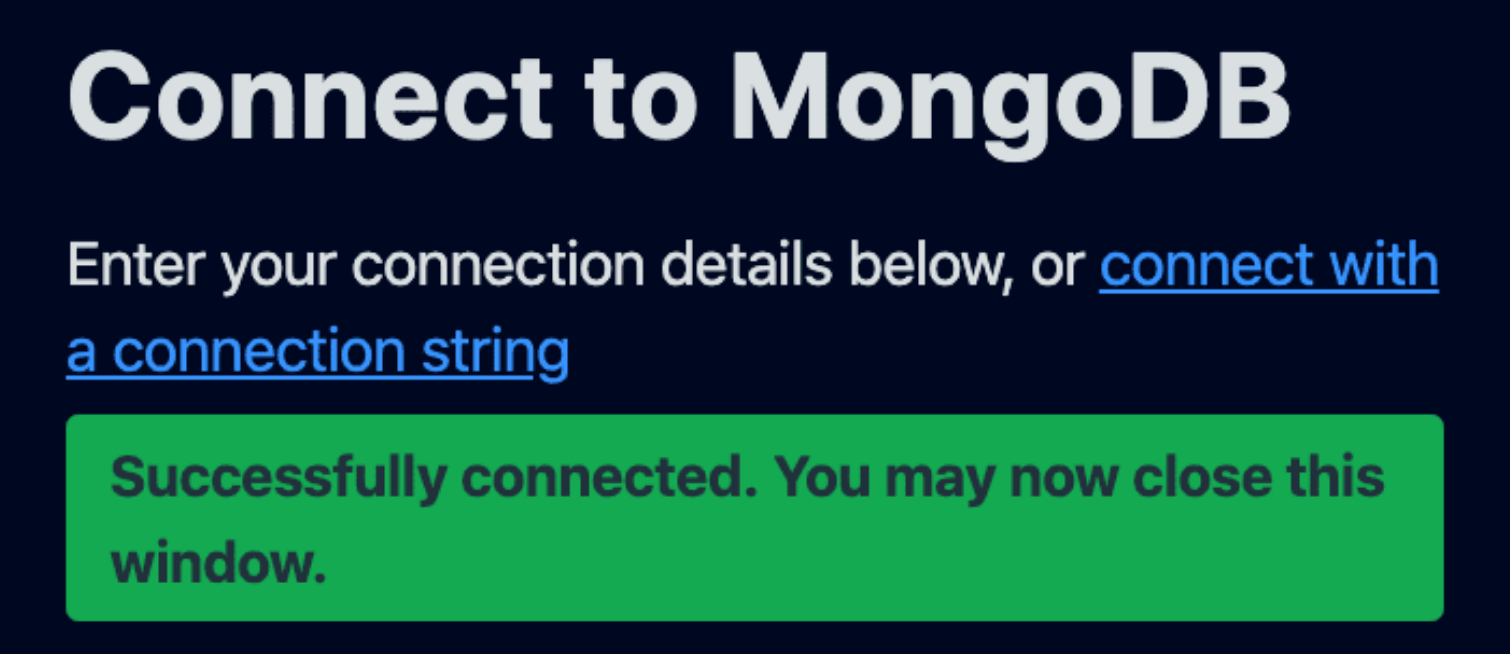
Once you've connected successfully, you should see an alert. At this point, you can explore the data in your cluster, as well as your schemas.
#Creating Functions to Initialize the App
Alright, now that we have been able to connect to our MongoDB Atlas database, let's write some code to allow our linked list to connect to our database and to do some cleaning while we are developing our linked list.
The general strategy for building our linked lists with MongoDB will be as follows. We are going to use a MongoDB document to keep track of meta information, like the head and tail location. We will also use a unique MongoDB document for each node in our linked list. We will be using the unique IDs that are automatically generated by MongoDB to simulate a pointer. So the next value of each linked list node will store the ID of the next node in the linked list. That way, we will be able to iterate through our Linked List.
So, in order to accomplish this, the first thing that we are going to do is set up our linked list class.
1 const MongoClient = require("mongodb").MongoClient; 2 3 // Define a new Linked List class 4 class LinkedList { 5 6 constructor() {} 7 8 // Since the constructor cannot be an asynchronous function, 9 // we are going to create an async `init` function that connects to our MongoDB 10 // database. 11 // Note: You will need to replace the URI here with the one 12 // you get from your MongoDB Cluster. This is the same URI 13 // that you used to connect the MongoDB VS Code plugin to our cluster. 14 async init() { 15 const uri = "PASTE YOUR ATLAS CLUSTER URL HERE"; 16 this.client = new MongoClient(uri, { 17 useNewUrlParser: true, 18 useUnifiedTopology: true, 19 }); 20 21 try { 22 await this.client.connect(); 23 console.log("Connected correctly to server"); 24 this.col = this.client 25 .db("YOUR DATABASE NAME HERE") 26 .collection("YOUR COLLECTION NAME HERE"); 27 } catch (err) { 28 console.log(err.stack); 29 } 30 } 31 } 32 33 // We are going to create an immediately invoked function expression (IFEE) 34 // in order for us to immediately test and run the linked list class defined above. 35 (async function () { 36 try { 37 const linkedList = new LinkedList(); 38 await linkedList.init(); 39 linkedList.resetMeta(); 40 linkedList.resetData(); 41 } catch (err) { 42 // Good programmers always handle their errors 43 console.log(err.stack); 44 } 45 })();
Next, let's create some helper functions to reset our DB every time we run the code so our data doesn't become cluttered with old data.
1 // This function will be responsible for cleaning up our metadata 2 // function everytime we reinitialize our app. 3 async resetMeta() { 4 await this.col.updateOne( 5 { meta: true }, 6 { $set: { head: null, tail: null } }, 7 { upsert: true } 8 ); 9 } 10 11 // Function to clean up all our Linked List data 12 async resetData() { 13 await this.col.deleteMany({ value: { $exists: true } }); 14 }
Now, let's write some helper functions to help us query and update our meta document.
1 // This function will query our collection for our single 2 // meta data document. This document will be responsible 3 // for tracking the location of the head and tail documents 4 // in our Linked List. 5 async getMeta() { 6 const meta = await this.col.find({ meta: true }).next(); 7 return meta; 8 } 9 10 // points to our head 11 async getHeadID() { 12 const meta = await this.getMeta(); 13 return meta.head; 14 } 15 16 // Function allows us to update our head in the 17 // event that the head is changed 18 async setHead(id) { 19 const result = await this.col.updateOne( 20 { meta: true }, 21 { $set: { head: id } } 22 ); 23 return result; 24 } 25 26 // points to our tail 27 async getTail(data) { 28 const meta = await this.getMeta(); 29 return meta.tail; 30 } 31 32 // Function allows us to update our tail in the 33 // event that the tail is changed 34 async setTail(id) { 35 const result = await this.col.updateOne( 36 { meta: true }, 37 { $set: { tail: id } } 38 ); 39 return result; 40 } 41 42 // Create a brand new linked list node 43 async newNode(value) { 44 const newNode = await this.col.insertOne({ value, next: null }); 45 return newNode; 46 }
#Add A Node
The steps to add a new node to a linked list are:
- Add a new node to the current tail.
- Update the current tails next to the new node.
- Update your linked list to point tail to the new node.
1 // Takes a new node and adds it to our linked lis 2 async add(value) { 3 const result = await this.newNode(value); 4 const insertedId = result.insertedId; 5 6 // If the linked list is empty, we need to initialize an empty linked list 7 const head = await this.getHeadID(); 8 if (head === null) { 9 this.setHead(insertedId); 10 } else { 11 // if it's not empty, update the current tail's next to the new node 12 const tailID = await this.getTail(); 13 await this.col.updateOne({ _id: tailID }, { $set: { next: insertedId } }); 14 } 15 // Update your linked list to point tail to the new node 16 this.setTail(insertedId); 17 return result; 18 }
#Find A Node
In order to traverse a linked list, we must start at the beginning of the linked list, also known as the head. Then, we follow each next pointer reference until we come to the end of the linked list, or the node we are looking for. It can be implemented by using the following steps:
- Start at the head node of your linked list.
- Check if the value matches what you're searching for. If found, return that node.
- If not found, move to the next node via the current node's next property.
- Repeat until next is null (tail/end of list).
1 // Reads through our list and returns the node we are looking for 2 async get(index) { 3 // If index is less than 0, return false 4 if (index <= -1) { 5 return false; 6 } 7 let headID = await this.getHeadID(); 8 let postion = 0; 9 let currNode = await this.col.find({ _id: headID }).next(); 10 11 // Loop through the nodes starting from the head 12 while (postion < index) { 13 // Check if we hit the end of the linked list 14 if (currNode.next === null) { 15 return false; 16 } 17 18 // If another node exists go to next node 19 currNode = await this.col.find({ _id: currNode.next }).next(); 20 postion++; 21 } 22 return currNode; 23 }
#Delete A Node
Now, let's say we want to remove a node in our linked list. In order to do this, we must again keep track of the previous node so that we can update the previous node's next pointer reference to the node that is being deleted next value is pointing to. Or to put it another way:
- Find the node you are searching for and keep track of the previous node.
- When found, update the previous nodes next to point to the next node referenced by the node to be deleted.
- Delete the found node from memory.

1 // reads through our list and removes desired node in the linked list 2 async remove(index) { 3 const currNode = await this.get(index); 4 const prevNode = await this.get(index - 1); 5 6 // If index not in linked list, return false 7 if (currNode === false) { 8 return false; 9 } 10 11 // If removing the head, reassign the head to the next node 12 if (index === 0) { 13 await this.setHead(currNode.next); 14 15 // If removing the tail, reassign the tail to the prevNode 16 } else if (currNode.next === null) { 17 await this.setTail(prevNode._id); 18 await this.col.updateOne( 19 { _id: prevNode._id }, 20 { $set: { next: currNode.next } } 21 ); 22 23 // update previous node's next to point to the next node referenced by node to be deleted 24 } else { 25 await this.col.updateOne( 26 { _id: prevNode._id }, 27 { $set: { next: currNode.next } } 28 ); 29 } 30 31 // Delete found node from memory 32 await this.col.deleteOne({ 33 _id: currNode._id, 34 }); 35 36 return true; 37 }
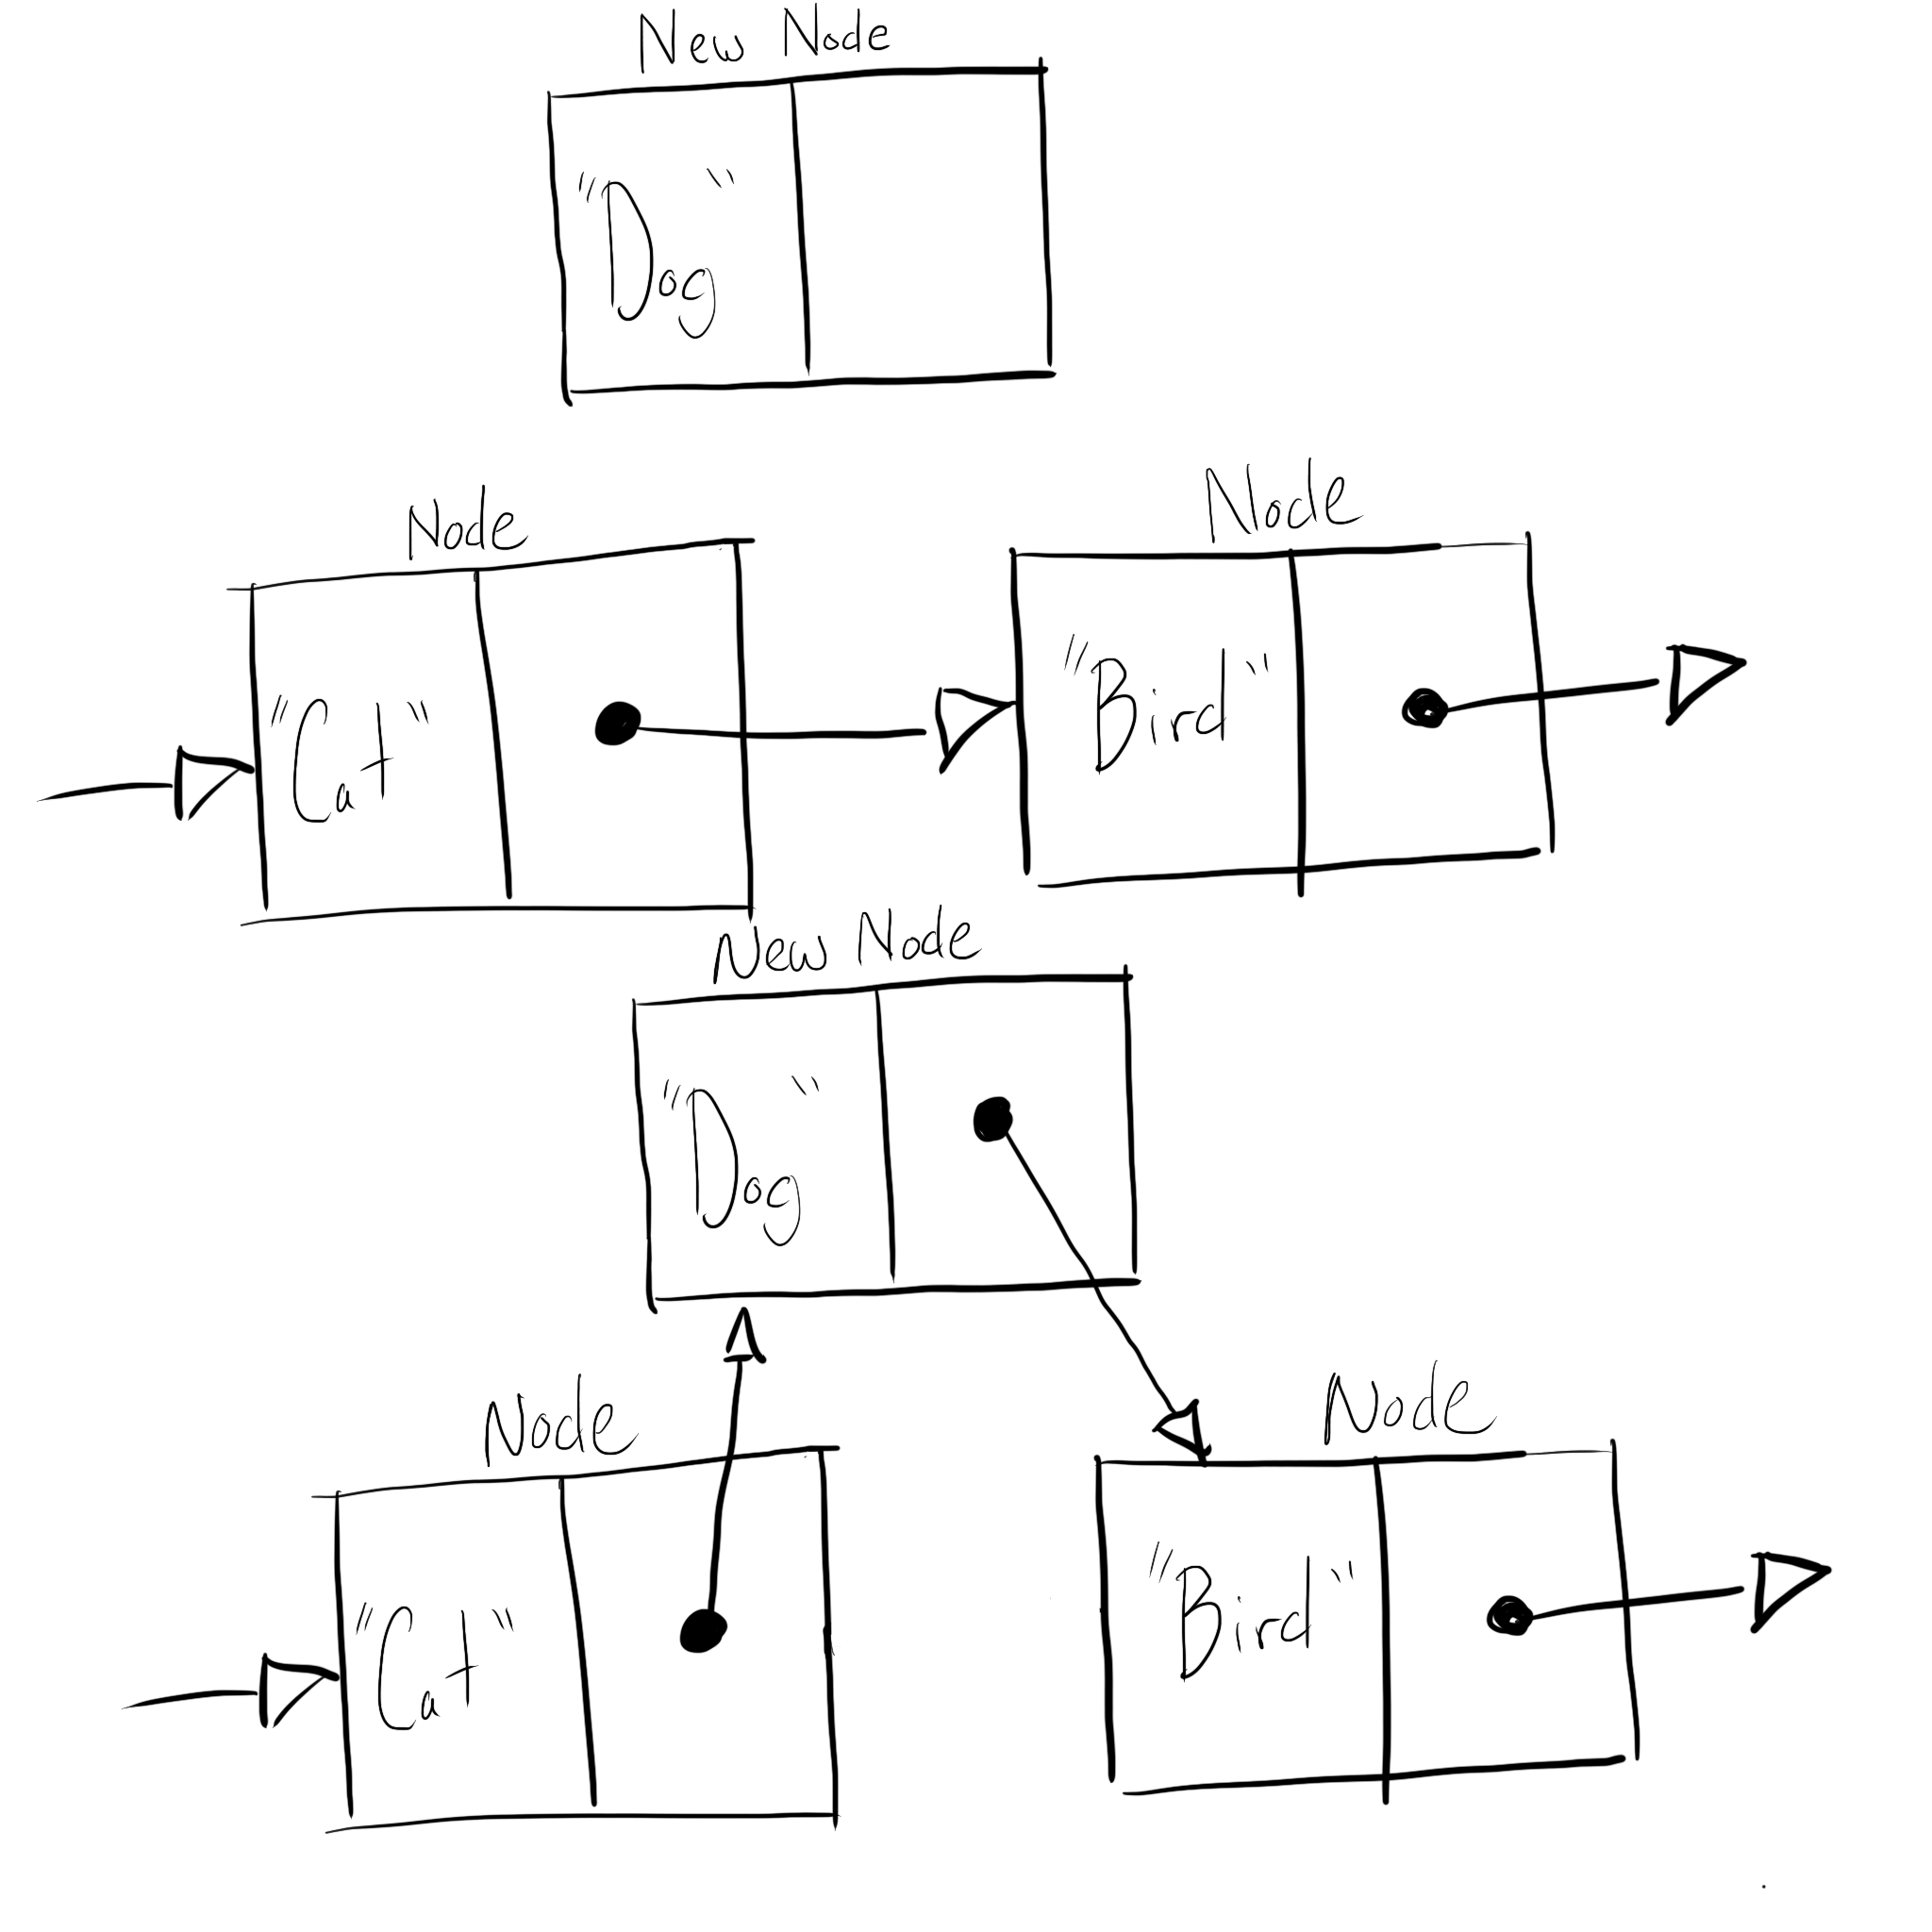
#Insert A Node
The following code inserts a node after an existing node in a singly linked list. Inserting a new node before an existing one cannot be done directly; instead, one must keep track of the previous node and insert a new node after it. We can do that by following these steps:
- Find the position/node in your linked list where you want to insert your new node after.
- Update the next property of the new node to point to the node that the target node currently points to.
- Update the next property of the node you want to insert after to point to the new node.
1 // Inserts a new node at the deisred index in the linked list 2 async insert(value, index) { 3 const currNode = await this.get(index); 4 const prevNode = await this.get(index - 1); 5 const result = await this.newNode(value); 6 const node = result.ops[0]; 7 8 // If the index is not in the linked list, return false 9 if (currNode === false) { 10 return false; 11 } 12 13 // If inserting at the head, reassign the head to the new node 14 if (index === 0) { 15 await this.setHead(node._id); 16 await this.col.updateOne( 17 { _id: node._id }, 18 { $set: { next: currNode.next } } 19 ); 20 } else { 21 // If inserting at the tail, reassign the tail 22 if (currNode.next === null) { 23 await this.setTail(node._id); 24 } 25 26 // Update the next property of the new node 27 // to point to the node that the target node currently points to 28 await this.col.updateOne( 29 { _id: prevNode._id }, 30 { $set: { next: node._id } } 31 ); 32 33 // Update the next property of the node you 34 // want to insert after to point to the new node 35 await this.col.updateOne( 36 { _id: node._id }, 37 { $set: { next: currNode.next } } 38 ); 39 } 40 return node; 41 }
#Summary
Many developers want to learn the fundamental Computer Science data structures and algorithms or get a refresher on them. In this author's humble opinion, the best way to learn data structures is by implementing them on your own. This exercise is a great way to learn data structures as well as learn the fundamentals of MongoDB CRUD operations.
When you're ready to implement your own linked list in MongoDB, check out MongoDB Atlas, MongoDB's fully managed database-as-a-service. Atlas is the easiest way to get started with MongoDB and has a generous, forever-free tier.
If you want to learn more about linked lists and MongoDB, be sure to check out these resources.
#Related Links
Check out the following resources for more information: