#Table of Contents
#Introduction
Building something with your bare hands gives a sense of satisfaction like few other tasks. But there's really no comparison to the feeling you get when you create something that not only accomplishes the immediate task at hand but also enables you to more efficiently accomplish that same task in the future. Or, even better, when someone else can use what you have built to more easily accomplish their tasks. That is what we are going to do today. We are going to build something that will automate the process of importing data into MongoDB.
An executable program is powerful because it's self contained and transportable. There's no requirement to compile it or ensure that other elements are present in the environment. It just runs. You can share it with others and assuming they have a relatively similar system, it'll just run for them too. We're going to focus on accomplishing our goal using Swift, Apple's easy-to-learn programming language. We'll also feature use of our brand new MongoDB Swift Driver that enables you to create, read, update and delete data in a MongoDB database.
#TL;DR:
Rather have a video run-through of this content? Check out the Youtube Video where my colleague Nic Raboy, and I talk through this very same content.
#Goals
Here are the goals for this article.
- Increase your familiarity with MongoDB Atlas
- Introduce you to the Swift Language, and the Xcode Development Environment
- Introduce you to the MongoDB Swift Driver
- Introduce you to the Swift Package Manager
By the end of this article, if we've met our goals, you will be able to do the following:
- Use Xcode to begin experimenting with Swift
Use Swift Package Manager to:
- Create a basic project.
- Integrate the MongoDB Swift Driver into your project
- Create an exectuable on your Mac.
#Prerequisites
Before we begin, let's clarify some of the things you'll have to have in place to get started.
- A Mac & MacOS (not an iOS device). You may be reading this on your Windows PC or an iPad. Sorry folks this tutorial was written for you to follow along on your Mac machine: MacBook, MacBook Pro, iMac, etc. You may want to check out macincloud if you're interested in a virtual Mac experience.
- Xcode. You should have Xcode Installed - Visit Apple's App Store to install on your Mac.
- Swift Installed - Visit Apple's Developer Site to learn more.
- Access to a MongoDB Database - Visit MongoDB Atlas to start for free. Read more about MongoDB Atlas.
If you haven't had much experience with Xcode or MacOS Application Development, check out the guides on Apple's Developer Hub. Getting started is very easy and it's free!
#What will we build?
The task I'm trying to automate involves importing data into a MongoDB database. Before we get too far down the path of creating a solution, let's document our set of requirements for what we'll create.
#Overview of Steps
Here's a quick run-down of the steps we'll work on to complete our task.
- Launch an Atlas Cluster.
- Add a Database user/password, and a network exception entry so you can access your database from your IP Address.
- Create a Swift project using Swift Package Manager (
swift package init --type=executable) - Generate an Xcode project using Swift Package Manager (
swift package generate-xcodeproj) - Create a (
for loop) using (String) to access, and print out the data in yourexample.csvfile. (See csvread.swift) - Modify your package to pull in the MongoDB Swift Driver. (See Package.swift)
- Test. (
swift build; swift run) Errors? See FAQ section below. - Modify your code to incorporate the MongoDB Swift Driver, and write documents. (See Sources/command-line-swift-mongodb/main.swift)
- Test. (
swift build; swift run) Errors? See FAQ section below. - Create executable and release. (
swift package release)
#Requirements for Solution
- The solution must import a set of data that starts in CSV (or tabular/excel) format into an existing MongoDB database.
- Each row of the data in the CSV file should become a separate document in the MongoDB Database. Further, each new document should include a new field with the import date/time.
- It must be done with minimal knowledge of MongoDB - i.e. Someone with relatively little experience and knowledge of MongoDB should be able to perform the task within several minutes.
We could simply use mongoimport with the following command line:
1 mongoimport --host localhost:27017 --type csv --db school --collection students --file example.csv --headerline
If you're familiar with MongoDB, the above command line won't seem tricky at all. However, this will not satisfy our requirements for the following reasons:
- Requirement 1: Pass - It will result in data being imported into MongoDB.
- Requirement 2: Fail - While each row WILL become a separate document, we'll not get our additional date field in those documents.
- Requirement 3: Fail - While the syntax here may seem rather straight-forward if you've used MongoDB before, to a newcomer, it can be a bit confusing. For example, I'm using localhost here... when we run this executable on another host, we'll need to replace that with the actual hostname for our MongoDB Database. The command syntax will get quite a bit more complex once this happens.
So then, how will we build something that meets all of our requirements?
We can build a command-line executable that uses the MongoDB Swift Driver to accomplish the task. Building a program to accomplish our task enables us to abstract much of the complexity associated with our task. Fortunately, there's a driver for Swift and using it to read CSV data, manipulate it and write it to a MongoDB database is really straight forward.
#Launching Your Database Cluster in Atlas
You'll need to create a new cluster and load it with sample data. My colleague Maxime Beugnet has created a video tutorial to help you out, but I also explain the steps below:
- Click "Start free" on the MongoDB homepage.
- Enter your details, or just sign up with your Google account, if you have one.
- Accept the Terms of Service
Create a Starter cluster.
- Select the cloud provider where you'd like to store your MongoDB Database
- Pick a region that makes sense for you.
- You can change the name of the cluster if you like. I've called mine "MyFirstCluster".
Once your cluster launches, be sure that you add a Network Exception entry for your current IP and then add a database username and password. Take note of the username and password - you'll need these shortly.
#Setting Up The Project
We'll start on our journey by creating a Swift Package using Swift Package Manager. This tool will give us a template project and establish the directory structure and some scaffolding we'll need to get started. We're going to use the swift command line tool with the package subcommand.
There are several variations that we can use. Before jumping in, let's example the difference in some of the flags.
1 swift package init
This most basic variation will give us a general purpose project. But, since we're building a MacOS, executable, let's add the --type flag to indicate the type of project we're working on.
1 swift package init --type=executable
This will create a project that defines the "product" of a build -- which is in essense our executable. Just remember that if you're creating an executable, typically for server-side Swift, you'll want to incorporate the --type=executable flag.
Xcode is where most iOS, and Apple developers in general, write and maintain code so let's prepare a project so we can use Xcode too. Now that we've got our basic project scaffolding in place, let's create an Xcode project where we can modify our code.
To create an Xcode project simply execute the following command:
1 swift package generate-xcodeproj
Then, we can open the .xcproject file. Your mac should automatically open Xcode as a result of trying to open an Xcode Project file.
1 open <your project name>.xcodeproj/ # change this to the name that was created by the previous command.
#Looking at our Data
With our project scaffolding in place, let's turn our focus to the data we'll be manipulating with our executable. Let's look at the raw data first. Let's say there's a list of students that come out every month that I need to get into my database. It might look something like this:
1 firstname,lastname,assigned 2 Michael,Basic,FALSE 3 Dan,Acquilone,FALSE 4 Eli,Zimmerman,FALSE 5 Liam,Tyler,FALSE 6 Jane,Alberts,FALSE 7 Ted,Williams,FALSE 8 Suzy,Langford,FALSE 9 Paulina,Stern,FALSE 10 Jared,Lentz,FALSE 11 June,Gifford,FALSE 12 Wilma,Atkinson,FALSE
In this example data, we have 3 basic fields of information: First Name, Last Name, and a Boolean value indicating whether or not the student has been assigned to a specific class.
We want to get this data from it's current form (CSV) into documents inside the database and along the way, add a field to record the date that the document was imported. This is going to require us to read the CSV file inside our Swift application. Before proceeding, make sure you either have similar data in a file to which you know the path. We'll be creating some code next to access that file with Swift.
Once we're finished, the data will look like the following, represented in a JSON document:
1 { 2 "_id": { 3 "$oid": "5f491a3bf983e96173253352" // this will come from our driver. 4 }, 5 "firstname": "Michael", 6 "lastname": "Basic", 7 "date": { 8 "$date": "2020-08-28T14:52:43.398Z" // this will be set by our Struct default value 9 }, 10 "assigned": false 11 }
In order to get the rows and fields of names into MongoDB, we'll use Swift's built-in String class. This is a powerhouse utility that can do everything from read the contents of a file to interpolate embedded variables and do comparisons between two or more sets of strings. The class method contentsOfFile of the String class will access the file based on a filepath we provide, open the file and enable us to access its contents. Here's what our code might look like if we were just going to loop through the CSV file and print out the rows it contains.
You may be tempted to just copy/paste the code below. I would suggest that you type it in by hand... reading it from the screen. This will enable you to experience the power of auto-correct, and code-suggest inside Xcode. Also, be sure to modify the value of the
pathvariable to point to the location where you put yourexample.csvfile.
1 import Foundation 2 3 let path = "/Users/mlynn/Desktop/example.csv" // change this to the path of your csv file 4 do { 5 let contents = try String(contentsOfFile: path, encoding: .utf8) 6 let rows = contents.components(separatedBy: NSCharacterSet.newlines) 7 for row in rows { 8 if row != "" { 9 print("Got Row: \(row)") 10 } 11 } 12 }
Let's take a look at what's happening here.
- Line 1: We'll use the Foundation core library. This gives us access to some basic string, character and comparison methods. The import declaration gives us access to native, as well as third party libraries and modules.
- Line 3: Hard code a path variable to the CSV file.
- Lines 6-7: Use the String method to access the contents of the CSV file.
- Line 8: Loop through each row in our file and display the contents.
To run this simple example, let's open the main.swift file that our that the command swift package init created for us. To edit this file, in Xcode,
To begin, let's open the main.swift file that our that the command swift package init created for us. To edit this file, in Xcode, traverse the folder tree
under Project->Sources-Project name... and open main.swift. Replace the simple hello world with the code above.
Running this against our example.csv file, you should see something like the following output. We'll use the commands swift build, and swift run.

#Integrating the MongoDB Swift Driver
With this basic construct in place, we can now begin to incorporate the code necessary to insert a document into our database for each row of data in the csv file. Let's start by configuring Swift Package Manager to integrate the MongoDB Swift Driver.

Navigate in the project explorer to find the Package.swift file. Replace the contents with the Package.swift file from the repo:
1 // swift-tools-version:5.2 2 // The swift-tools-version declares the minimum version of Swift required to build this package. 3 import PackageDescription 4 5 let package = Package( 6 name: "csvimport-swift", 7 platforms: [ 8 .macOS(.v10_15), 9 ], 10 dependencies: [ 11 .package(url: "https://github.com/mongodb/mongo-swift-driver.git", from: "1.0.1"), 12 ], 13 targets: [ 14 .target( 15 name: "csvimport-swift", 16 dependencies: [.product(name: "MongoSwiftSync", package: "mongo-swift-driver")]), 17 .testTarget( 18 name: "csvimport-swiftTests", 19 dependencies: ["csvimport-swift"]), 20 ] 21 )
If you're unfamiliar with Swift Package Manager take a detour and read up over here.
We're including a statement that tells Swift Package Manager that we're building this executable for a specific set of MacOS versions.
1 platforms: [ 2 .macOS(.v10_15) 3 ],
Tip: If you leave this statement out, you'll get a message stating that the package was designed to be built for MacOS 10.10 or similar.
Next we've included references to the packages we'll need in our software to insert, and manipulate MongoDB data. In this example, we'll concentrate on an asynchronous implementation. Namely, the mongo-swift-driver.
Now that we've included our dependencies, let's build the project. Build the project often so you catch any errors you may have inadvertently introduced early on.
1 swift package build
You should get a response similar to the following:
1 [3/3] Linking cmd
Now let's modify our basic program project to make use of our MongoDB driver.
1 import Foundation 2 import MongoSwiftSync 3 4 var murl: String = "mongodb+srv://<username>:\(ProcessInfo.processInfo.environment["PASS"]!)@myfirstcluster.zbcul.mongodb.net/<dbname>?retryWrites=true&w=majority" 5 let client = try MongoClient(murl) 6 7 let db = client.db("students") 8 let session = client.startSession(options: ClientSessionOptions(causalConsistency: true)) 9 10 struct Person: Codable { 11 let firstname: String 12 let lastname: String 13 let date: Date = Date() 14 let assigned: Bool 15 let _id: BSONObjectID 16 } 17 18 let path = "/Users/mlynn/Desktop/example.csv" 19 var tempAssigned: Bool 20 var count: Int = 0 21 var header: Bool = true 22 23 let personCollection = db.collection("people", withType: Person.self) 24 25 do { 26 let contents = try String(contentsOfFile: path, encoding: .utf8) 27 let rows = contents.components(separatedBy: NSCharacterSet.newlines) 28 for row in rows { 29 if row != "" { 30 var values: [String] = [] 31 values = row.components(separatedBy: ",") 32 if header == true { 33 header = false 34 } else { 35 if String(values[2]).lowercased() == "false" || Bool(values[2]) == false { 36 tempAssigned = false 37 } else { 38 tempAssigned = true 39 } 40 try personCollection.insertOne(Person(firstname: values[0], lastname: values[1], assigned: tempAssigned, _id: BSONObjectID()), session: session) 41 count.self += 1 42 print("Inserted: \(count) \(row)") 43 44 } 45 } 46 } 47 }
Line 2 imports the driver we'll need (mongo-swift).
Next, we configure the driver.
1 var murl: String = "mongodb+srv://<username>:\(ProcessInfo.processInfo.environment["PASS"]!)@myfirstcluster.zbcul.mongodb.net/<dbname>?retryWrites=true&w=majority" 2 let client = try MongoClient(murl) 3 4 let db = client.db("students") 5 let session = client.startSession(options: ClientSessionOptions(causalConsistency: true))
Remember to replace <username> with the user you created in Atlas.
To read and write data from and to MongoDB in Swift, we'll
need to leverage a Codable structure. Codeables are an amazing feature of Swift and definitely helpful
for writing code that will write data to MongoDB. Codables is actually an alias for two protocols: Encodable, and Decodable.
When we make our Struct conform to the Codable protocol, we're able to encode our string data into JSON and then decode it back
into a simple Struct using JSONEncoder and JSONDecoder respectively.
We'll need this structure because
the format used to store data in MongoDB is slightly different that the representation
you see of that data structure in Swift. We'll create
a structure to describe what our document schema should look like inside MongoDB.
Here's what our schema Struct should look like:
1 struct Code: Codable { 2 let code: String 3 let assigned: Bool 4 let date: Date = Date() 5 let _id: BSONObjectID 6 }
Notice we've got all the elements from our CSV file plus a date field.
We'll also need a few temporary variables that we will use as we process the data. count and a special temporary variable I'll
use when I determine whether or not a student is assigned to a class or not... tempAssigned. Lastly, in this code block, I'll create a variable to store the state
of our position in the file. header will be set to true initially because we'll want to skip the first row of data. That's where the column headers live.
1 let path = "/Users/mlynn/Desktop/example.csv" 2 var tempAssigned: Bool 3 var count: Int = 0 4 var header: Bool = true
Now we can create a reference to the collection in our MongoDB Database that we'll use to store our student data. For lack of a better name, I'm calling mine personCollection.
Also, notice that we're providing a link back to our Struct using the withType argument to the collection method. This ensures that the driver knows what type of data we're
dealing with.
1 let personCollection = db.collection("people", withType: Person.self)
The next bit of code is at the heart of our task. We're going to loop through each row and create a document. I've commented and explained each row inline.
1 let contents = try String(contentsOfFile: path, encoding: .utf8) // get the contents of our csv file with the String built-in 2 let rows = contents.components(separatedBy: NSCharacterSet.newlines) // get the individual rows separated by newline characters 3 for row in rows { // Loop through all rows in the file. 4 if row != "" { // in case we have an empty row... skip it. 5 var values: [String] = [] // create / reset the values array of type string - to null. 6 values = row.components(separatedBy: ",") // assign the values array to the fields in the row of data 7 if header == true { // if it's the first row... skip it and. 8 header = false // Set the header to false so we do this only once. 9 } else { 10 if String(values[2]).lowercased() == "false" || Bool(values[2]) == false { 11 tempAssigned = false // Above: if its the string or boolean value false, so be it 12 } else { 13 tempAssigned = true // otherwise, explicitly set it to true 14 } 15 try personCollection.insertOne(Person(firstname: values[0], lastname: values[1], assigned: tempAssigned, _id: BSONObjectID()), session: session) 16 count.self += 1 // Above: use the insertOne method of the collection class form 17 print("Inserted: \(count) \(row)") // the mongo-swift-driver and create a document with the Person ``Struct``. 18 } 19 } 20 }
#Conclusion
Importing data is a common challenge. Even more common is when we want to automate the task of inserting, or manipulating data with MongoDB. In this how-to, I've explained how you can get started with Swift and accomplish the task of simplifying data import by creating an executable, command-line tool that you can share with a colleague to enable them to import data for you. While this example is quite simple in terms of how it solves the problem at hand, you can certainly take the next step and begin to build on this to support command-line arguments and even use it to not only insert data but also to remove, and merge or update data.
I've prepared a section below titled Troubleshooting in case you come across some common errors. I've tried my best to think of all of the usual issues you may find. However, if you do find another, issue, please let me know. The best way to do this is to Sign Up for the MongoDB Community and be sure to visit the section for Drivers and ODMs.
#Resources
#Troubleshooting
Use this section to help solve some common problems. If you still have issues after reading these common solutions, please visit me in the MongoDB Community.
#No Such Module
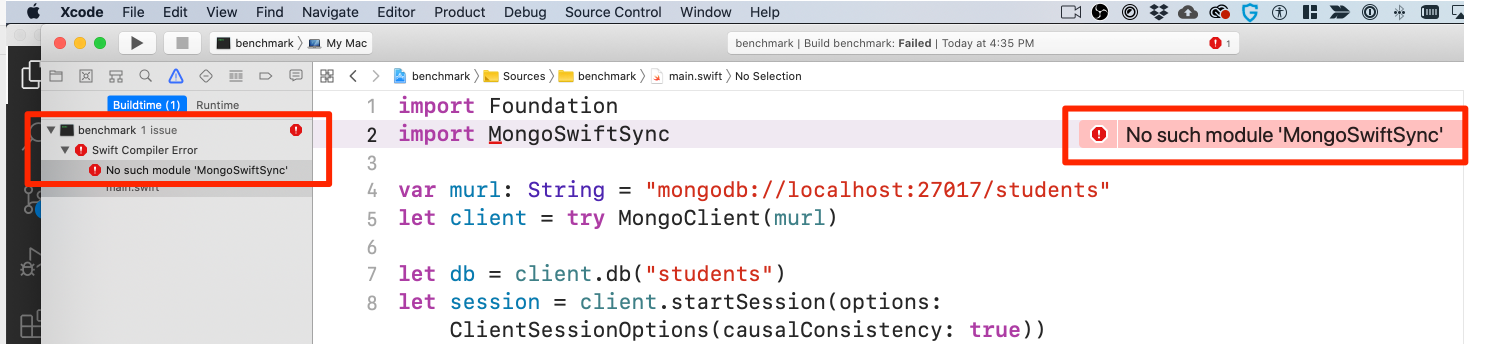
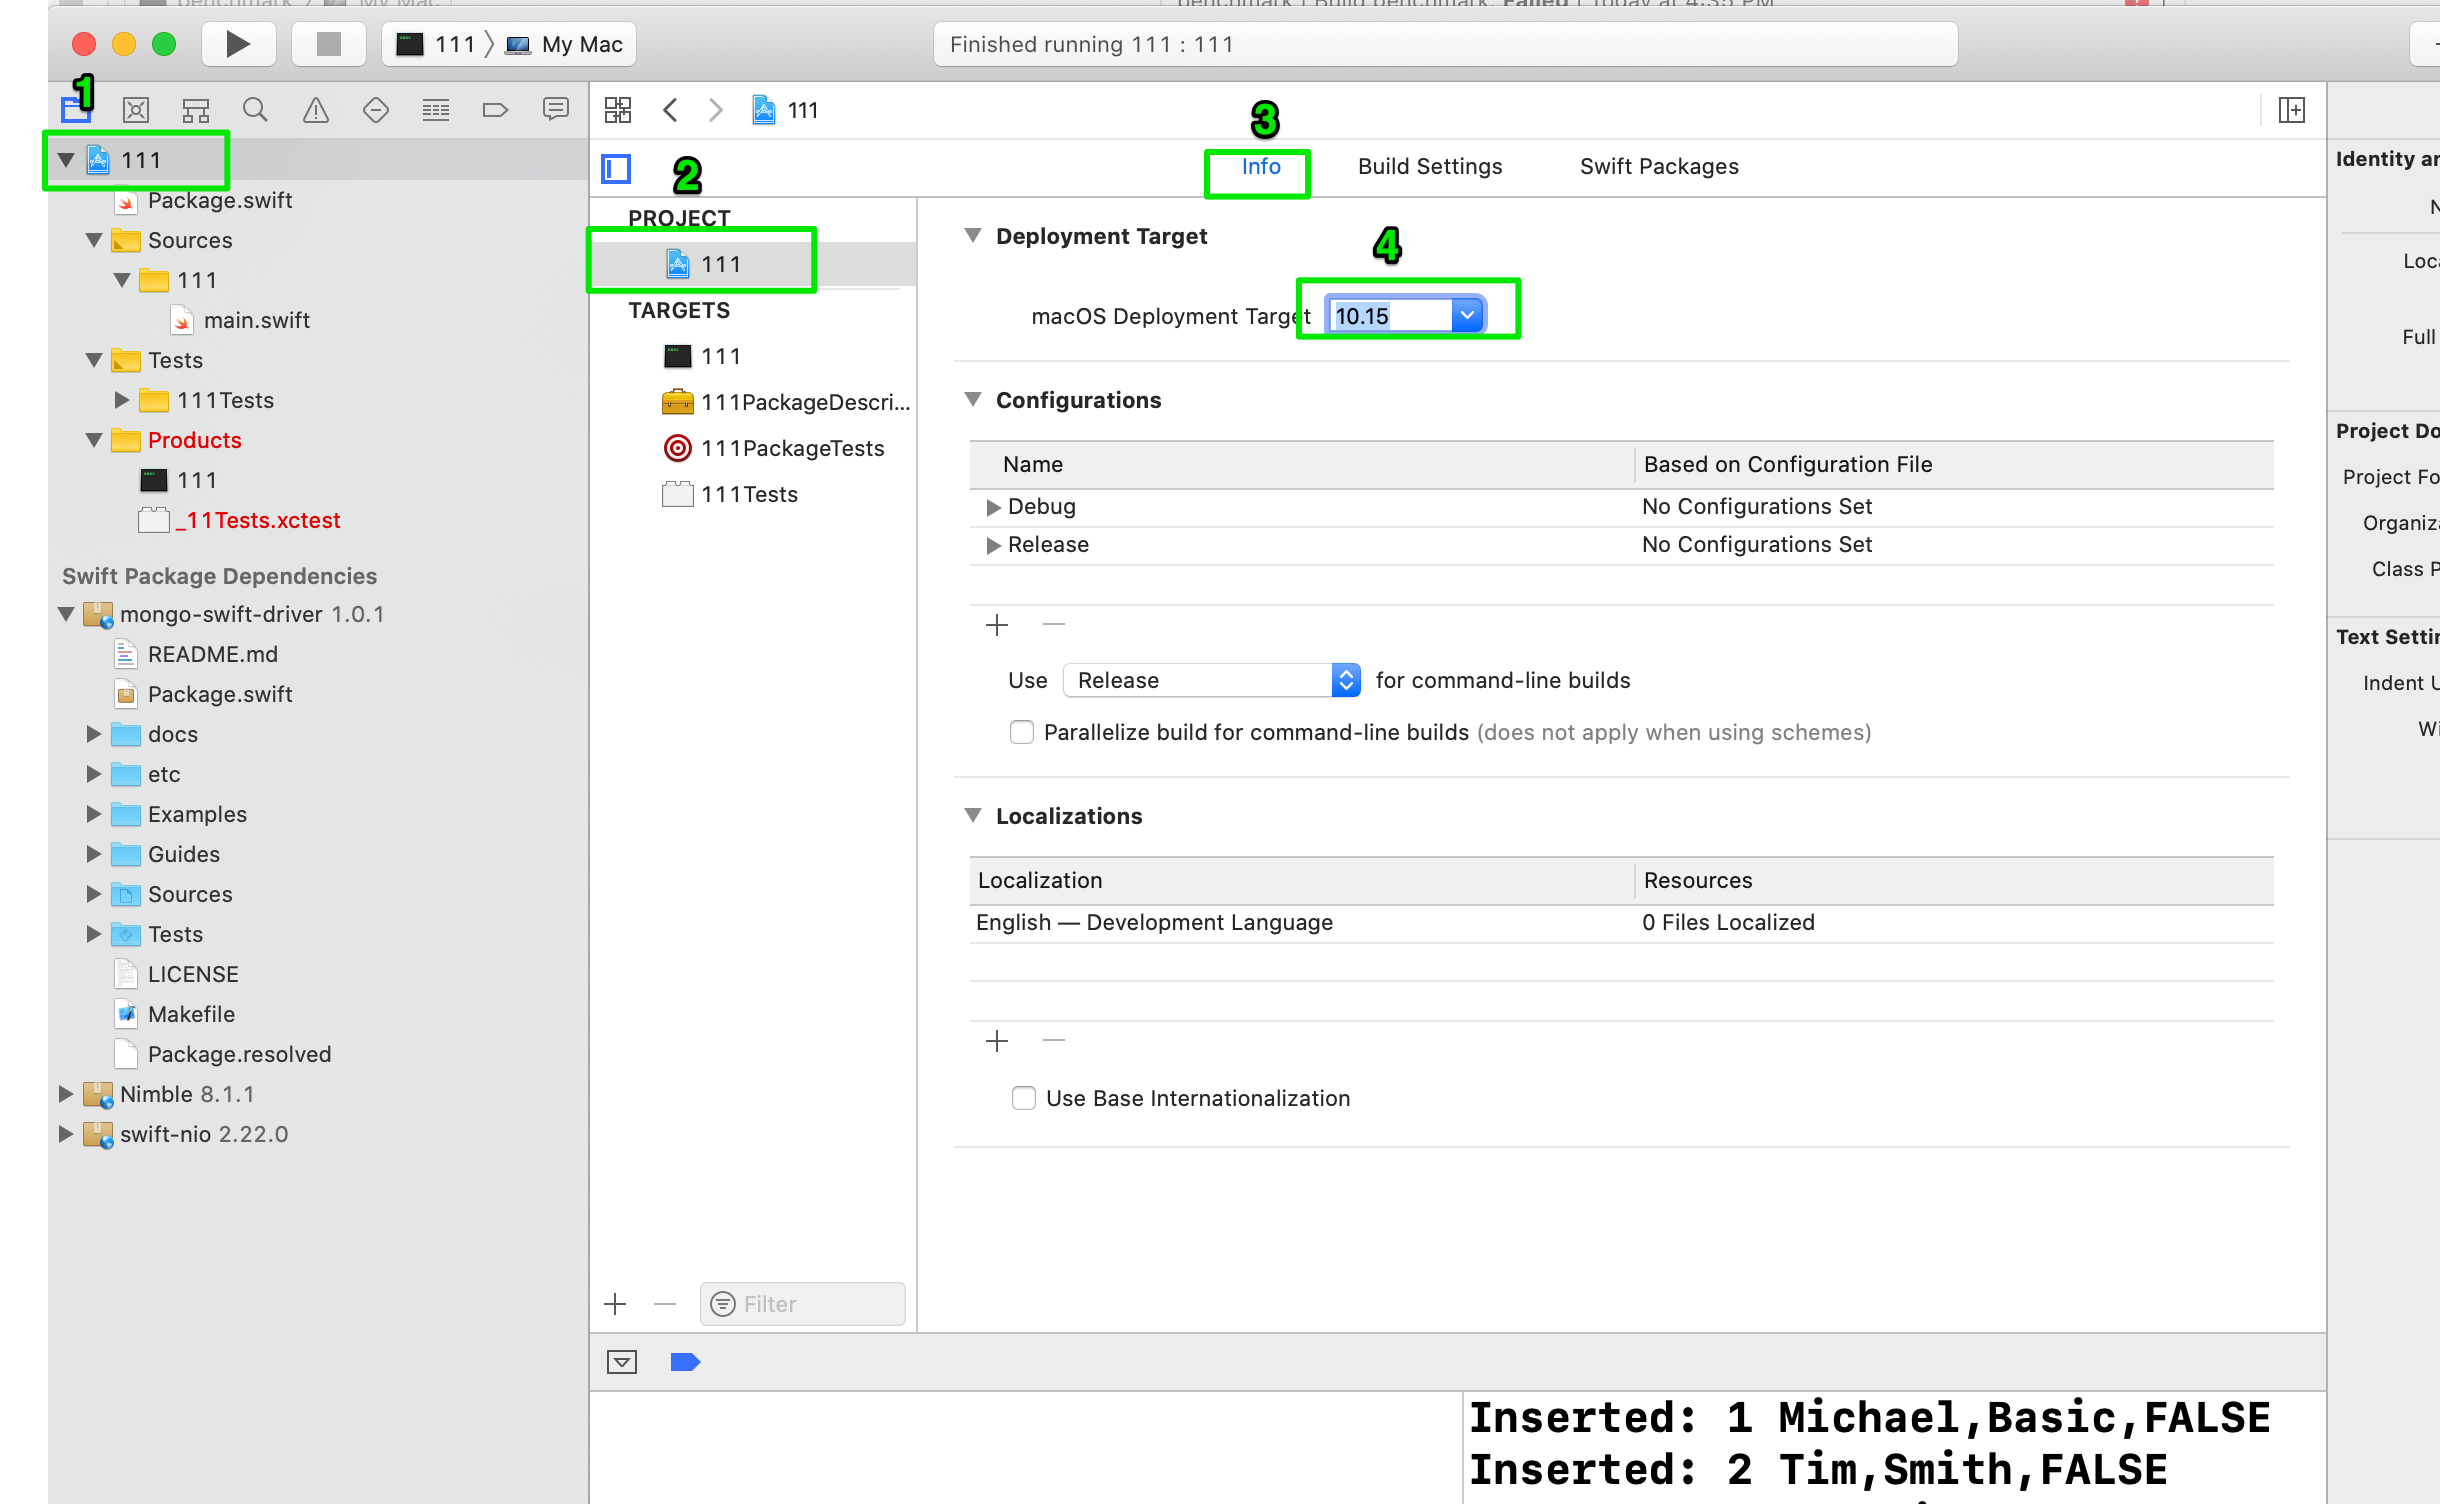
This occurs when Swift was unable to build the mongo-swift-driver module. This most typically occurs when
a developer is attempting to use Xcode and has not specified a minimum target OS version. Review the attached image and note the sequence
of clicks to get to the appropriate setting. Change that setting to 10.15 or greater.