
#TL;DR
In this tutorial, we will be exploring how to use MongoDB Realm and MongoDB Atlas with Composer Pro No-Code platform from AppGyver Inc.
We will be covering the following topics:
- Authentication and data permissions
- Data access from MongoDB Realm
- Integrating GraphQL
This article is focused more on the MongoDB Atlas and Realm side. If you wish to understand the AppGyver side, please visit the twin post on AppGyver's documentation.
#Introduction
We always want to build simple, robust, and fast-growing applications. Together with technology, development methodologies evolve, helping us to build applications faster without all the unneeded boilerplate coding and allowing us to focus on the important aspects of our applications.
MongoDB Realm and AppGyver's Composer Pro are exactly the tools you need to build your Cross-Platform applications using as little code as possible while maintaining all the advantages of modern versatile applications.
In this tutorial, we will cover all needed aspects to get you going from Authentication routing to consuming/storing and reacting to your data changes.
It's important to note that both platforms have a generous free tier, so you can complete this tutorial and many more completely free of charge.
Let's go!
#Development Prerequisites
- AppGyver account and a new Application.
If you haven't yet set up your free cluster on MongoDB Atlas, now is a great time to do so. You have all the instructions in this blog post.
If you are new to either platform, I recommend watching the following tutorials before continuing:
#MongoDB Realm
- MongoDB Realm (Former "Stitch") Basics blog (The blog uses the old name "Stitch," since product was lately rebranded to MongoDB Realm)
#AppGyver Platform
Once we have our application and clusters defined, we can start building our application. On the backend side, I will load data for the movie search application based on MongoDB's "mflix" dataset which I can load to my cluster via the sample data load button.
In Composer Pro, I will configure three initial pages with the canvas editor:
- The login page with username/password login form for my Auth process, created by going:
- Auth global toolbar section
- Enable authentication
- Direct third party authentication
- The main movies feed list.
- A movie details page, to be opened once we click on the movie and its comments.
#Authentication
#Email/Password
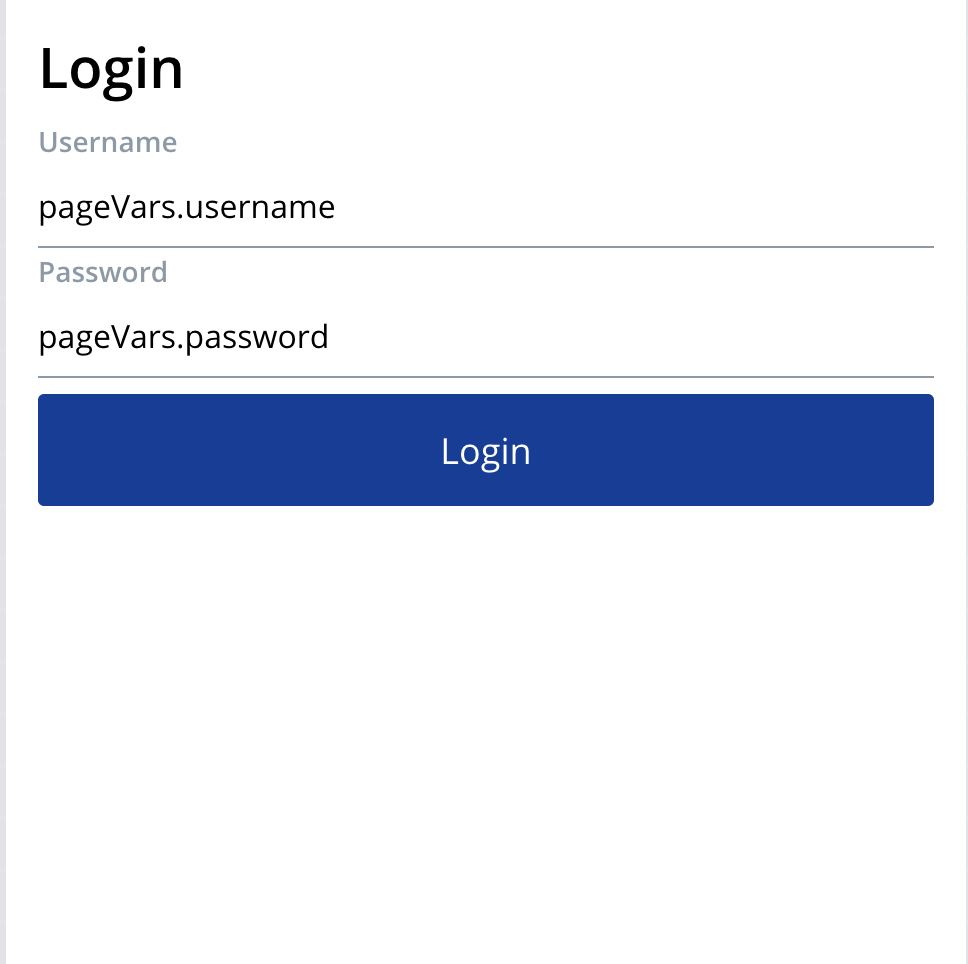
On the AppGyver side, I will need to fix my created login page:
- Add any additional components like title and input fields.
- Perform the desired design via the style tab of each component.
- Use the relevant page variables (
credentials.username,credentials.passwordetc.) and confirm the binding with the input fields via the properties bar, so the variables will be populated upon user input.
Once successfully bound, the variable name will be presented on the fields (similar to the below picture).
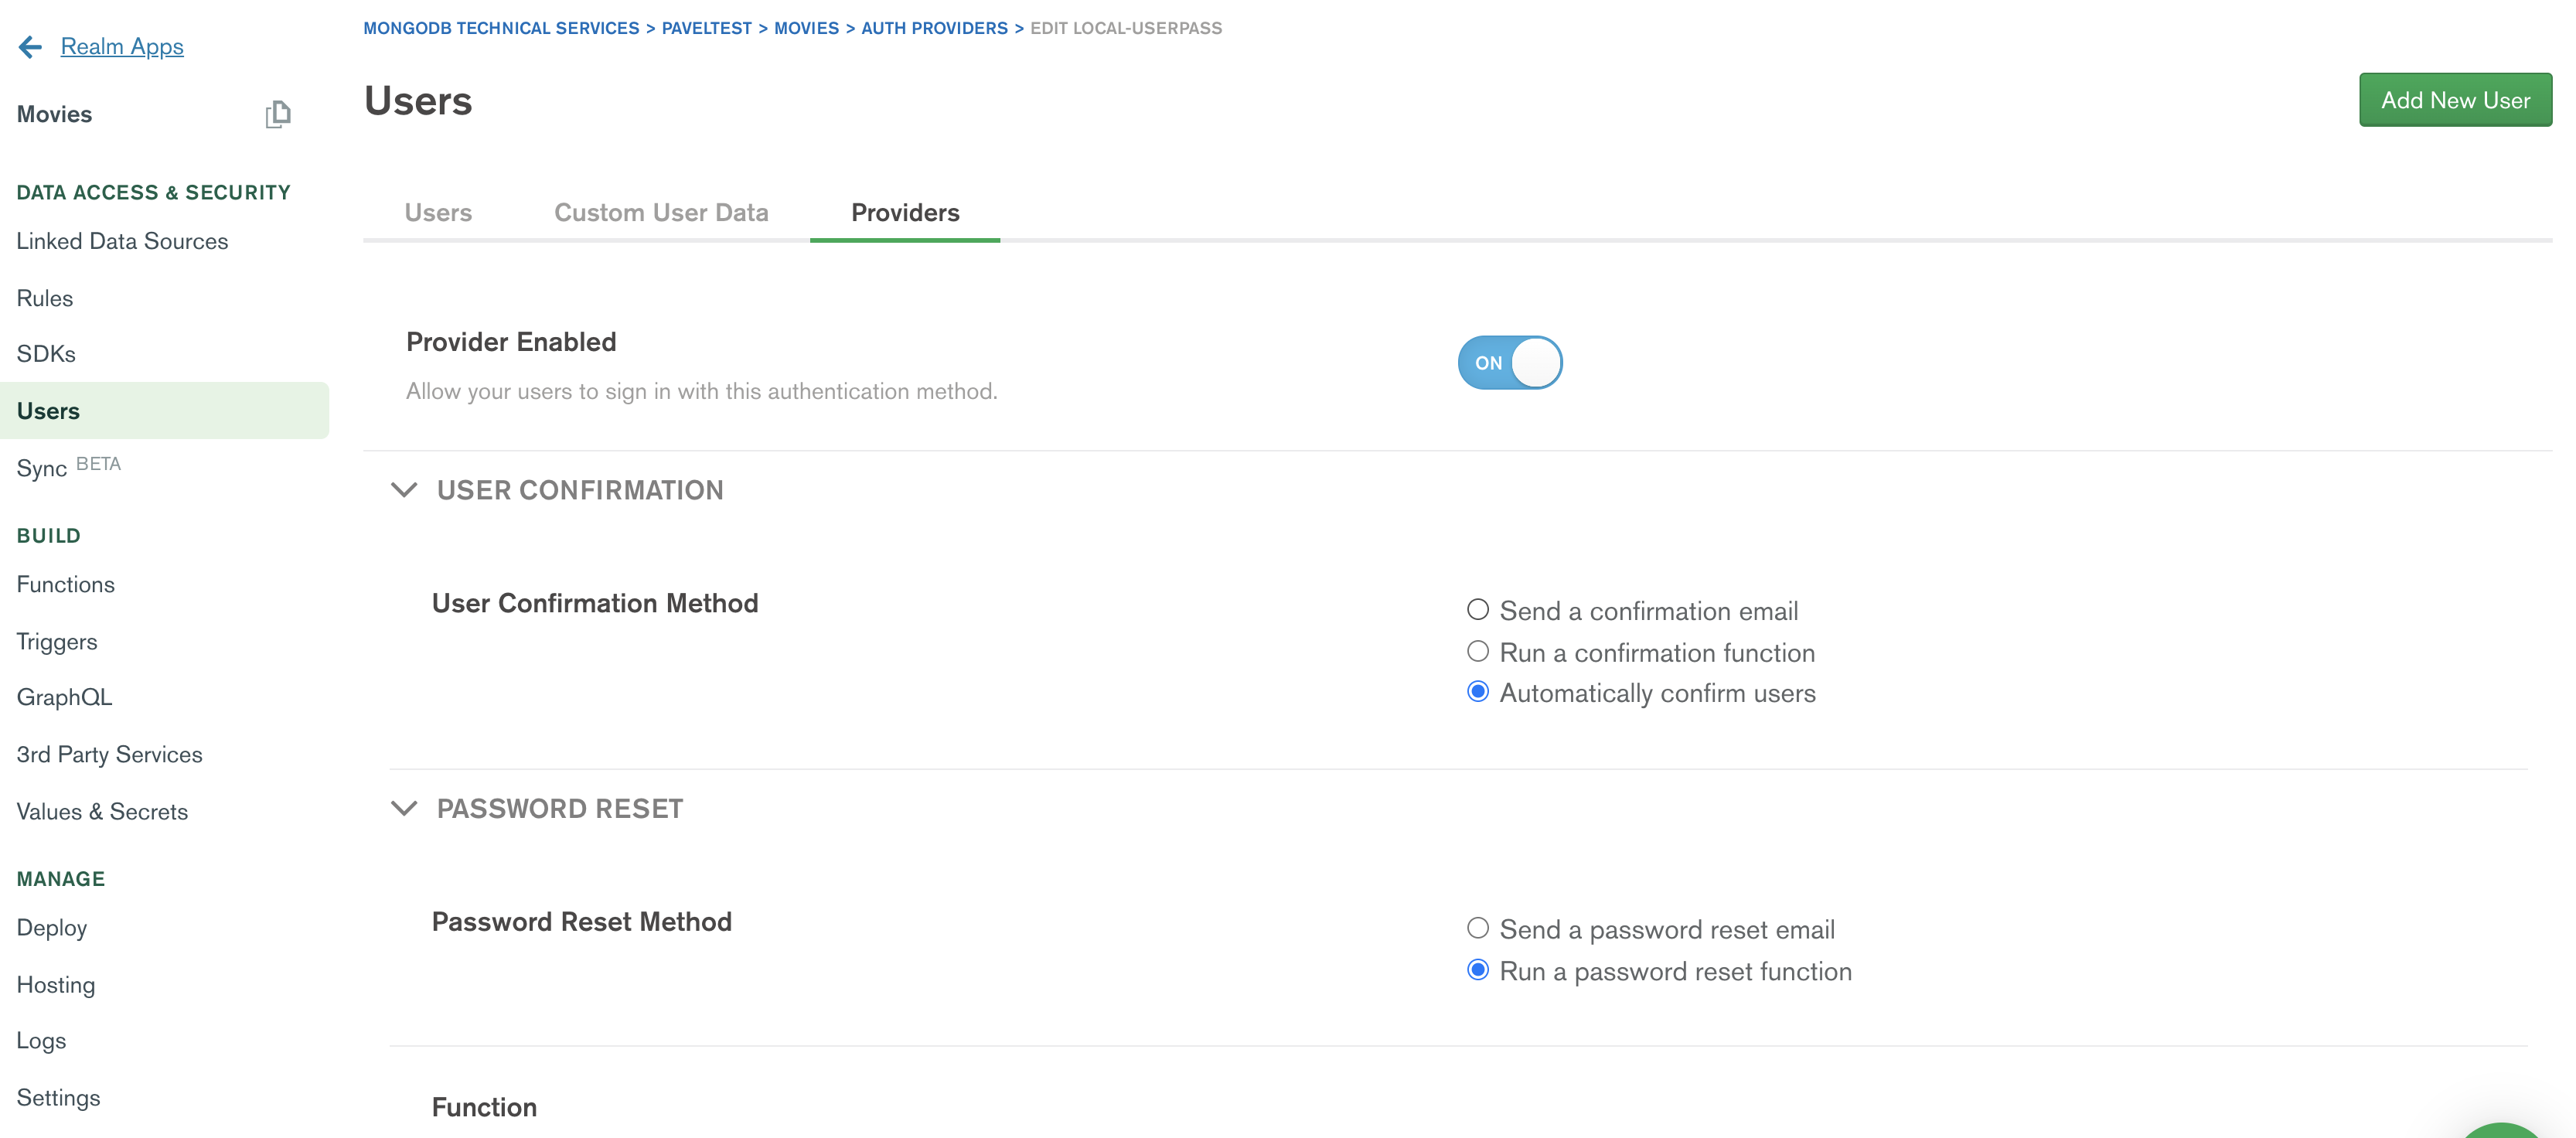
On the Realm Application, I should enable the Email/Password provider by:
- Going to
Users>Authentication Providers> TogglingEmail/Passwordto enable. - Choosing "Automatically confirm users" and "Run a password reset function." Potentially, you can use any of the providers; I will showcase a custom-function provider later in the tutorial in this section.
For more details, read more on Realm authentication concepts here.
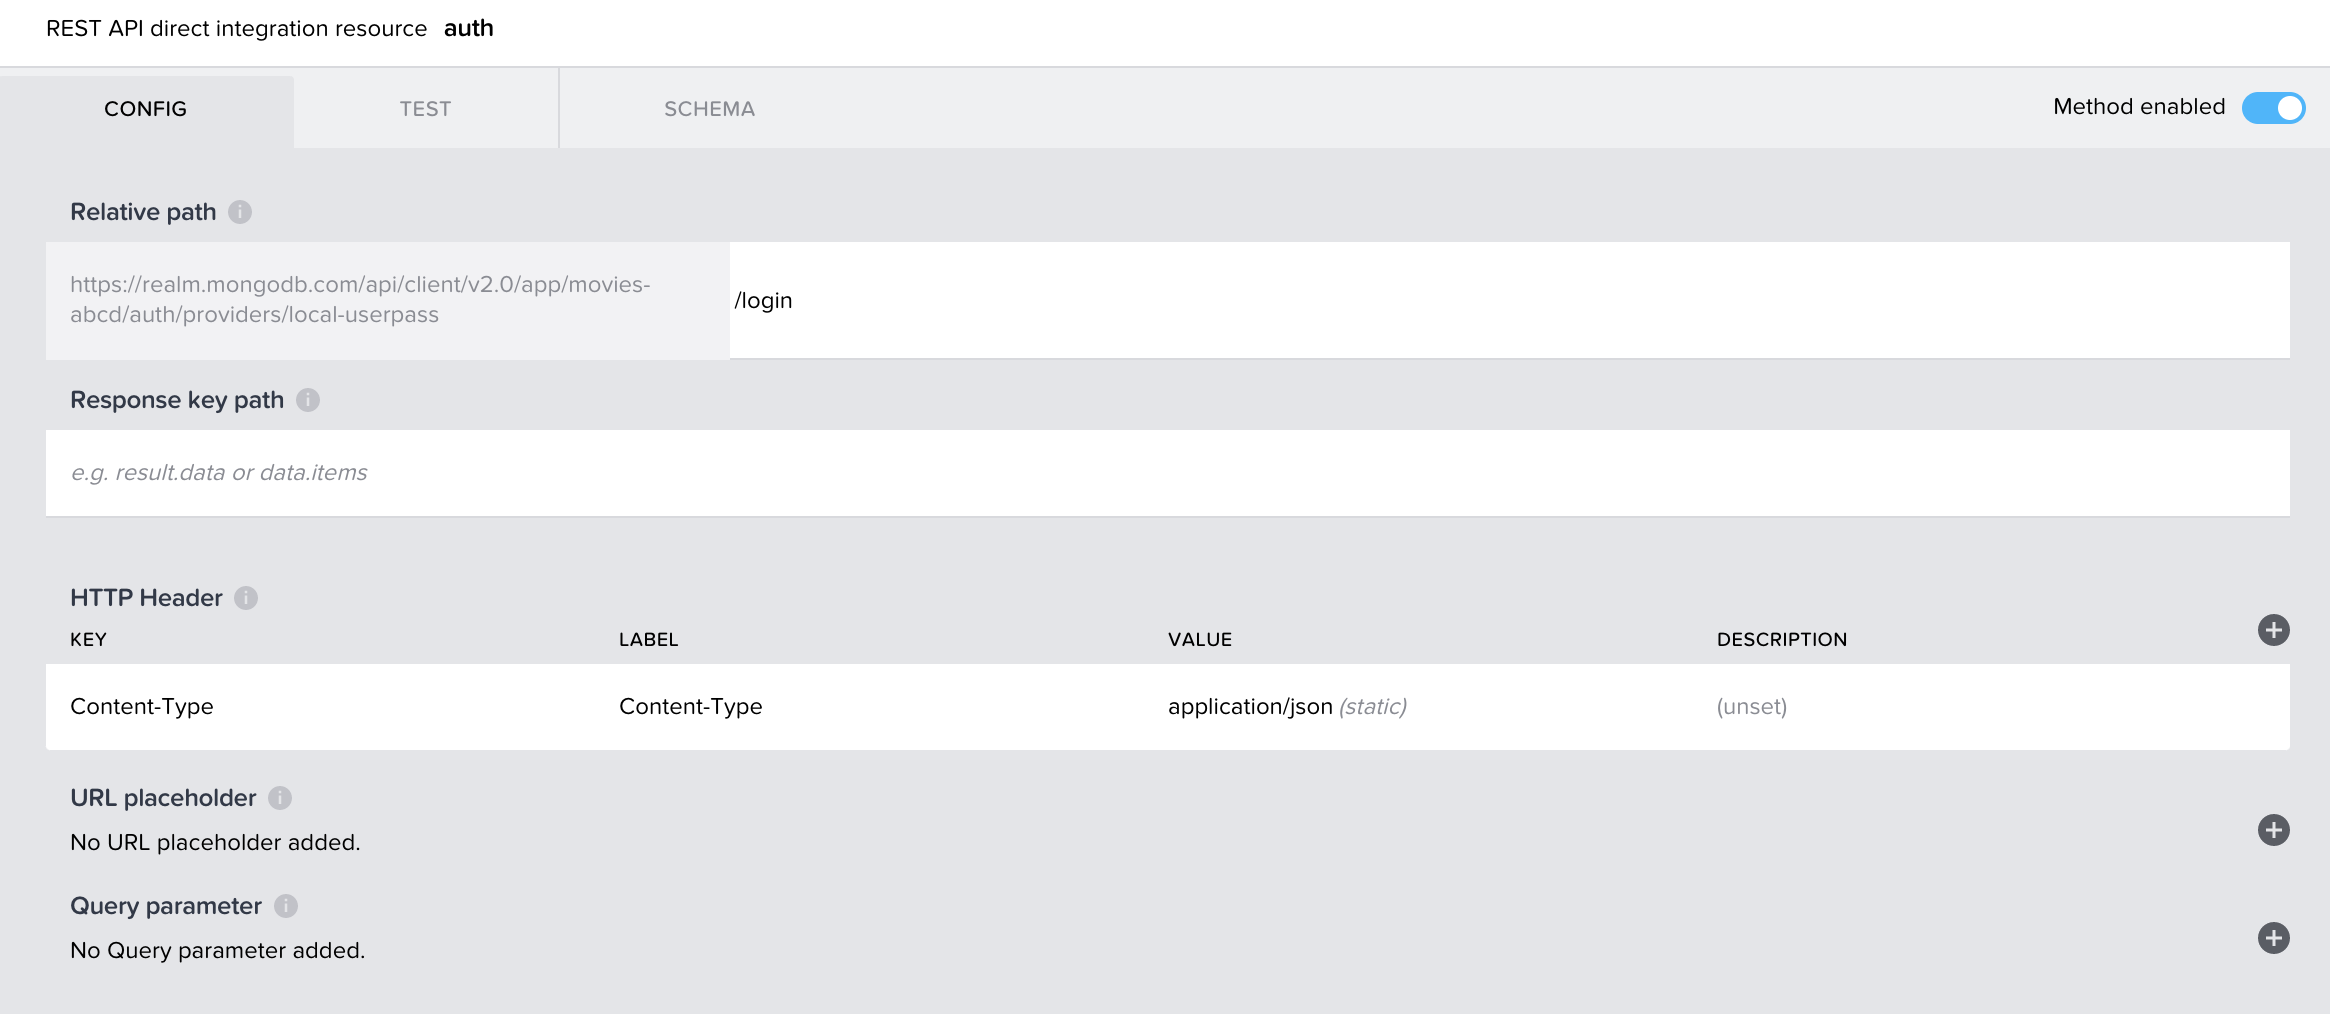
On Composer side, I will need to define a REST API direct integration data resource called auth where my Base URL is pointing to my current authentication provider:
- Go to "DATA" on the upper toolbar for your AppGyver application.
- Click "ADD DATA RESOURCE" button > "REST API direct integration."
- Choose any meaningful Resource ID (eg. "Auth" or "User_Password_API").
- Input the Base URL page with the relevant Realm authentication URL (This is based on the following convention
https://realm.mongodb.com/api/client/v2.0/app/<yourappid>/auth/providers/<provider type>/login).
1 https://realm.mongodb.com/api/client/v2.0/app/movies-abcd/auth/providers/local-userpass
movies-abcdis my Application ID from Realm.
- Since authentication requires a POST request, I have used the "Create Record" section and pointed it to the /login path. I also added a
Content-Type: application/jsonheader.
If I wanted to implement a user registration flow, I would need to use the Administration API for a user creation. I created my test users through the UI.
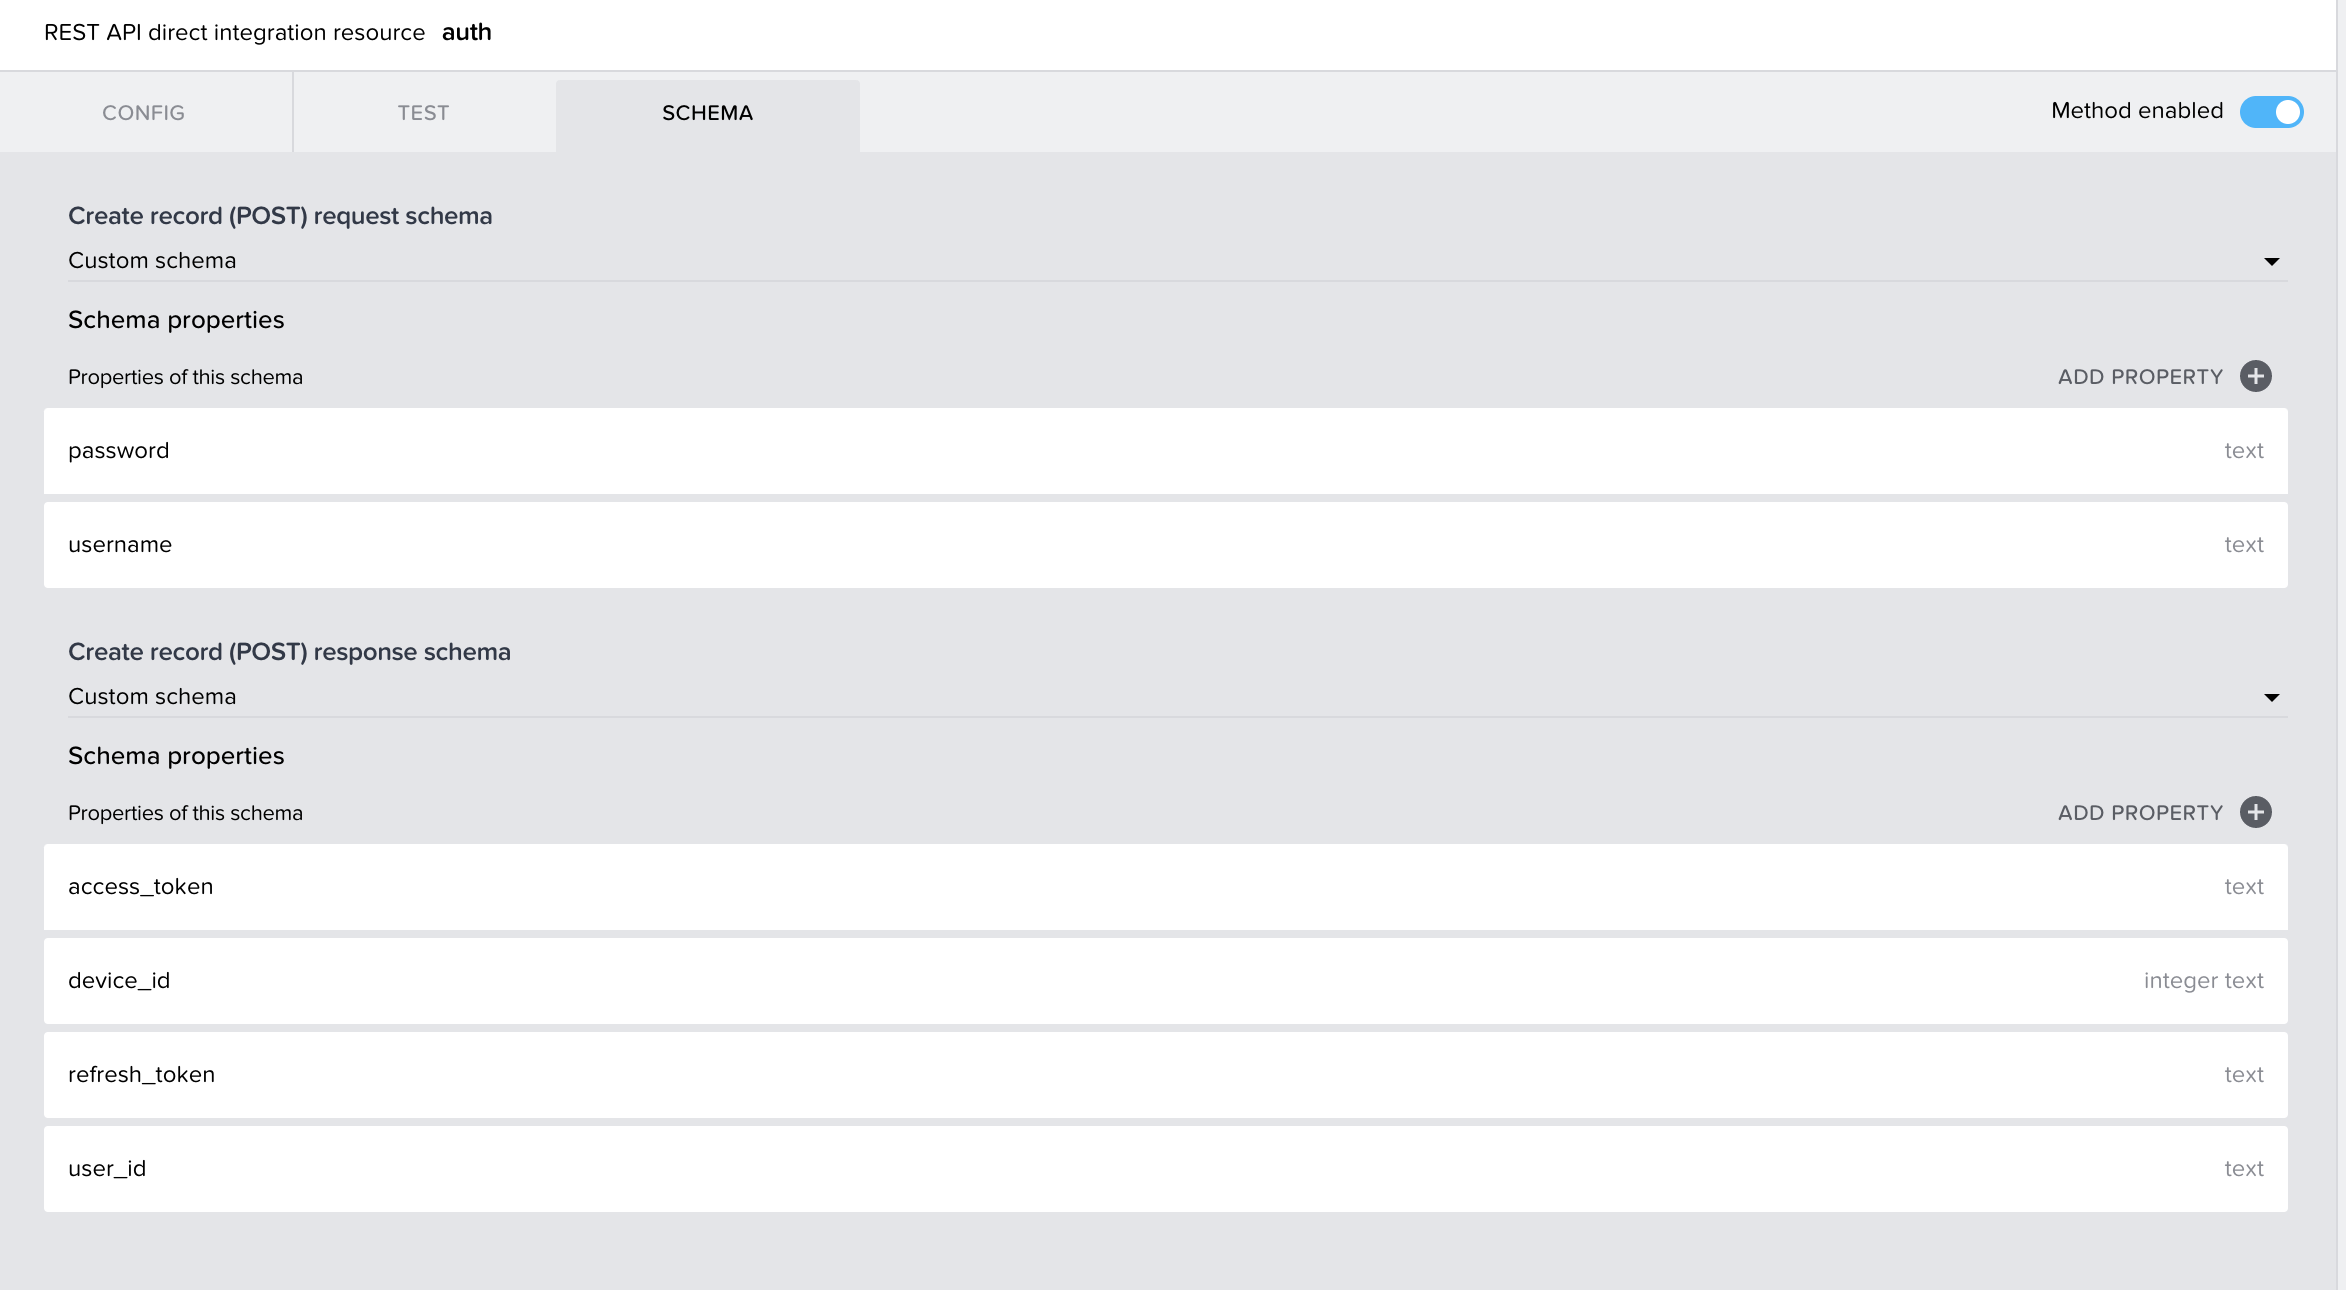
Next, I've set up my schema. The request schema needs to be configured manually:
- When on the "Create Record" page, click the "Schema" tab and add two properties for the request schema:
username,password. - Once you run a "Test" call from the "Test" tab, you can set the "SET SCHEMA FROM RESPONSE" button to populate the response schema automatically.
Now all there is left to do is build the login logic flow when using the logic canvas on our "Login" button.
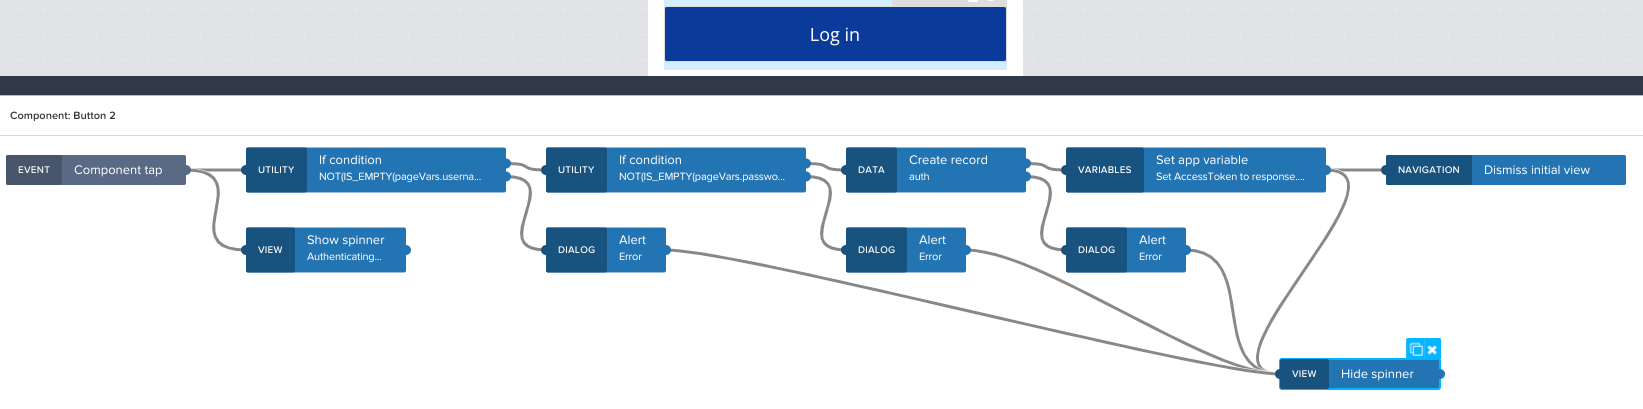
If you want to learn more on the logic part, please visit my guest tutorial on docs.appgyver.com.
The token and the user_id we get from the Realm authentication API will be needed later for our user-data interaction.
We are good to go with our username/password authentication. It's that easy!

#Custom-Function Authentication - SMS Authentication
Email/Password is a common and basic authentication pattern. However, modern applications require better authentication. I wanted to showcase an SMS authentication flow, with the use of MongoDB Realm custom-function authentication and a Twilio service defined on the Realm platform.
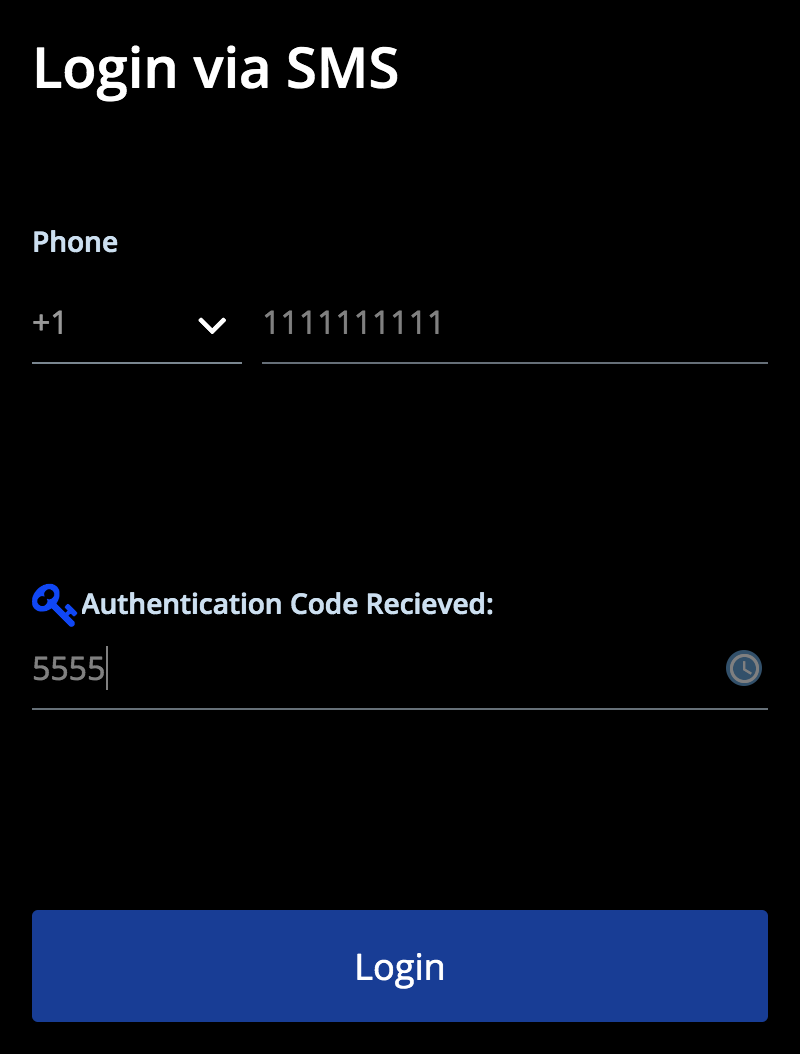
First, I will amend the login view accordingly, having only a phone number input separated to a country code dropdown and a second field allowing only numbers.
The dropdown values can be constructed visually via the list of values binding type, or by inputting a formula.
- We need to configure a webhook in Realm that generates an auth code, instructs Twilio to send it via SMS to the user, and stores it in the database for verification in our authentication function.
- The Twilio service can be defined in Realm via 3rd Party Services > Twilio service > Input Twilio credentials.
- We will configure an HTTP service webhook (called
startLogin), which we can define to use a "SYSTEM" auth and method POST.
The webhook function will look something like the following (see comments for detailed code explanation):
1 // Generate a random number function 2 function getRandomInt(max) { 3 return Math.floor(Math.random() * Math.floor(max)); 4 } 5 6 // This function is the webhook's request handler. 7 exports = async function(payload, response) { 8 // Data can be extracted from the request as follows: 9 // Query params phone 10 const {phone} = payload.query; 11 12 13 // Initiate the auth data collection 14 const users = context.services 15 .get("mongodb-atlas") 16 .db("app") 17 .collection("smsAuthLogin"); 18 19 // Get an up to 4 digits random code. 20 const authCode = getRandomInt(9999); 21 22 // Send the code via twilio, make sure to place your admin twilio number instead of +1234567 23 const twilio = context.services.get("authSMS"); 24 twilio.send({ 25 to: phone, 26 from: "+1234567", 27 body: `Please authenticate to AppGyver with: ${authCode}` 28 }); 29 30 // Upsert the code for existing user document with the specified phone 31 await users.updateOne({phone},{ phone, "authCode" : authCode.toString(), lastModified : new Date()}, {upsert : true}); 32 };
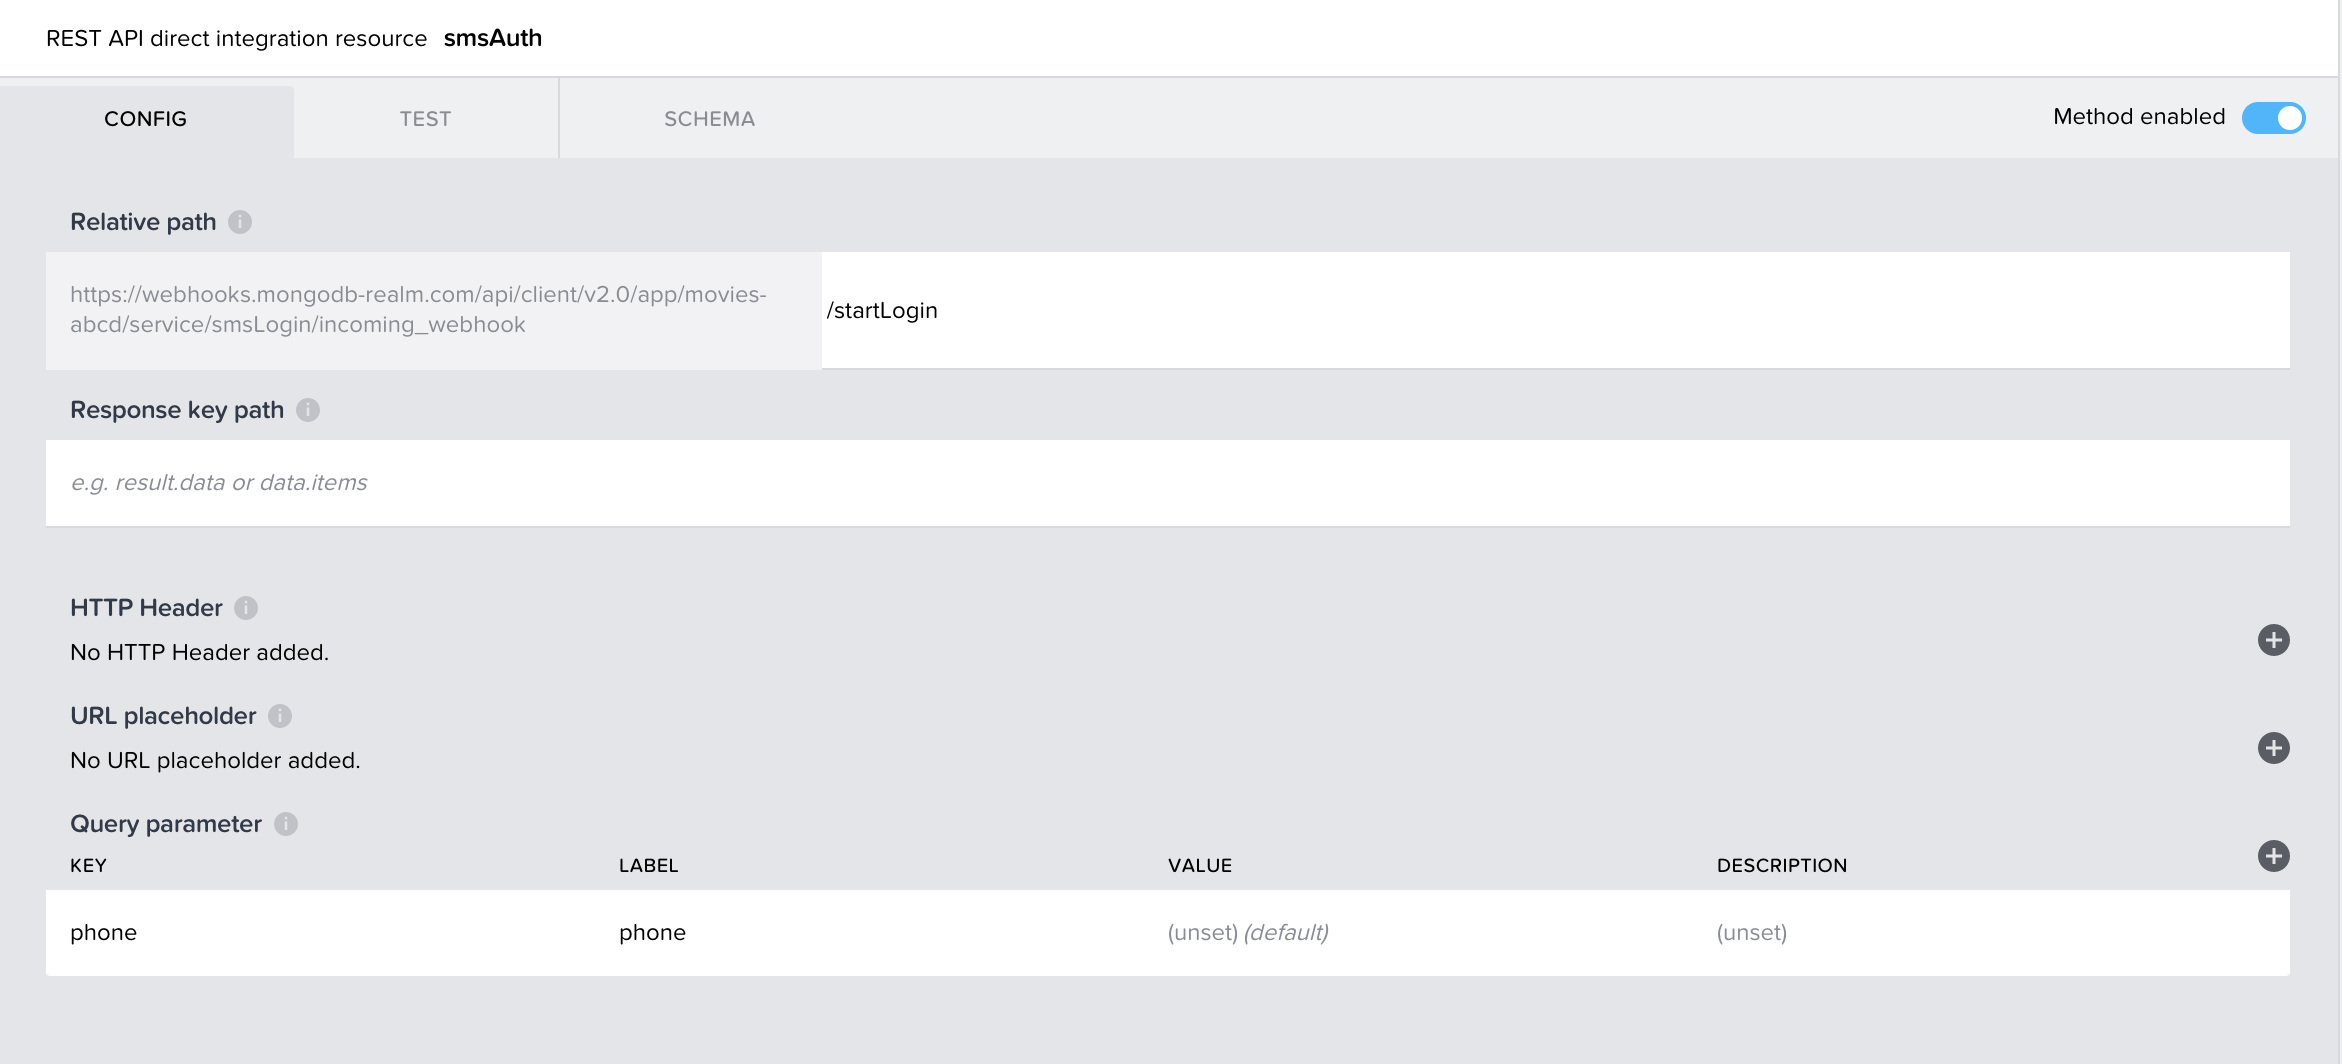
Then, we create a new DATA REST API integration on our AppGyver application called smsAuth which calls our startLogin webhook URL via the Create record (POST) method:
- Again, we will define the base URL as the path to our webhook service without the webhook function name.
1 https://webhooks.mongodb-realm.com/api/client/v2.0/app/movies-abcd/service/smsLogin/incoming_webhook/
- The "Create Record (POST)'' will be pointed to
startLoginwith query parameterphone.
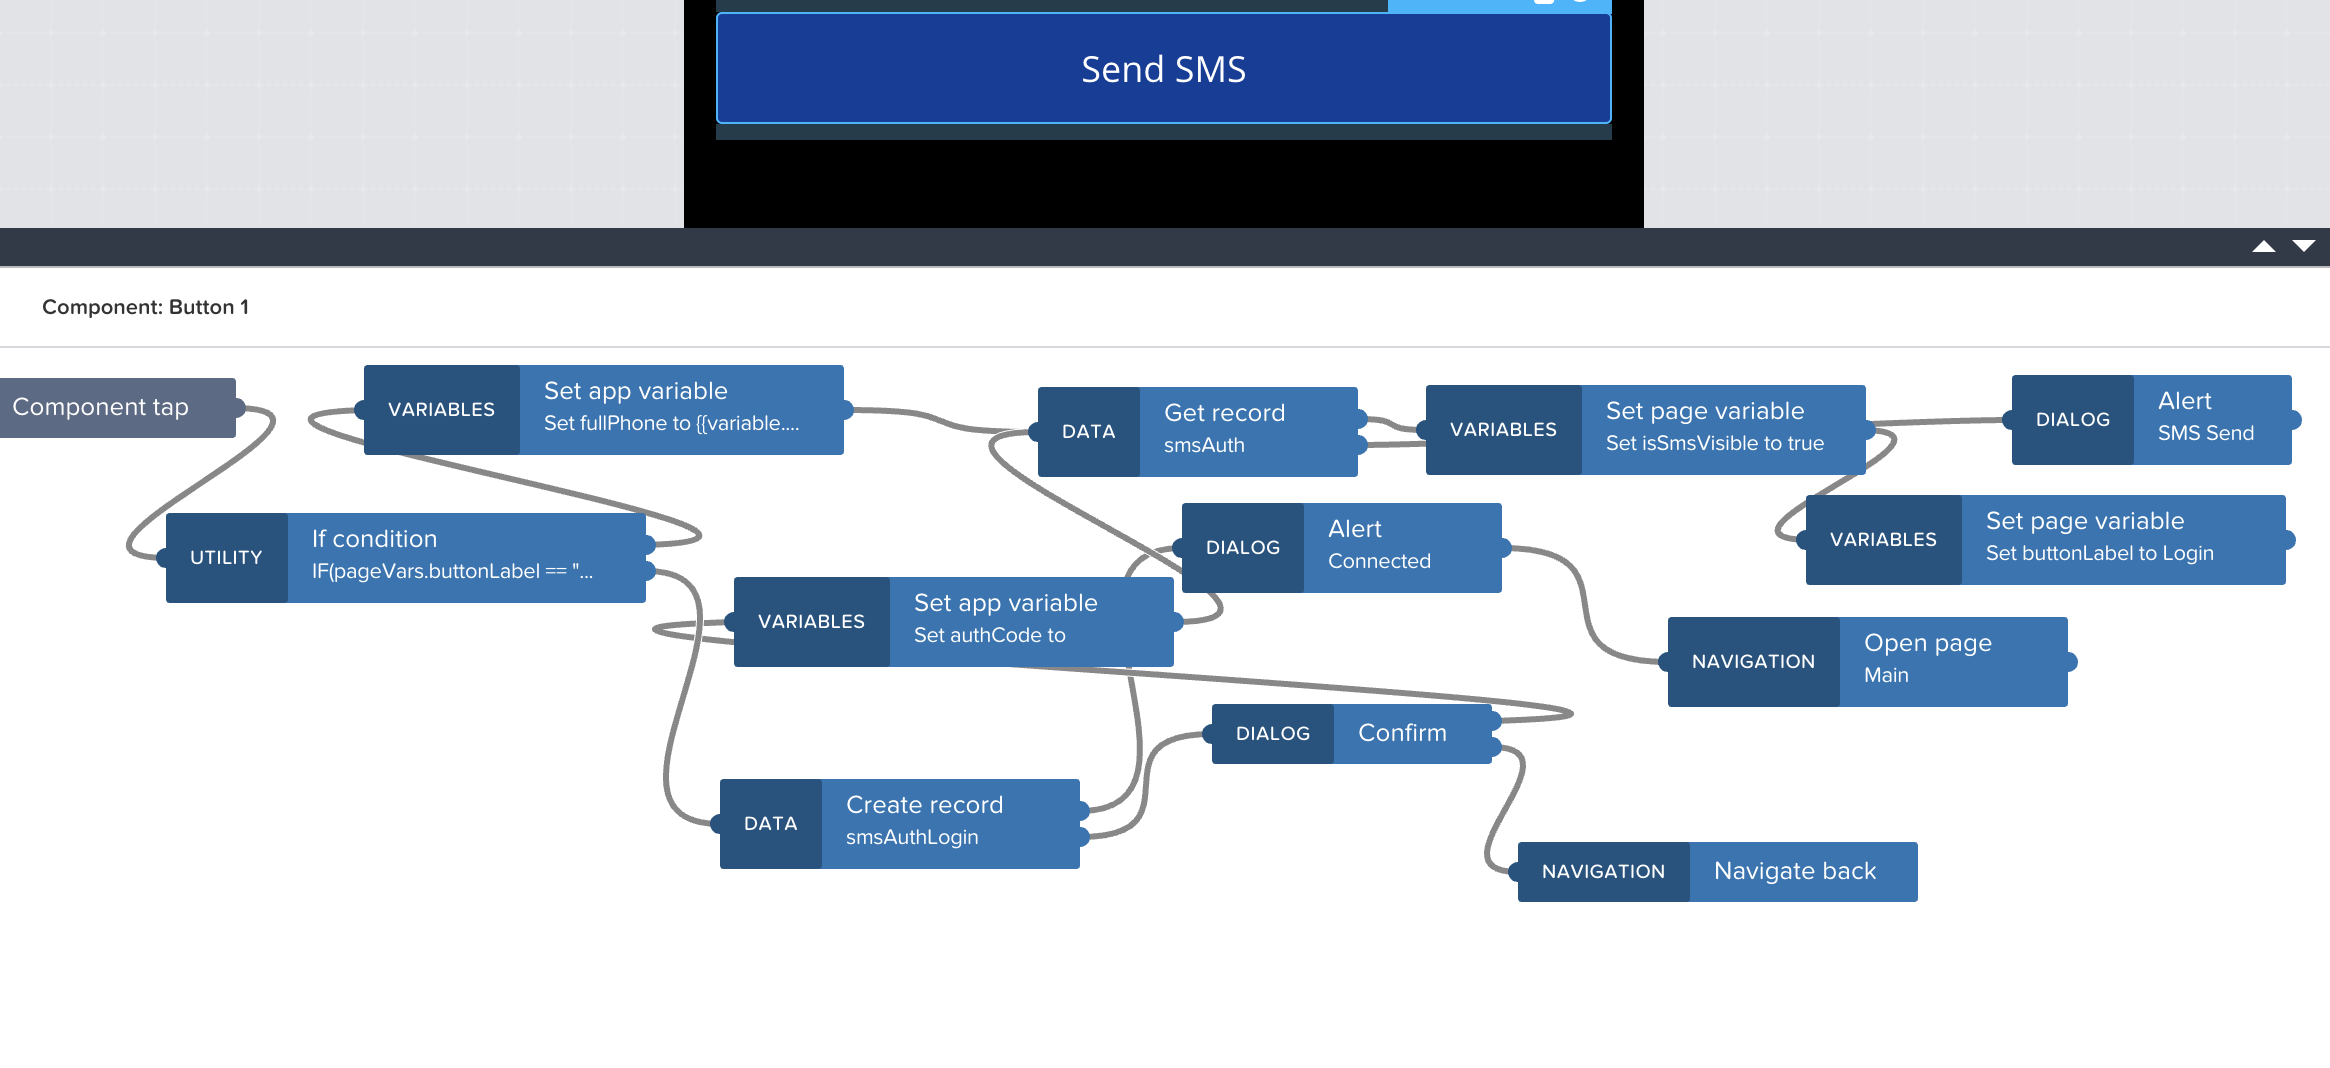
Now we will need to implement our login button logic:
- Once clicked, we will construct our
appVars.prefixCode + appVars.phoneNumberthrough a formula and bind it to thephoneparameter for oursmsAuthcreate record box. - When the "Create Record" is executed, we will take its response and mark the SMS Code component as visible.
If all goes well, you should get an SMS to the inputted number after the logic button is executed. Behind the scenes, the webhook has created the following document in app.smsAuthLogin collection:
1 { 2 "_id" : ObjectId(...), 3 "phone" : "+111111111", 4 "authCode" : "5555", 5 "lastModified : 2020-09-01T08:00:00.000
}
#Authentication Function
On the MongoDB Realm Application, I have enabled custom-function authentication.
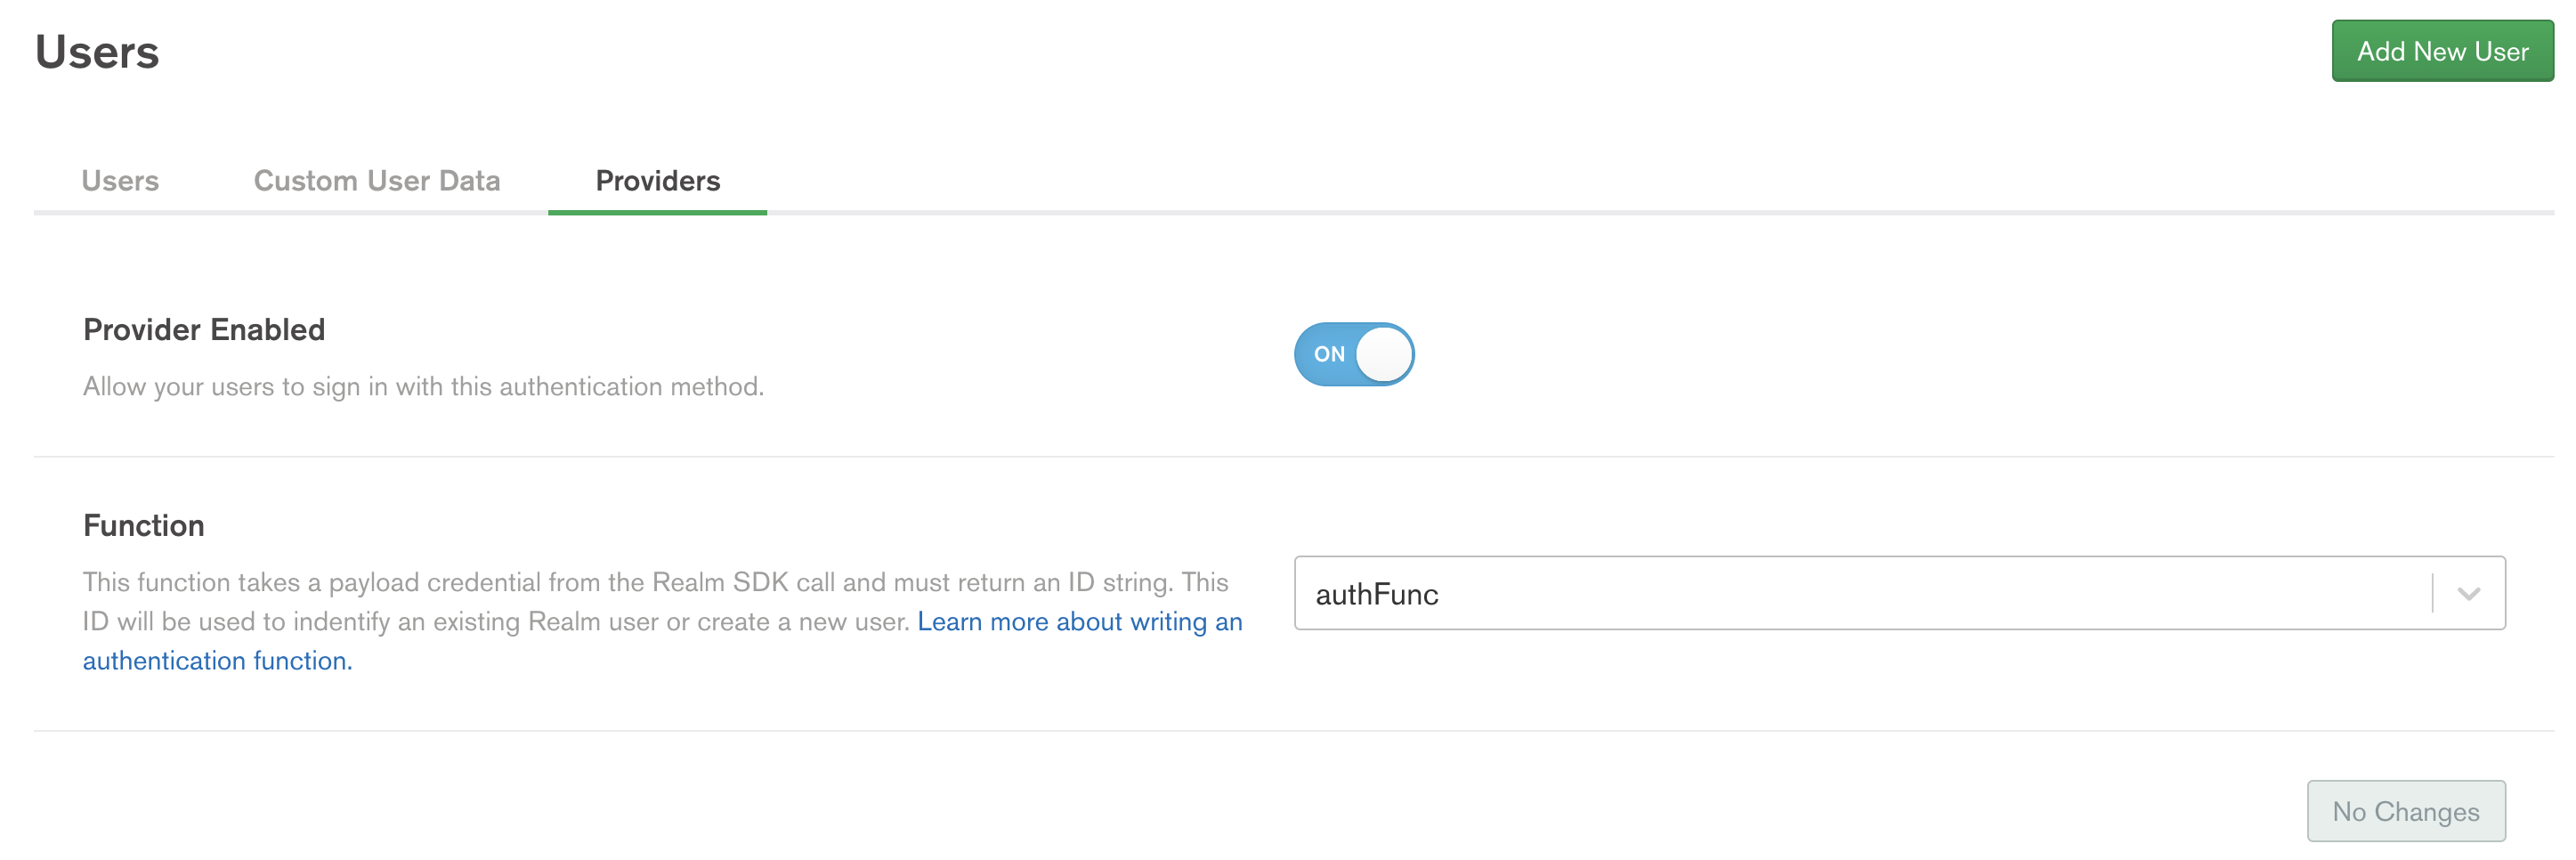
authFunc is the following small function to authenticate a valid SMS token:
1 exports = async function(loginPayload) { 2 // Get a handle for the app.smsAuthLogin collection 3 const users = context.services 4 .get("mongodb-atlas") 5 .db("app") 6 .collection("smsAuthLogin"); 7 8 // Parse out custom data from the FunctionCredential 9 const { phone, authCode } = loginPayload; 10 11 // Query for an existing user document with the specified phone 12 const user = await users.findOne({ "phone" : phone , "authCode" : authCode}); 13 14 if (user) { 15 // If the user document exists, return its unique ID 16 return user._id.toString(); 17 } else { 18 throw "Auth failed"; 19 } 20 };
The function expects a phone and authCode in the request body, matching them with the values stored in the previous step. If a match is found, the function returns the user's _id to the auth provider, thereby authenticating the user and, for example, returning a valid access token.
We can change our auth integration to point to the new URL:
1 https://realm.mongodb.com/api/client/v2.0/app/movies-abcd/auth/providers/custom-function
We also need to change the request body to have phone and authCode instead of email and password. Now, when we call Create record for auth with the phone number and auth code inputted by the user, if the code is the one we sent to the user's phone, the authentication will return a 200 status code. If the response comes through the success output, we can log in our user.
The access_token or/and the user_id we get at the end of the flow will be tested against rules such as "Read your own data"/"Write your own Data" on the MongoDB side when using the data access methods in the following section. Read here for more information.
Full logic can be seen here and explained in detail in my AppGyver tutorial.
#Data Access and Permissions
MongoDB has always been known for its stunningly easy and robust way of querying, updating, and aggregating data with the flexible schema approach and built-in redundancy and scalability mechanics. With MongoDB Realm, we get a fully scalable and managed backend that utilizes the familiar MongoDB technology. Combining this with the state-of-the-art frontend produced by Composer brings about one heck of a powerful stack.
There are two main ways we can currently quickly consume data for our AppGyver application from MongoDB Realm.
#Using HTTP Service Webhooks to Retrieve Data
With HTTP Service webhooks, we can define little microservices, which receive query parameters/headers and body data to perform reading or writing of data. Since we can quickly access any of the provided services, like our mongodb-atlas instance, we can use any of the available CRUD commands, including the aggregation framework. Then we can respond with this array of documents or a single document back to our application.
However, since Atlas offers some additional capabilities like the Atlas Search service we can, for example, dramatically boost our search capabilities, which is what I've done in my Movies application when searching for my movies.
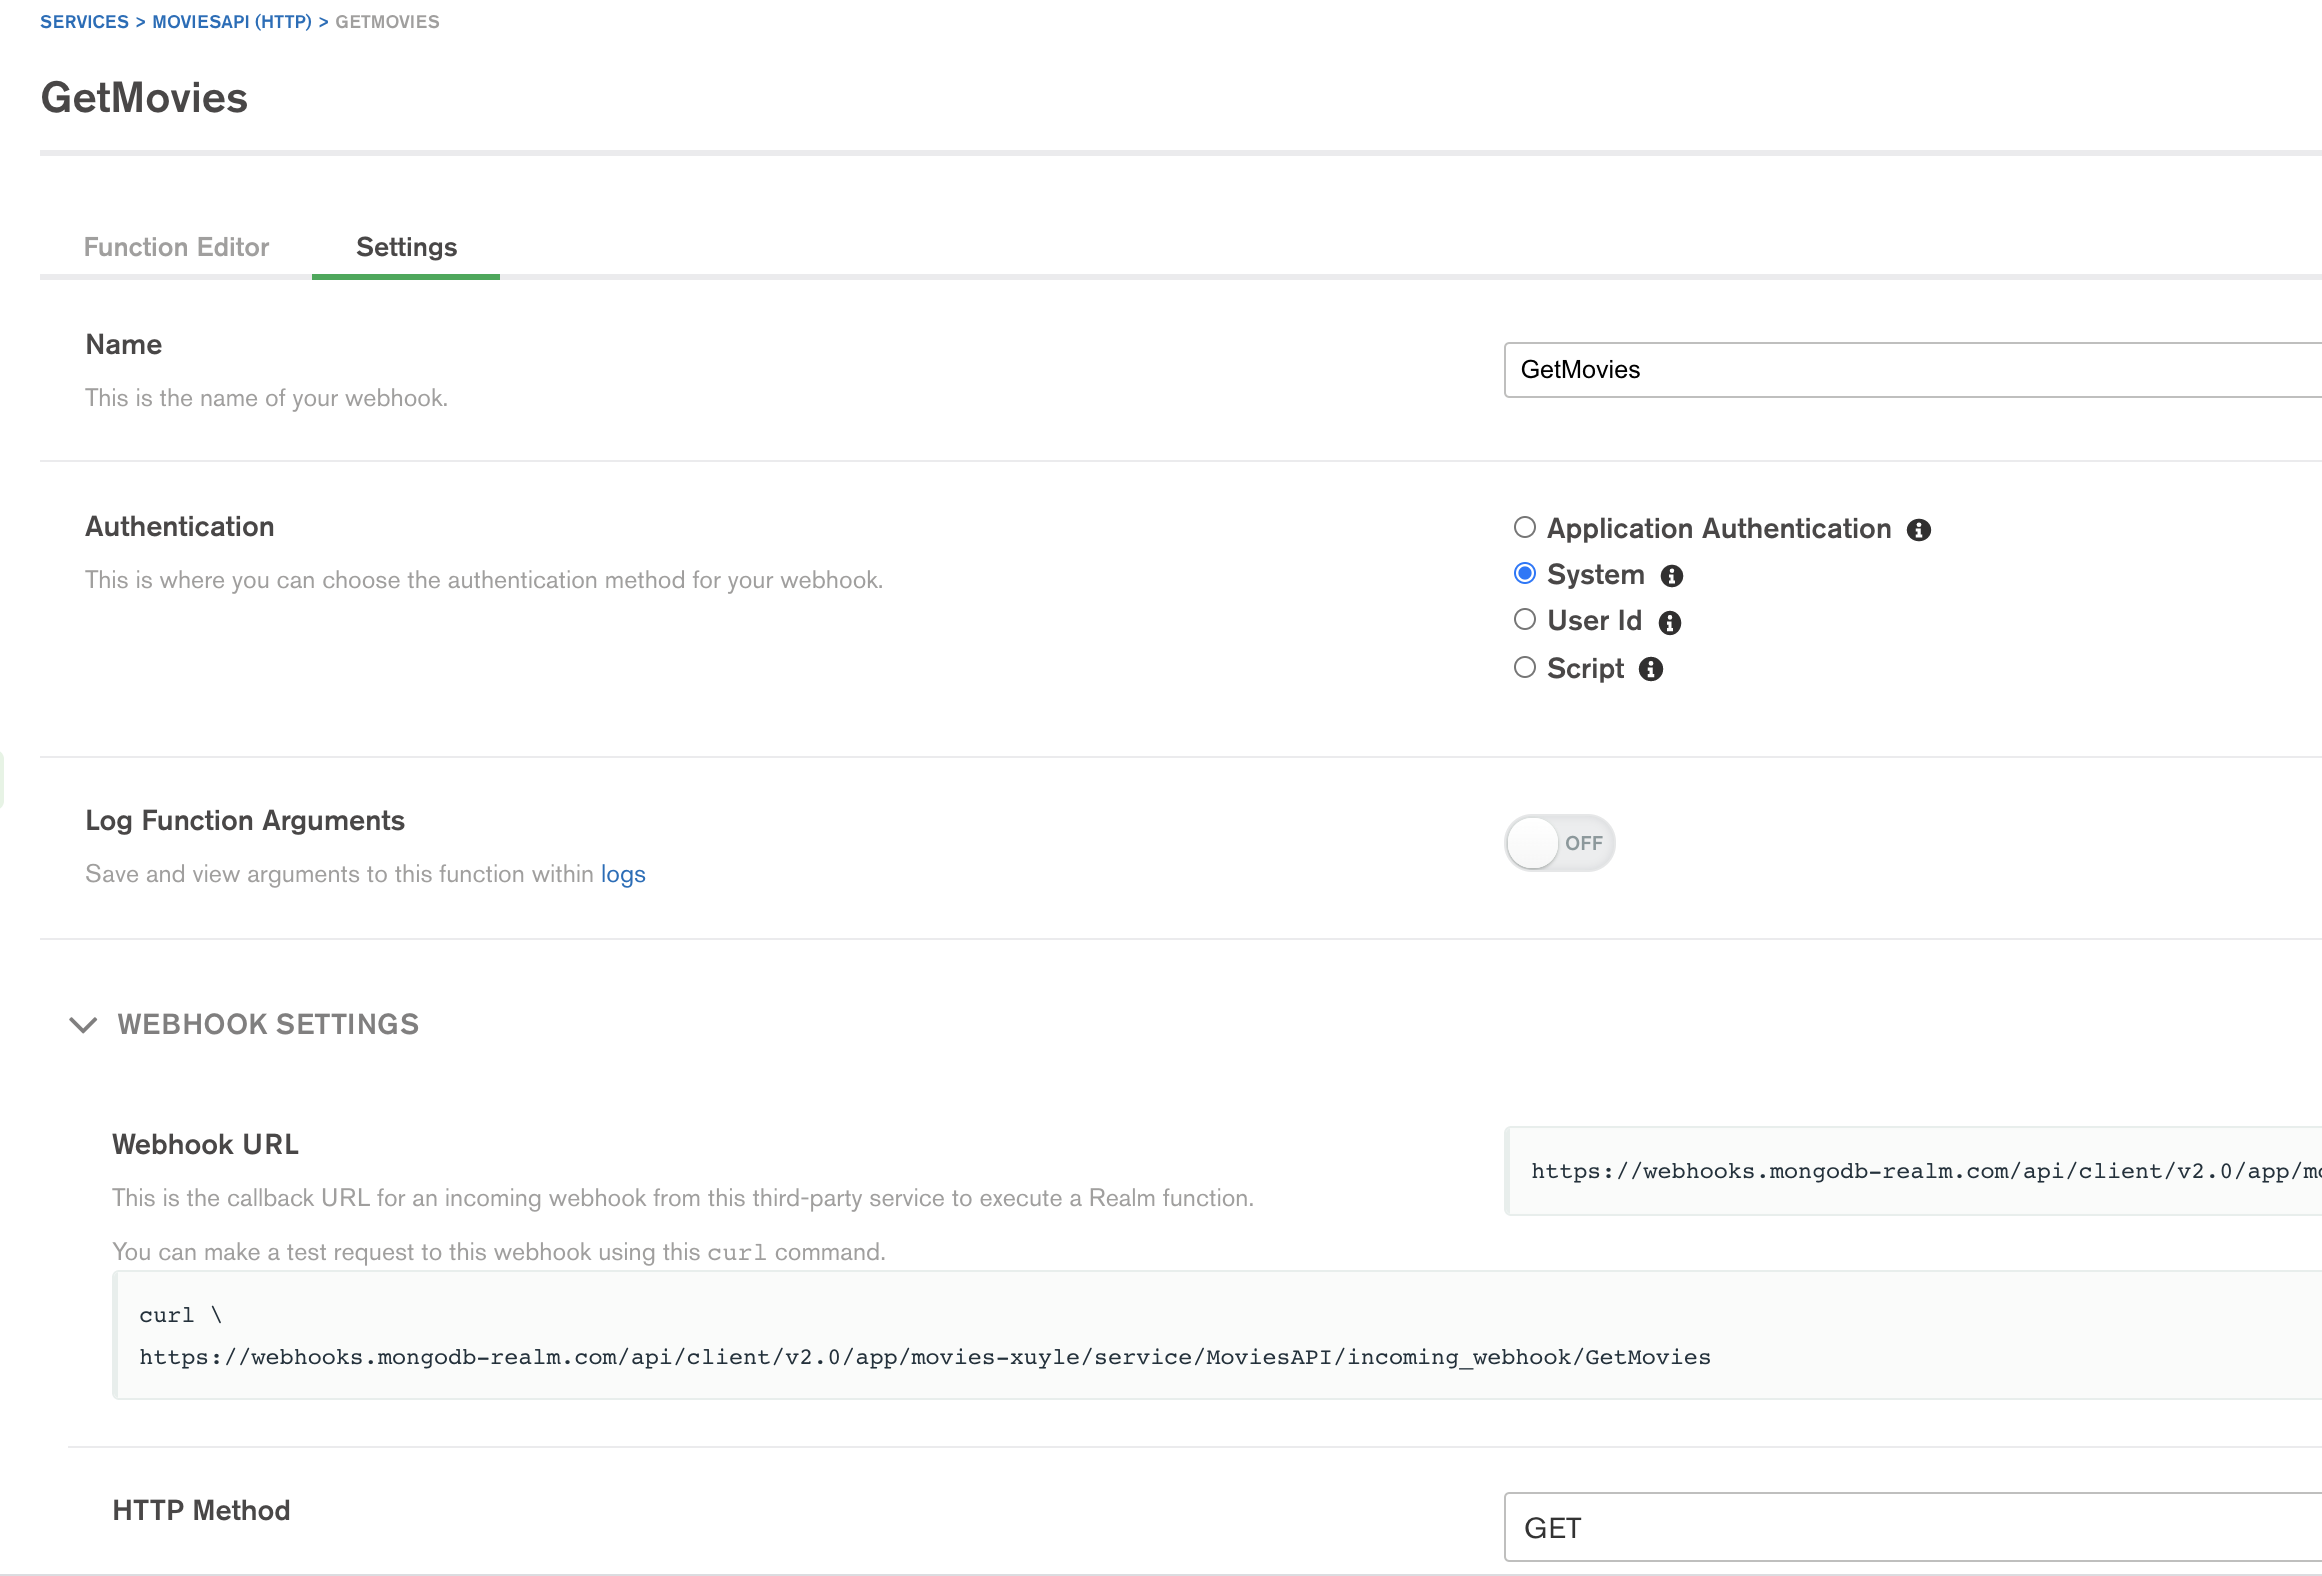
First, I've defined an HTTP service called MoviesAPI and an incoming webhook on method GET. Since our API is public for all our users, I have used a SYSTEM authentication and toggled the "Response with Result" on. Atlas Search currently also requires a SYSTEM base authentication for sensitive information to secure a webhook with a Secret or a payload signature with an authorization expression.
The code I've used for my Movie search webhook body is:
1 /*
This API searches movies from db("sample_mflix").collection("movies") using Atlas Search aggregation
*/ 2 exports = async function(payload, response) { 3 4 // Extract, the search query param 5 const {Search} = payload.query; 6 var filter; 7 8 // Get the collection object 9 const movies = await context.services.get("mongodb-atlas").db("sample_mflix").collection("movies"); 10 var doc = []; 11 12 console.log(`ID ${Search}`); 13 // If Search term is not empty use atlas search $search operator 14 if (Search !== "") 15 { 16 filter = [{ 17 '$search': { 18 'text': { 19 'path': ['title', 'plot','fullplot','generes'], 20 'query': Search, 21 'fuzzy': {} 22 } 23 } 24 },{"$limit" : 100}]; 25 doc = await movies.aggregate(filter).toArray(); 26 } 27 else 28 { 29 // If no Search term provided return first found 100 results 30 doc = await movies.aggregate([{"$limit" : 100}]).toArray(); 31 } 32 33 // Return the found documents through the response object 34 response.setBody(JSON.stringify(doc)); 35 response.setStatusCode(200); 36 37 };
Now, we integrate this webhook the same way we integrated the previous APIs: by defining a new REST API data resource and using the Get collection (GET) method.
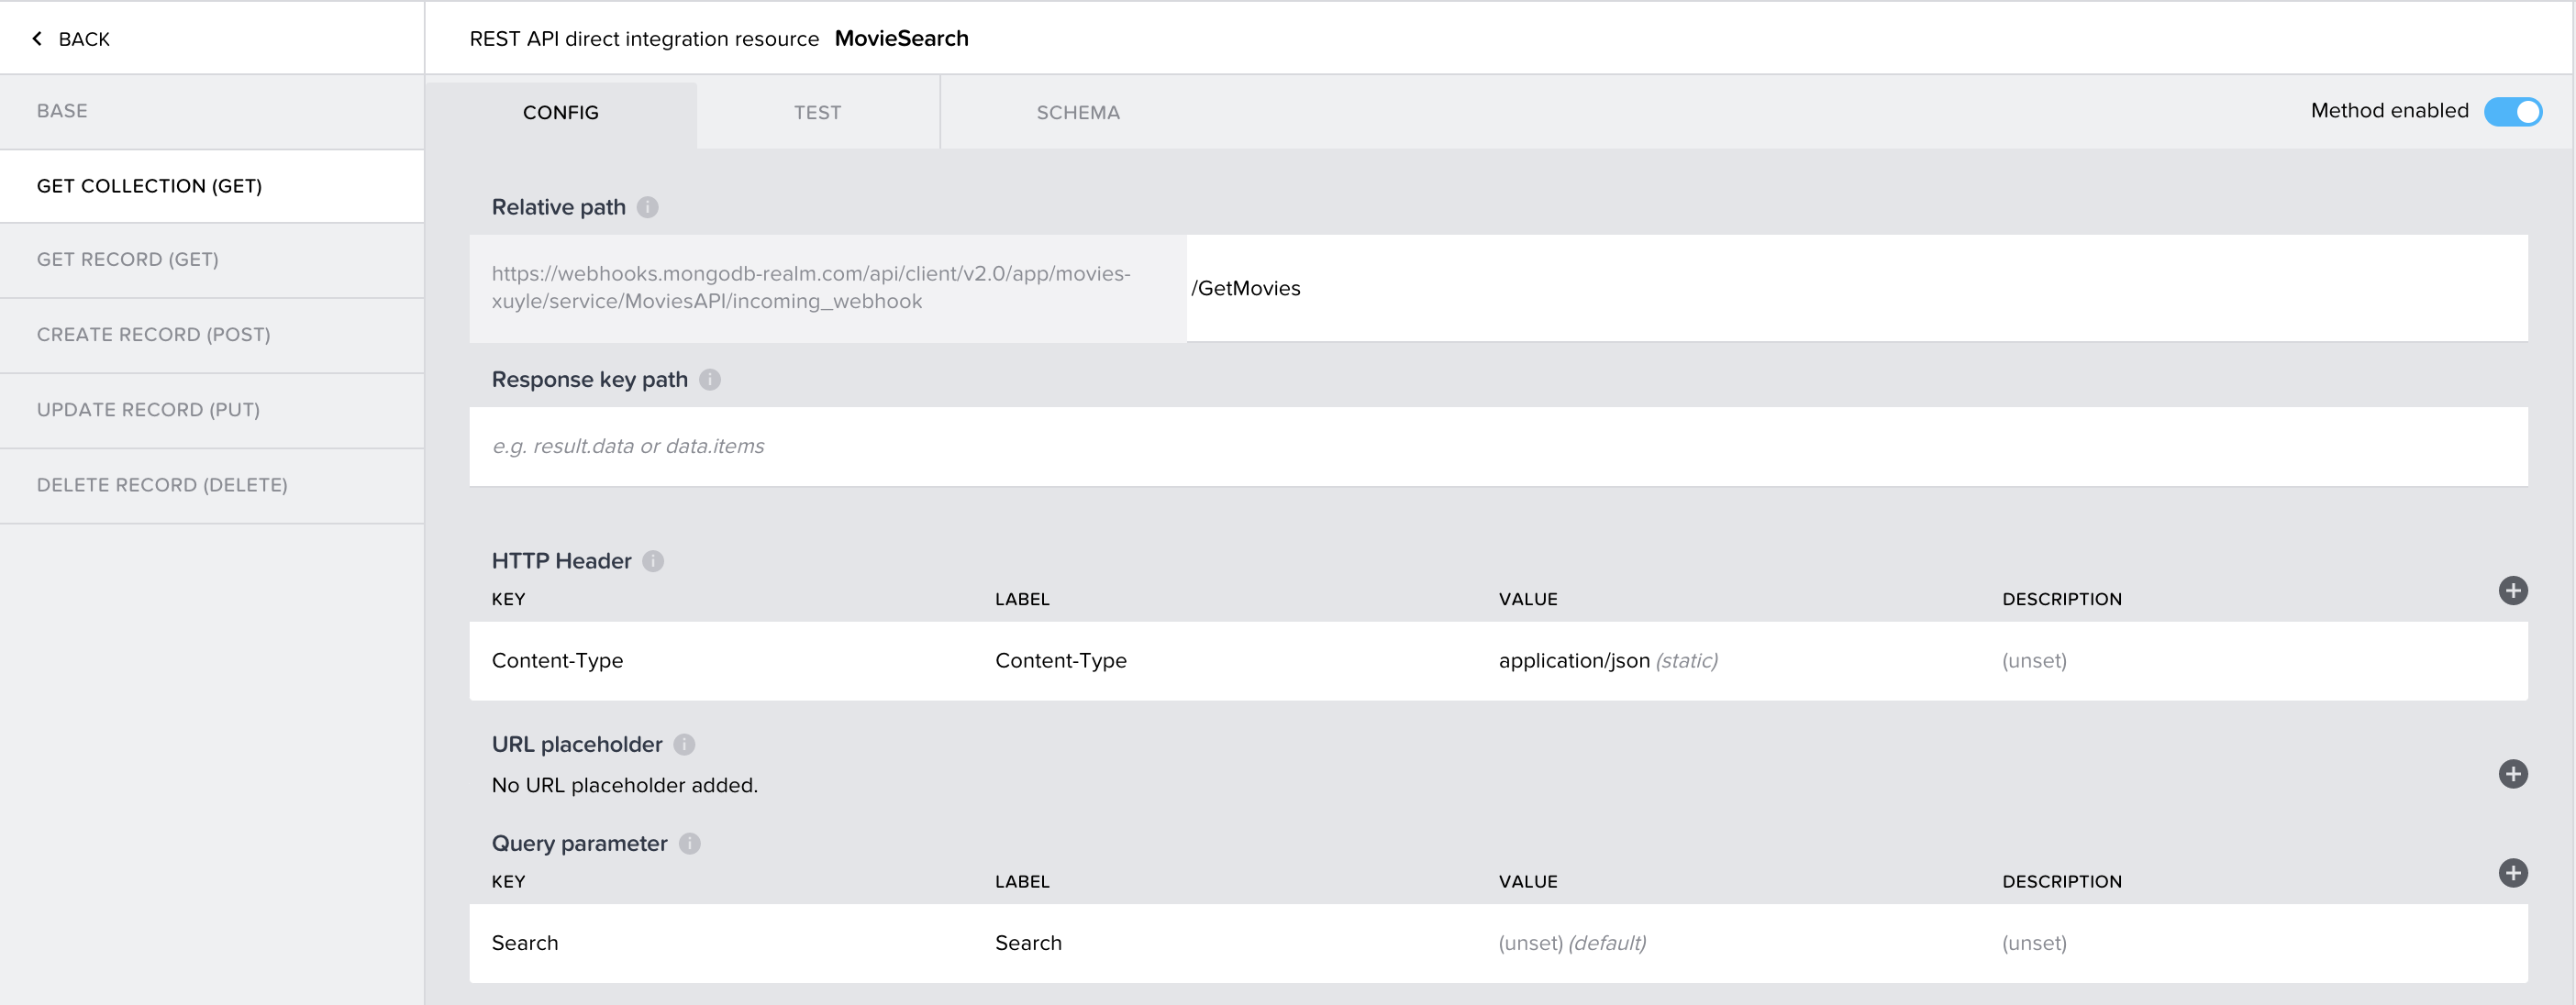
We can then define a data variable MovieSearchApp on our movies list page. We define a SearchTerm page variable and bind it to the data variable's Search input and a search field on our page. Now, whatever the user inputs in the search field gets stored in the variable, and when the data variable refresh loop triggers again, a new API call gets made with the updated search term.
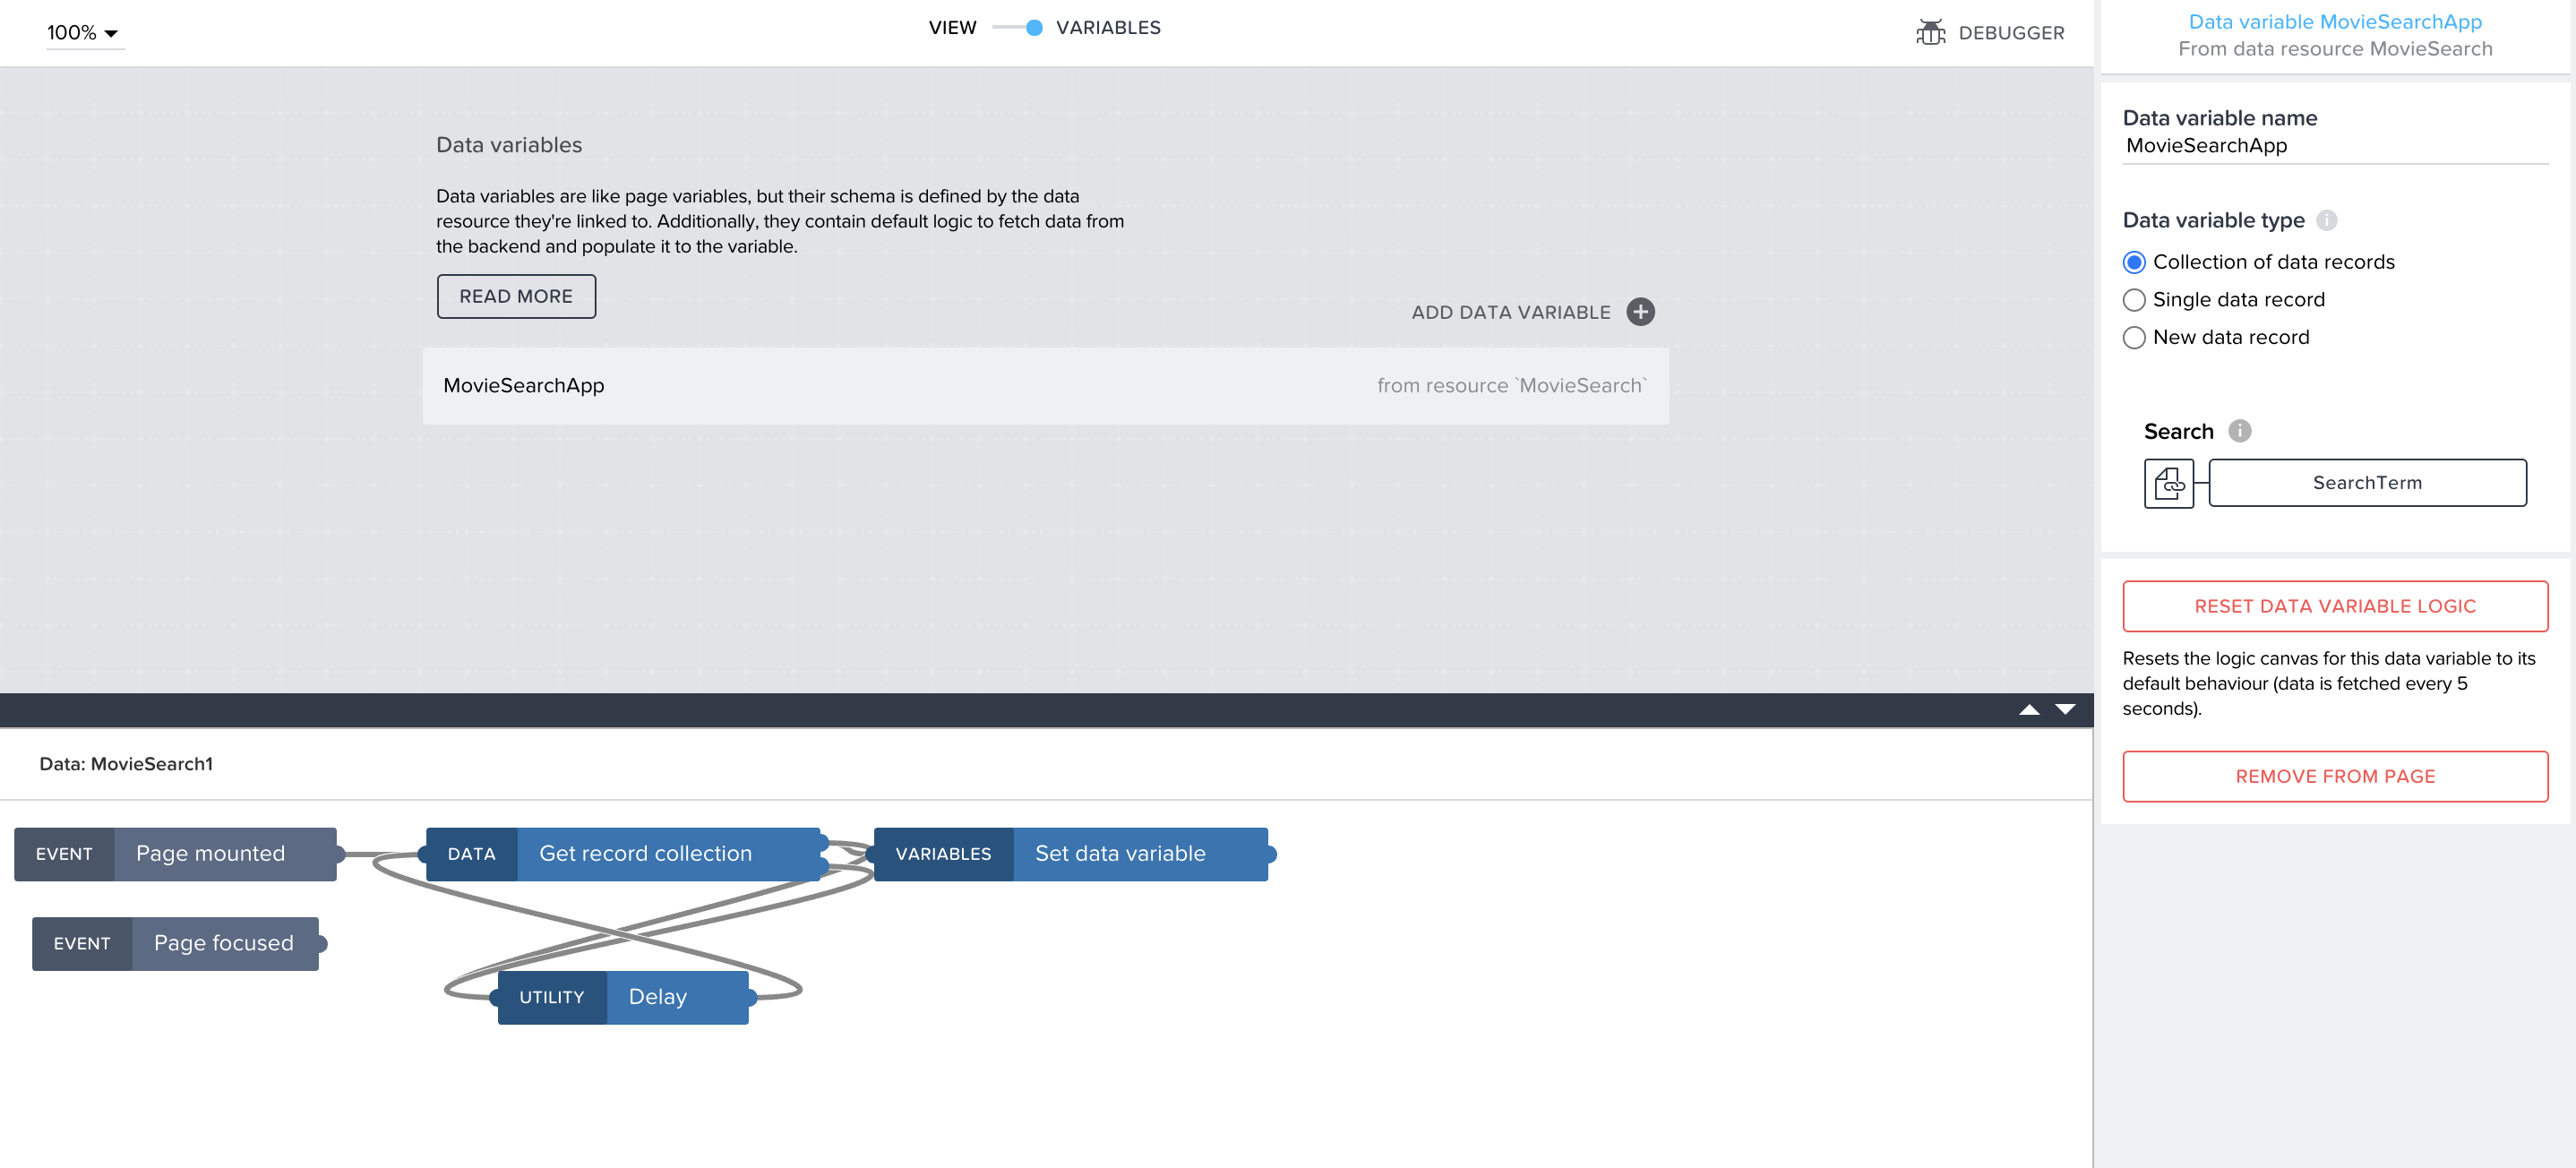
To get the list of movies to show based on the data, I set the rating card component I created to repeat based on the data variable, binding each property to a field in my data (title, plot, rating etc). For some properties, I used a formula to mangle the data into the correct format.
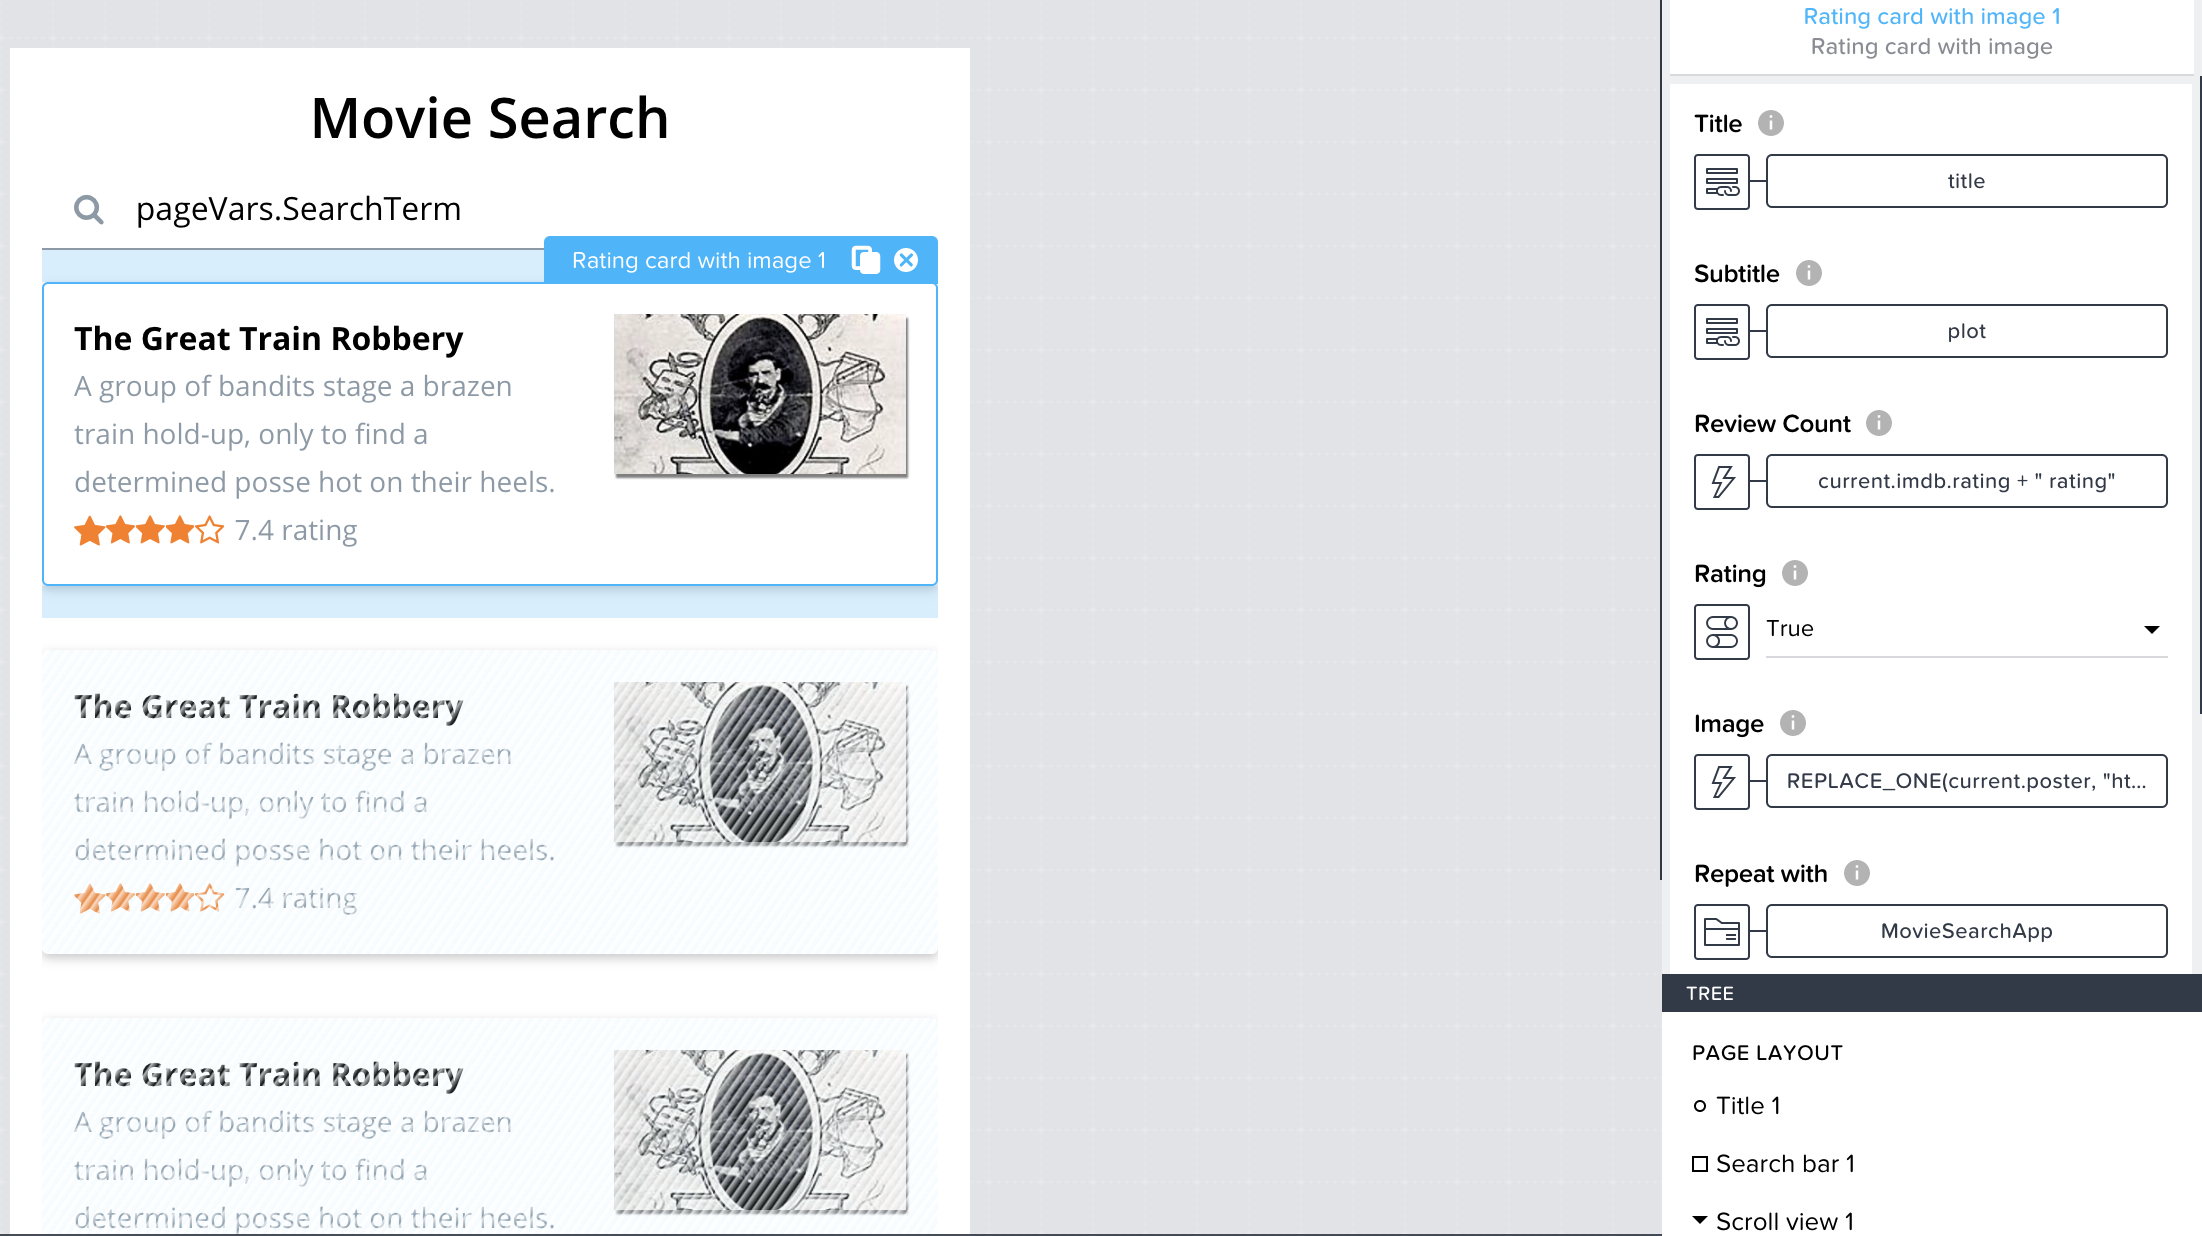
Now we have a full search engine connected to a MongoDB Atlas database through Realm webhooks, with beautiful, automatically reactive UI.
#Using HTTP Service Webhooks to Store Data
The same way we can define our GET collection, we can define a "Create Record" API with a POST webhook service. In my application, I have defined a CommentsAPI integration, where in the POST section, I have placed the URL for a webhook called UpsertComment, defined in MongoDB Realm.
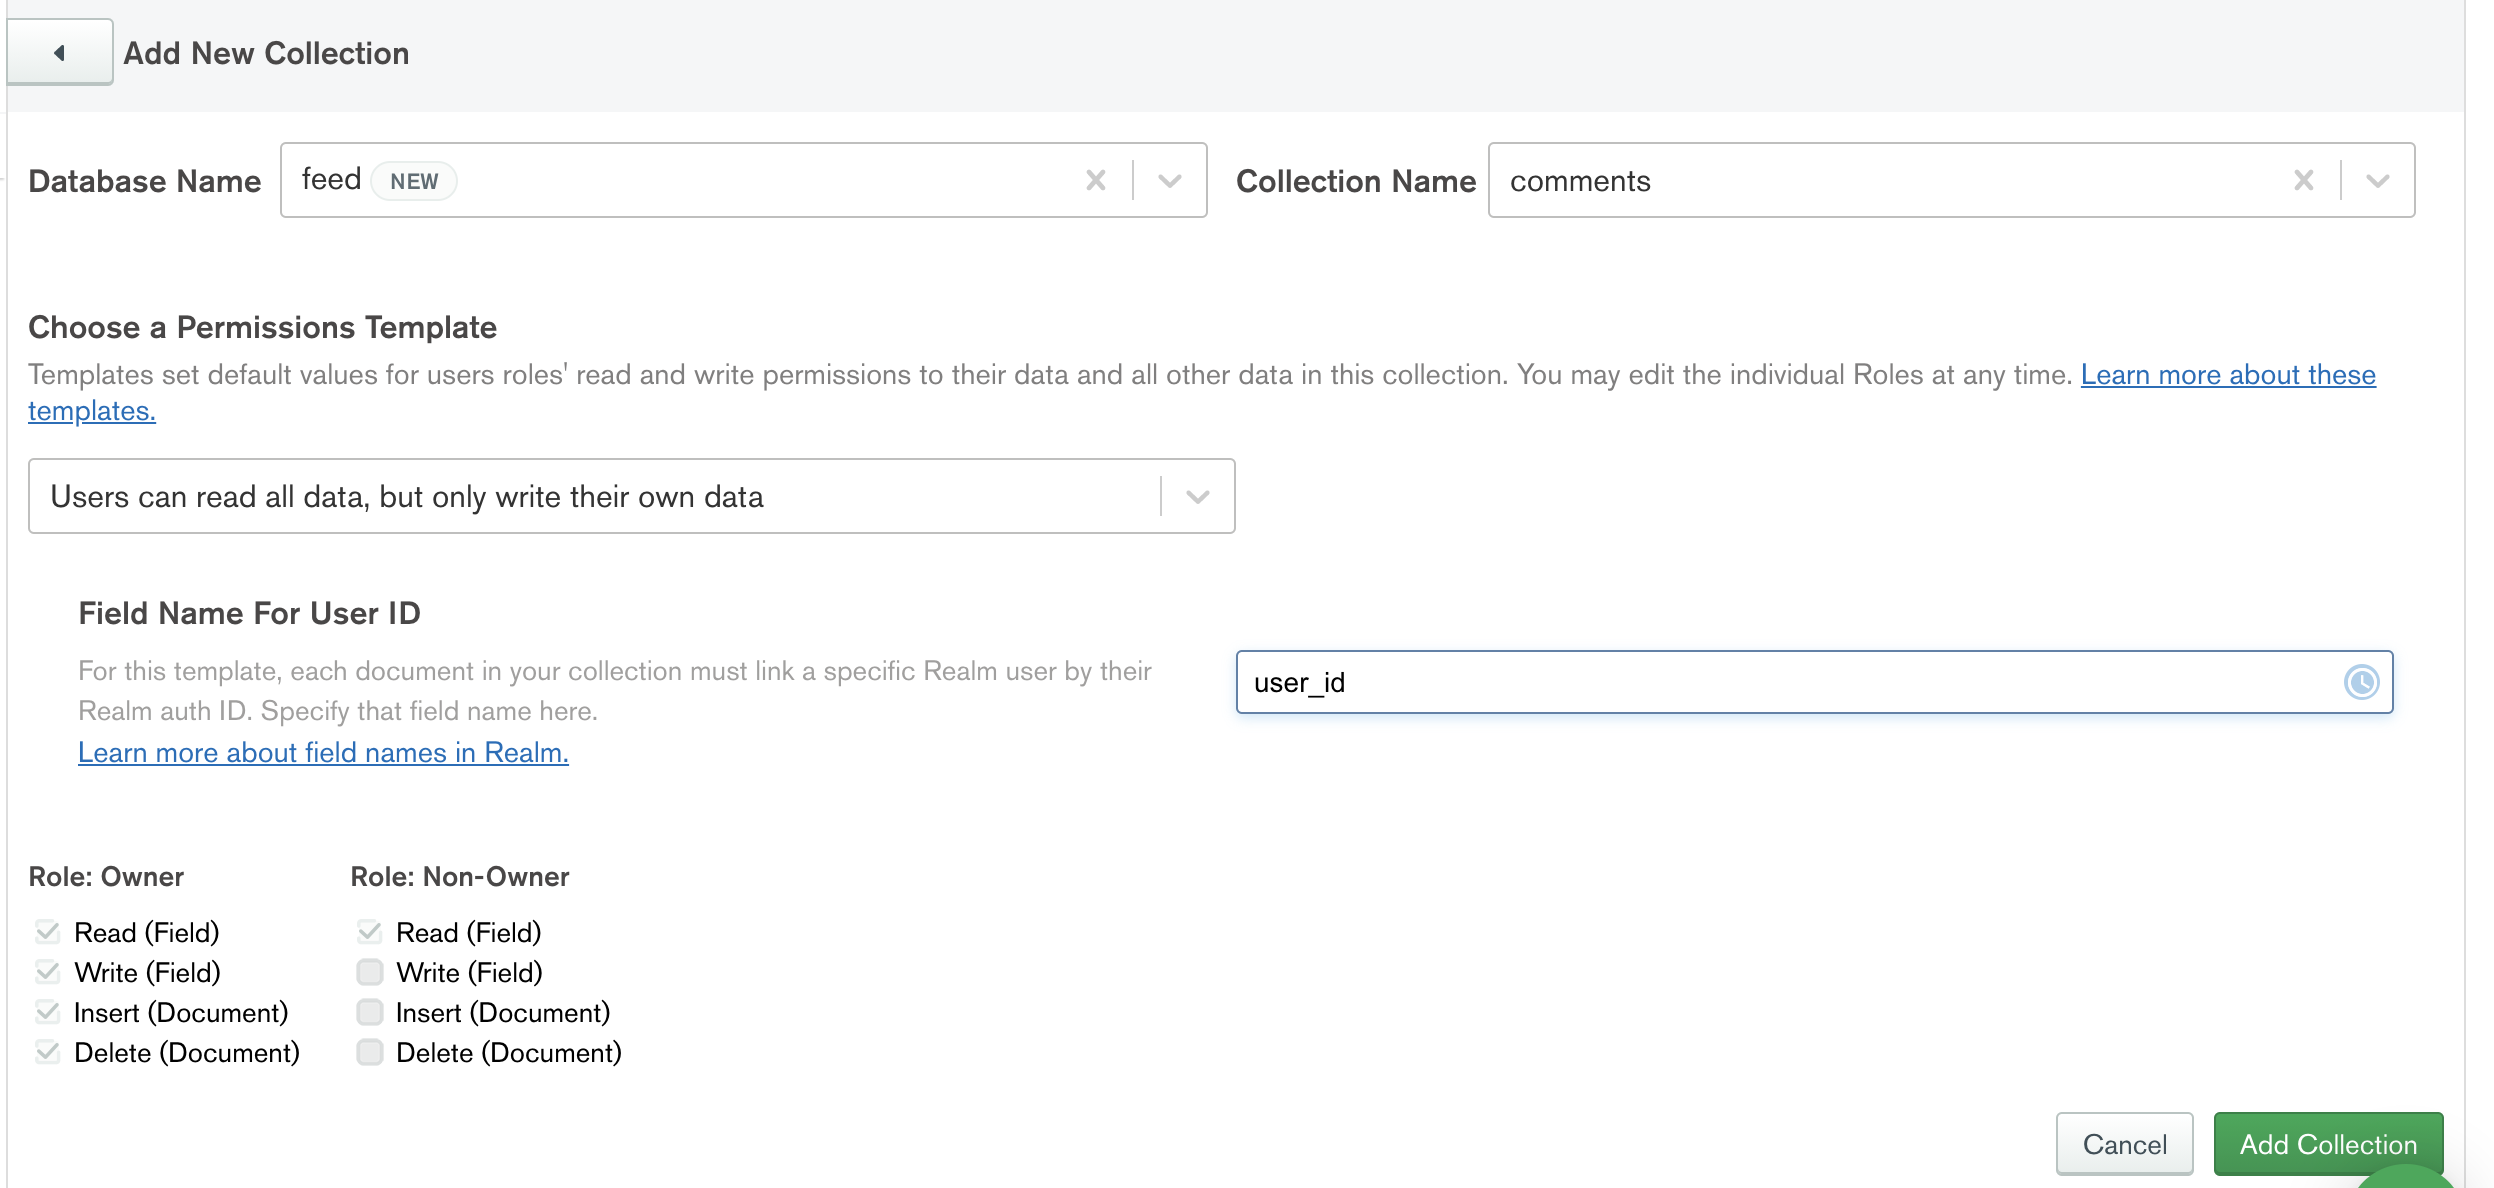
Here is where MongoDB Realm permissions come to play. We will define our comment collection with a template of "Users can read all data, but write only their own data." Here is where the received user_id will also be useful as this will be added as the field name to distinguish user documents.
Now, when we set up our webhook, we will use the Script based authentication and set the executor as the provided user_id in payload. Since we will store the provided payload as the comment object, we will also cover the needed collection rule.
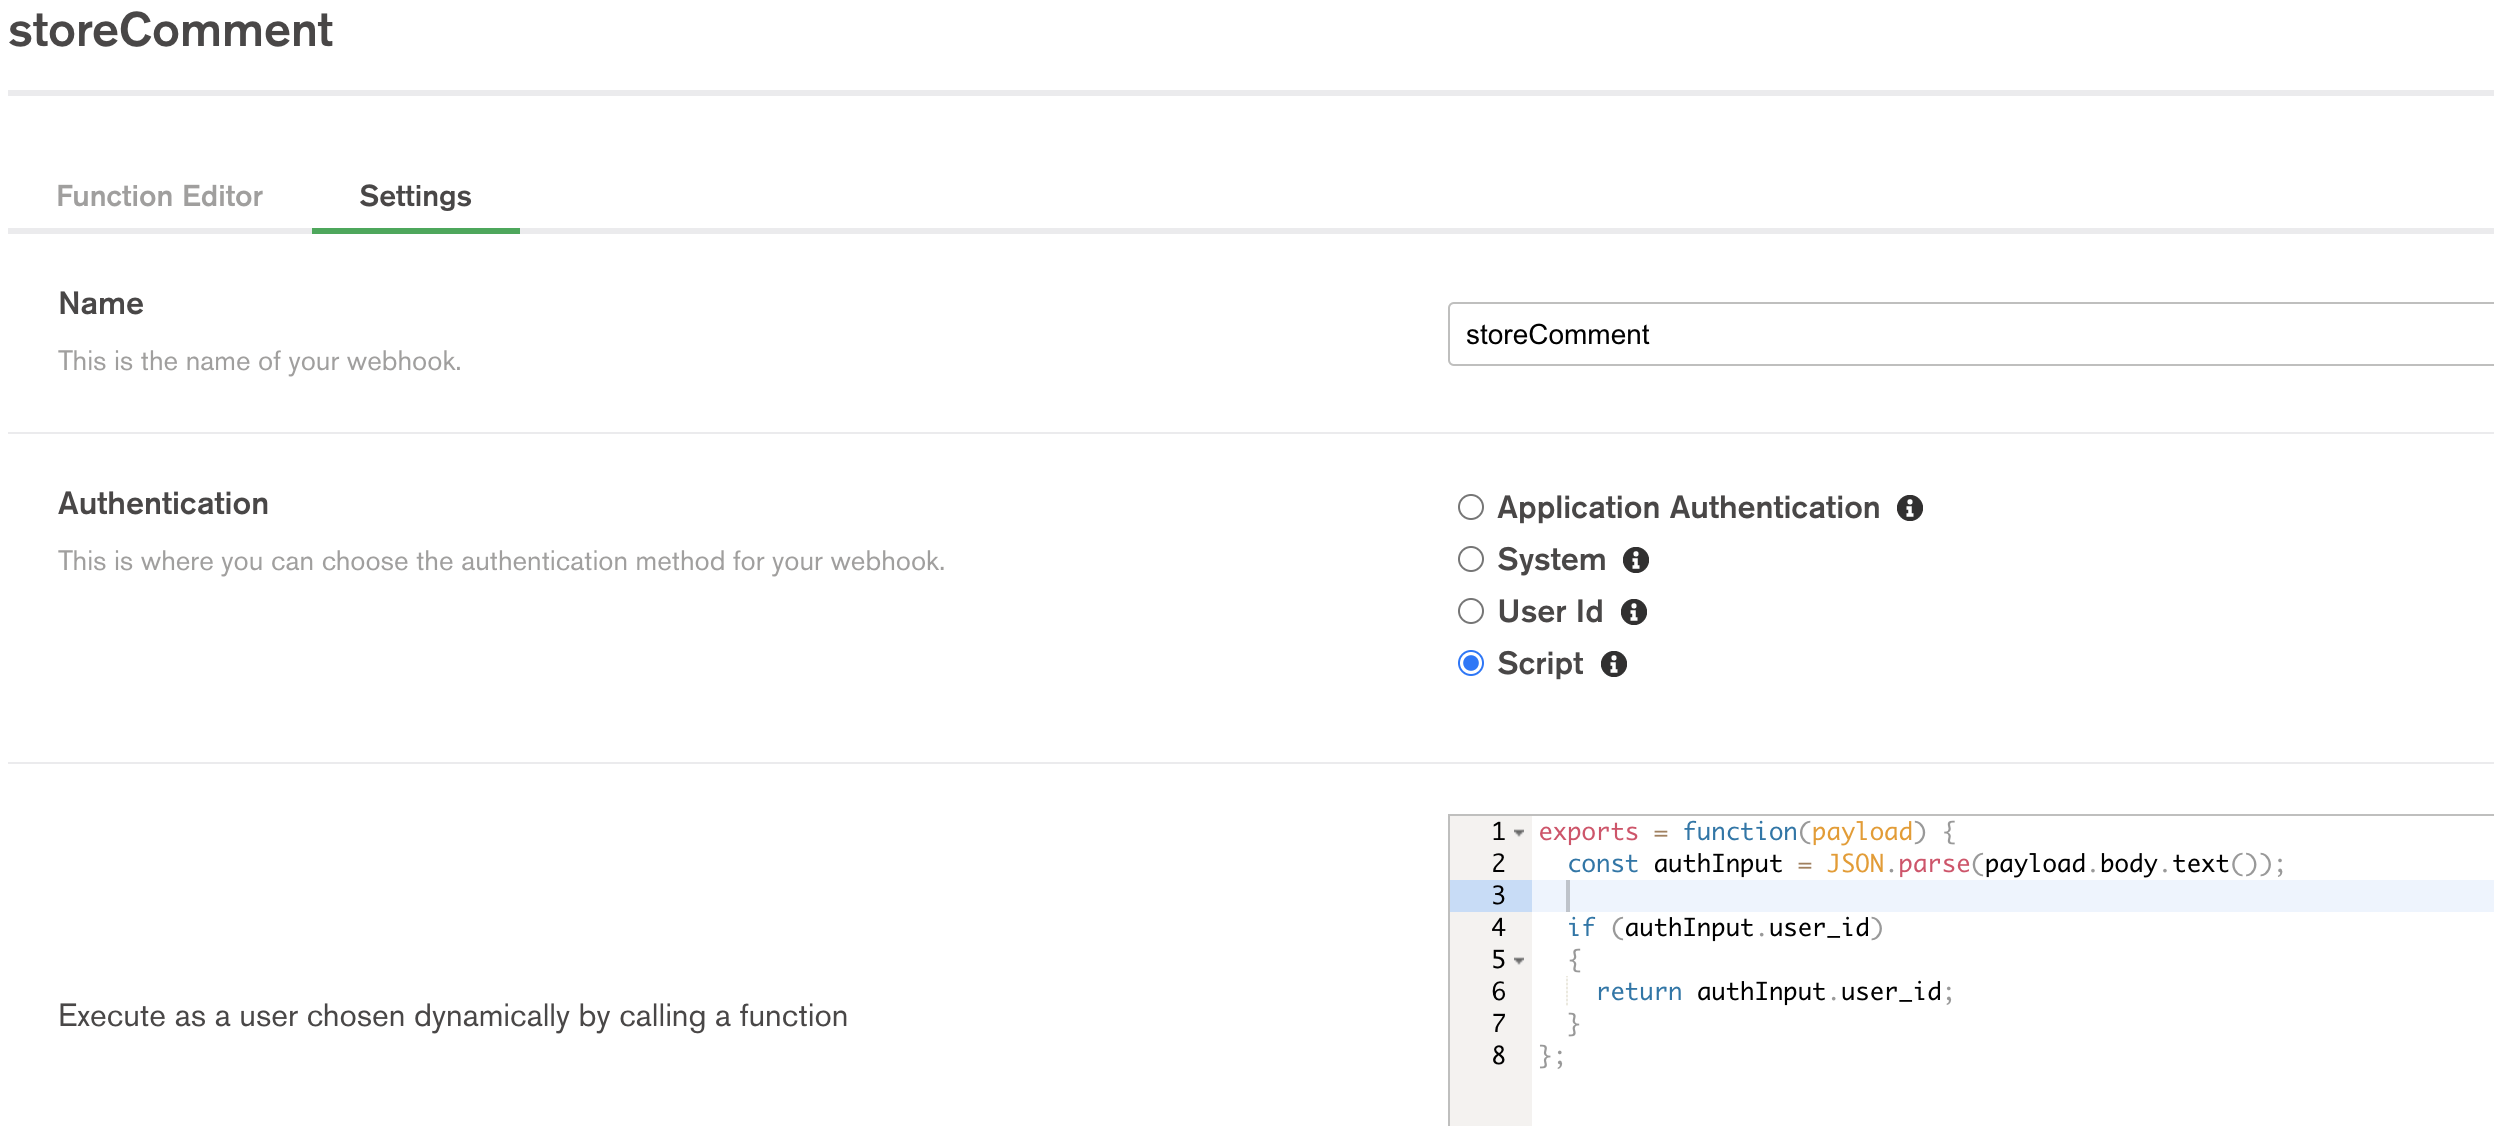
The webhook function performs an upsert by the provided comment ID, updating the record if it exists and creating a new one if nothing is found with the ID. It also sets the user_id which is linked from the authentication object we got from our "login" flow.
1 // This function is storing comments 2 exports = async function(payload, response) { 3 4 // Extract JSON object from the body 5 const body = JSON.parse(payload.body.text()); 6 7 const updateObj = body; 8 // Set comment time from string to date 9 updateObj.commentTime = new Date(`${updateObj.commentTime}`); 10 11 // Upsert the comment for insert or update 12 const comments = await context.services.get("mongodb-atlas").db("sample_mflix").collection("comments"); 13 14 const upsert_res = await comments.updateOne({"id" : updateObj.id}, updateObj, {"upsert" : true}); 15 16 return upsert_res; 17 };
By wiring this integration up to our UI, we can now create new comments and update existing ones by simply calling the Create record function. Only users with correct user_id can edit their comments.
#GraphQL Integration
Webhooks are a good tool to define your data microservices to perform common and complex application tasks. However, sometimes we need a service to be flexible and able to quickly query arbitrary data as well as perform data "Mutations" for us. MongoDB's Realm GraphQL service allows just that.
With the already defined rules on our collections, we can generate their schema, done automatically through the schema tab, and start consuming them right away.
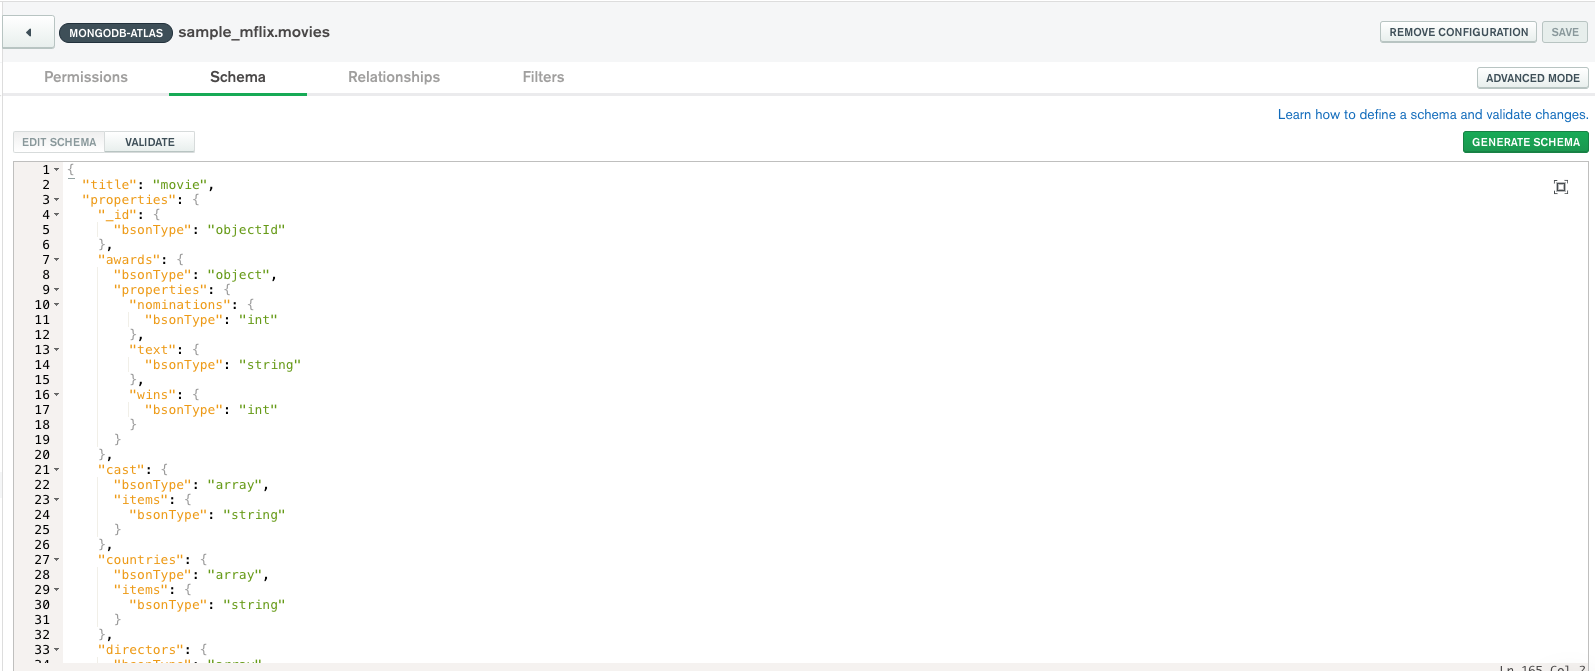
The resulted generated schema will be automatically available under the GraphQL tab, for example, the Movie type:
1 type Movie { 2 _id: ObjectId 3 awards: MovieAward 4 cast: [String] 5 countries: [String] 6 directors: [String] 7 fullplot: String 8 genres: [String] 9 imdb: MovieImdb 10 languages: [String] 11 lastupdated: String 12 metacritic: Int 13 num_mflix_comments: Int 14 plot: String 15 poster: String 16 rated: String 17 released: DateTime 18 runtime: Int 19 title: String 20 tomatoes: MovieTomato 21 type: String 22 writers: [String] 23 year: Int 24 }
All that's left to do is to build our AppGyver Data API around the GraphQL endpoint providing an Authorization header with our access_token from the authentication step as a Bearer value. See GraphQL Authentication documentation for more information.
1 https://realm.mongodb.com/api/client/v2.0/app/movies-abcd/graphql
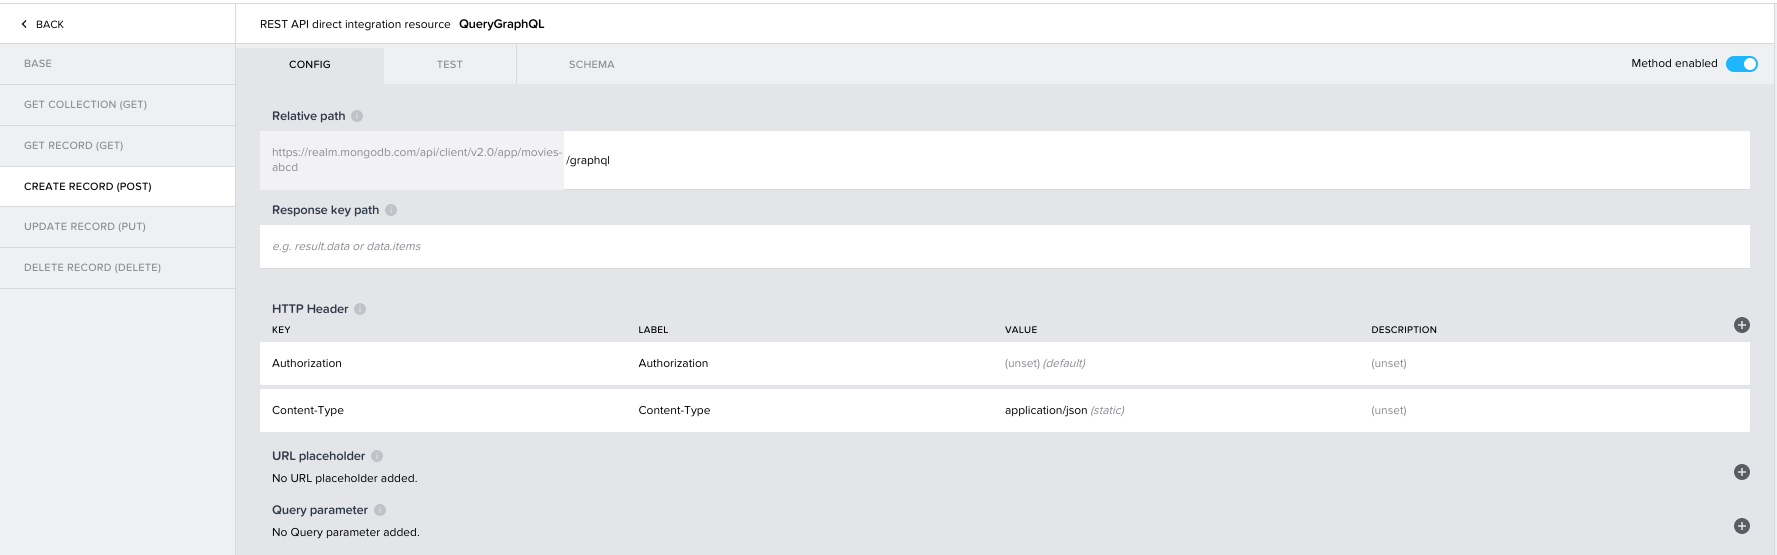
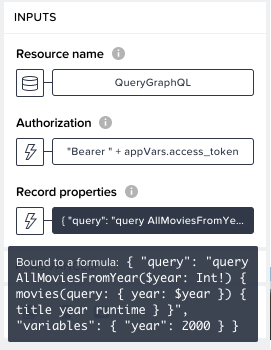
The service is ready for use in our application flows. Since a POST method is required, we will run all our queries and mutations via the "Create Record" method and provide our headers and queries using a formula object. As an example, I have queried and populated my view with all movies from the 2000s and fetched their title , year, and runtime. Those can be automatically mapped to a data variable or directly into a UI attribute.
#Wrap-Up
AppGyver's No-Code Platform offers a significant addition to fast application development, and when integrated with powerful platforms like MongoDB Realm and MongoDB Atlas, the development cycle boosts by orders of magnitude.
Developers might need some time to digest these concepts, but I am certain they will fall in love with it right after their first app.